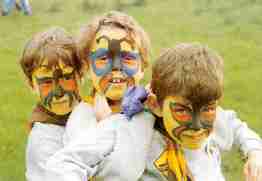
Inspired by our selection, you can easily turn your favorite baby face into a funny animal or cartoon hero. Even last time you held a brush in hands at a drawing lesson!
Virtually not a single children's holiday or entertainment event is now complete without make-up artists. Once one child sees another with an unusual pattern on his face - and begins: “Mom-dad! I also want to!". Therefore, the turn to the coveted tables with jars is the same familiar attribute of children's leisure as trampolines and cotton candy. And this pleasure, I must say, is not cheap. Especially if you are waiting for a whole series of Christmas trees and fun activities during the holidays.
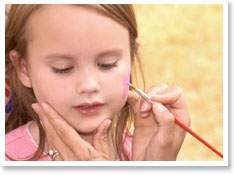
Why don't you try to master this picturesque procedure yourself? So you can not only save, but also enjoy the creativity. Having spent one time on paints, you can delight your child with new images as much as you like. In addition, such drawings will perfectly complement the corresponding carnival costume. Make a face painting for children with their own hands is not so difficult. Take a look at these ideas of face drawings for beginners and try yourself in the new role of an artist!
Using only white and black colors, you can easily draw a traditional winter character. Apply the white circles of the snowman first: the snowman’s head in a hat or bucket — on the child’s forehead, continuing the outline around the eyes and nose. And then circle the resulting shape with black paint, putting specks of eyes, mouth and buttons. You will need a drop of orange for a carrot-nose. Additionally, you can draw on the face.
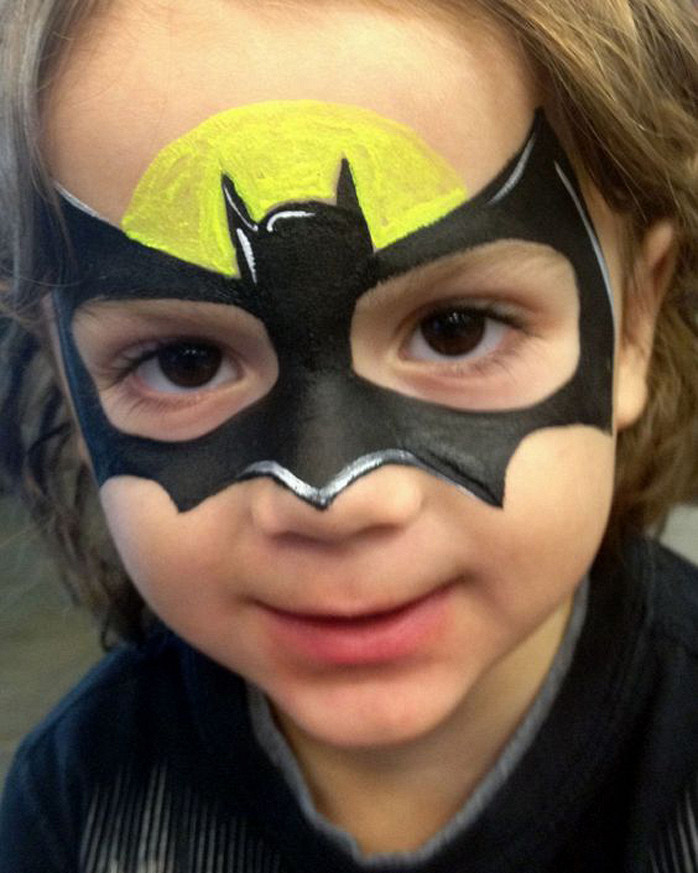
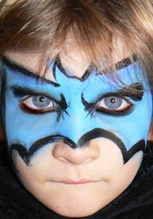
This hero will also not cause you much difficulty. Black paint first draw the contours of the bat around the eye-wings and paint over. The baby’s nose and part of the forehead will become the body and head. Do not forget to depict the rising above the head, which symbolizes the hero’s favorite time of day. For liveliness, paint with white paint around the edges.
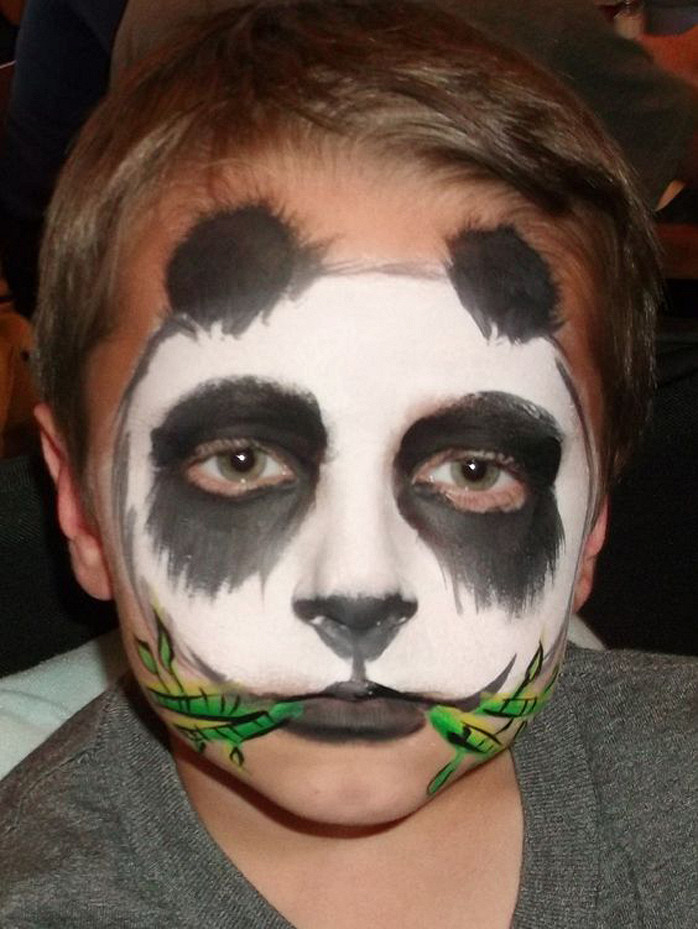
The image of the panda continues our series of black and white drawings. Paint over almost all of your face with white makeup, leaving space around your eyes. That's all, the image is almost ready. Just blacken the ears, nose, lips and eye spots in black, indicating the outline of the face. The finishing touch is a green twig of bamboo in the mouth.
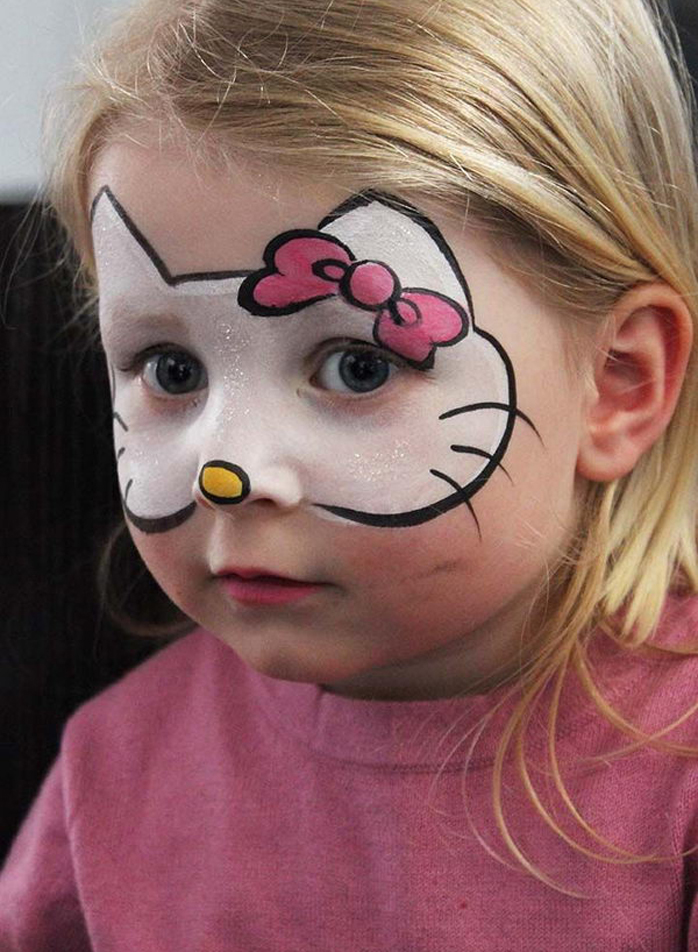
The main part of the image is a white muzzle. The child’s eyes will become her eyes, and her ears will be above his eyebrows. You just have to circle the contours and antennae with black, and also draw a pink bow of the cartoon heroine and a yellow circle of nose.
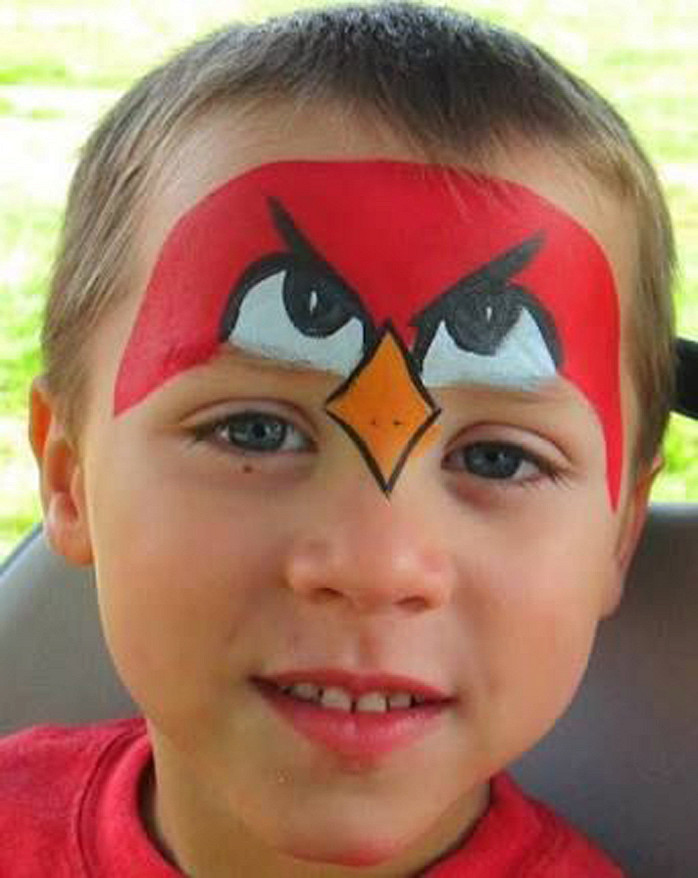
Draw the whites of the bird’s eyes over the eyebrows of the child, and when they dry, circle with black paint, add the pupils and dashes of the eyebrows. Between the eyes, place the yellow beak rhombus. Paint the rest of the space on the forehead with a red semicircle, from which the character’s head will turn out.
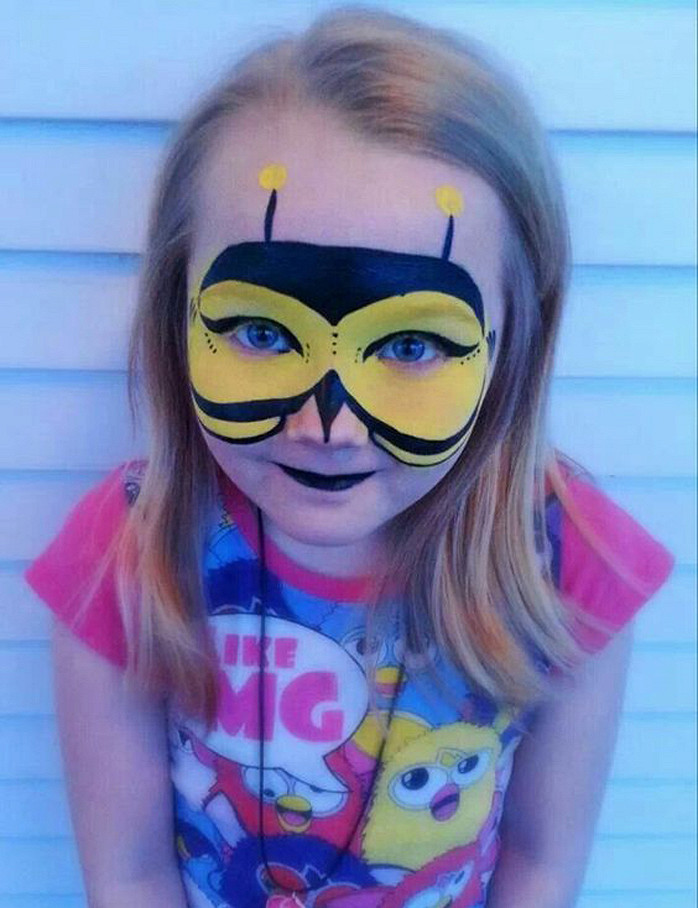
Two colors will be quite enough for you, so that the fidget turns into bright. Draw a yellow mask around the eyes in the form of large glasses. And then bring the matter to an end by treating the background with black paint: eye arrows, nose, forehead and antennae antennae.
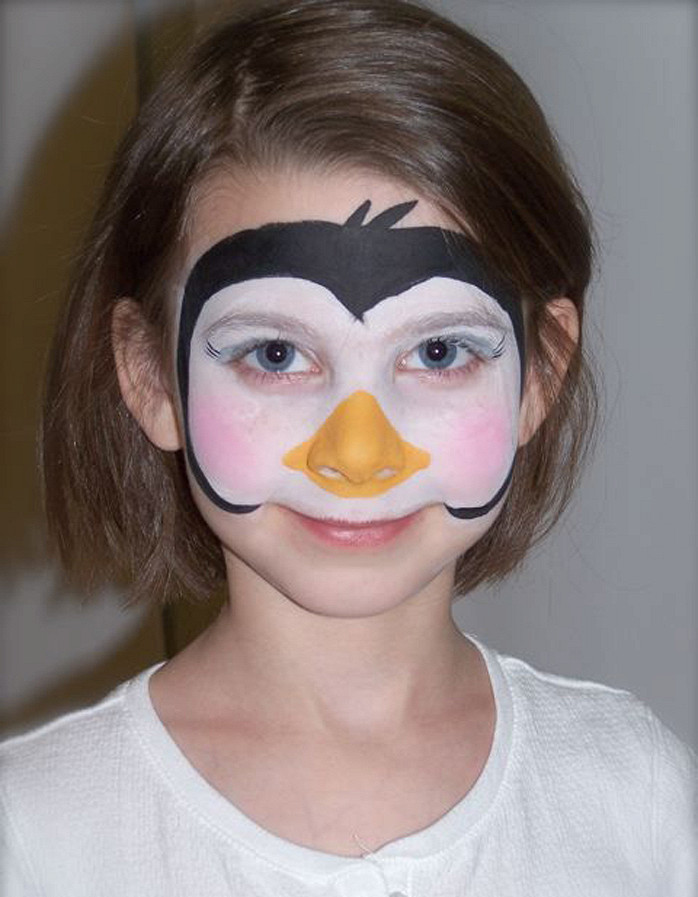
Apply a white background from half of the forehead to the upper lip. Circle it with black paint, completing it with a perky crest. Paint over the baby’s nose with a triangular beak. Pink blush will complement the image of the Antarctic bird.
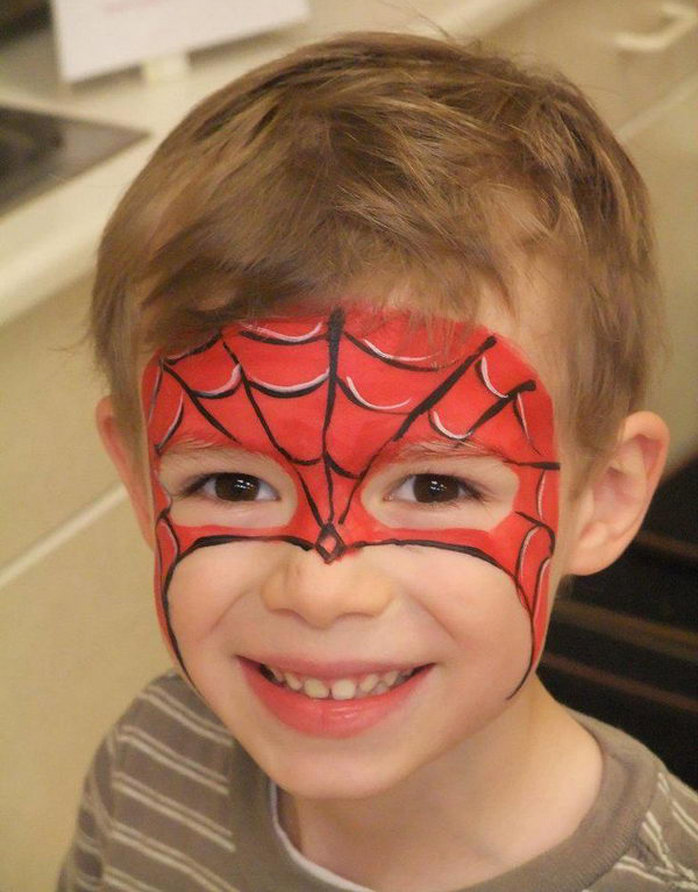
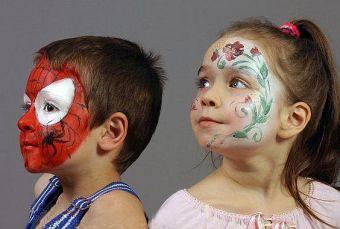
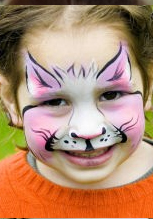
Well, what a holiday without a loved one! Surely every boy at least once tried on this role for himself. It will take you just a couple of minutes to create the image. Paint half the face with red oval. And then draw the black threads of the cobweb. Put white glare in places - and you can safely be proud of your art. For a girl, and for a boy. Prepare the foundation by painting the central part of the face with white. At the same time, outline the contours of the cheeks and ears. Let the background dry and finish the drawing with black paint, having drawn the outline of the face, spots, eyebrows, nose, mustache and mouth. Contours do not need to be made even: apply them with strokes that look like wool. The last step is the red tongue sticking out.
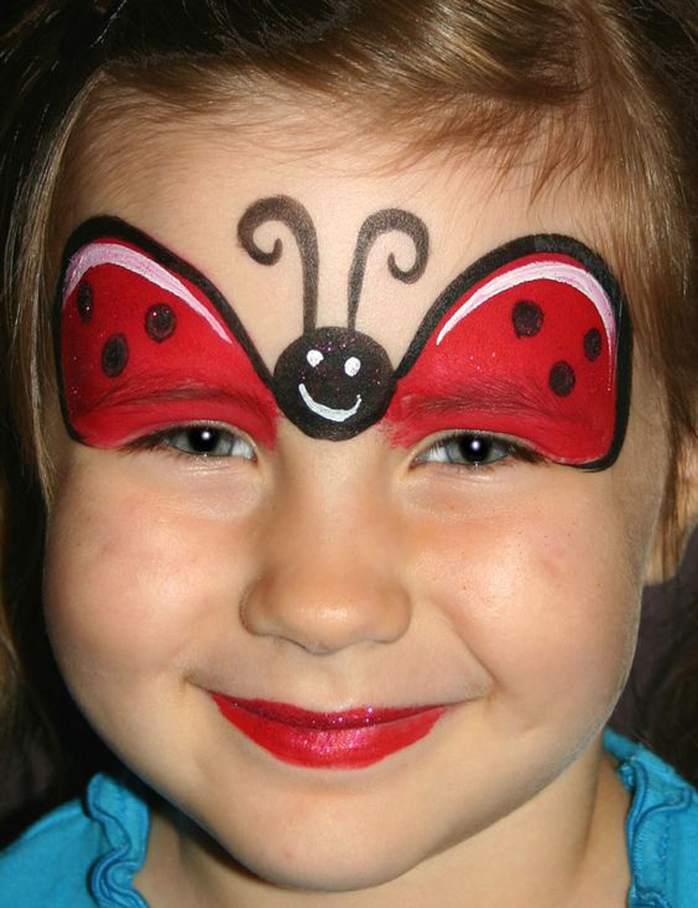
If you can draw a "stick, stick, cucumber" - then, to portray a ladybug above the eyes of a child is also quite within your power. In red, go over the lips, and in black circle the painted outline, adding a circle of insect head, spots and antennae. White paint the eyes, smile and glare on the wings.
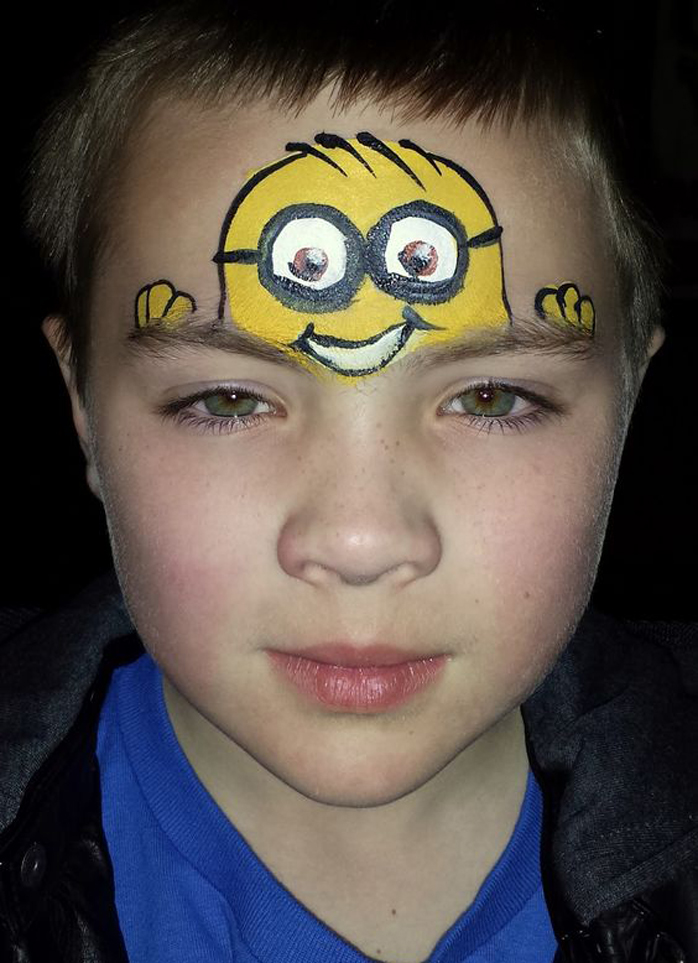
Despite the fact that they are the servants of the villains, these funny and touching characters won the hearts of many viewers around the world. On the child’s forehead, draw the cartoon’s yellow head, leaving the hero’s fingers not over the eye sockets, but over the eyebrows. Color the squirrels and pupils, add a white-toothed smile and emphasize everything with a black outline, not forgetting the hairs.
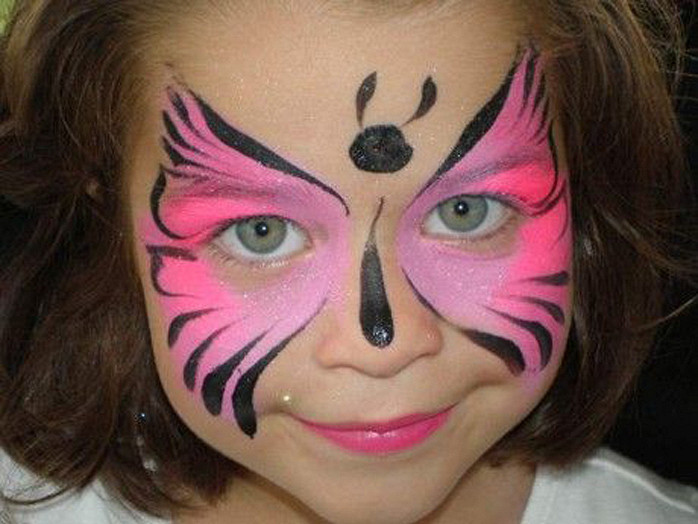
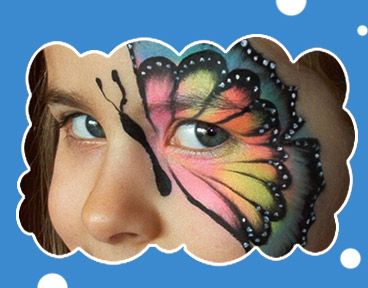
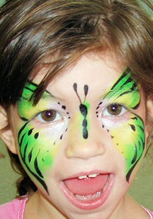
Apply a pink background around the eyes of the child, trying to give it the shape of the wings. Draw a round insect head with antennae on the forehead, and an elongated body on the baby nose. Turn the same makeup over with the same black paint, emphasizing strokes airiness and patterns on the wings.
Circle everything in black, including the outline of the mouth, and completely paint over the nose, indicating the nostrils. Draw the coat with strokes. Let the child himself put the final point in your art - he will portray a smile!
Material from Summer Camp
Face painting in the camp
It's simple - the drawings on the face will create a fun atmosphere at any event. Face painting ( Face painting) - these are creative drawings that are applied to the face and body with special paint. Face painting is a peculiar element of the costume. He not only draws attention to the action, but also shows the character of the character, for the opportunity to immerse yourself in his fairy-tale, magical world. Face painting is absolutely harmless to the skin, it is easy to apply and also easy to wash off with soap and water.
What could be more fun for children than face drawings? If you are planning a large entertainment event in the camp, then the easiest way to keep children happy and happy (not the easiest task!) Can be face painting. Why do not you try yourself in the drawings on the face? Learning this is not as difficult as you think. In fact, a little practice and patience, and you will gain sufficient skills to create beautiful images that children will love.
Design choice
Obviously, if you will be the first to depict drawings on the faces of children, you should prepare several images in advance. The Internet is an excellent source for finding the simplest images that can be especially useful if you just started practicing face drawings. Starting from kitties and dogs and ending with your favorite superheroes - you can find the images you need.
Face painting basics
The first thing you need to do when you are going to draw on the face of a child (although it would be nice if you would first practice before showing your talents to the public) is to imagine what the face of the child should look like as a result. That's why it would be nice to print the image in advance before you start drawing. You can use regular brushes to apply face paint, but it would be better if you used sponges instead of brushes to apply paint to large areas, for example, when you apply a main coat of paint to your face. It is better to use a sponge, because in this way you can cover most of the face faster, and you do not have to worry about washing these sponges, because they are completely inexpensive. In addition, the sponge will allow you to apply the paint more evenly, which will prevent the appearance of stains. It doesn't matter if you use a brush or sponge, you should apply a thin layer of paint; and if there is too much paint, it will crack or lose its luster.
Your first face painting experience
Before you start drawing on your face for the first time, you need to print out the images you like and limit yourself to those that you have already tried. Let the children choose their own images that they would like you to draw. Let's hope that a limited number of images presented to children will please them and save you from asking children to draw characters unknown to you.
More advanced facial designs
After you master the basics, you can try to develop new skills for creating more complex images. One of the biggest tests may be the rejection of the main drawings and the proposal for the children to come up with their own for what they want to see on their faces. You will be surprised and delighted with their requests, and at the same time you will be amazed at your new face painting abilities!
So, let's talk about face painting
Face painting - these are creative drawings that are applied to the face and body with special paint. Children very often fantasize and imagine themselves as princesses, brave princes, butterflies, wizards, and many other fairy-tale characters! Face painting is a peculiar element of the costume. He not only draws attention to the action, but also shows the character of the character, for the opportunity to immerse yourself in his fairy-tale, magical world. Face painting is absolutely harmless to the skin, it is easy to apply and also easy to wash off with soap and water.
How simple and easy to set a new mood, image, help children and adults become fairy-tale heroes. Just a little makeup on the face. This is done by professionals, but lovers can try it. The main thing is a good mood and creative enthusiasm.
Makeup. Beginner Tips
And in dramatic and musical productions, and just on a fun holiday, make-up helps to forget about reality and plunge into the fantasy world. Well, in fact, what is Dracula without the deathly pallor of her face and bloodied fangs? Would a clown be funny without a red nose and a painted smile?
Basic accessories
Makeup can be purchased at a department store, a toy store, but it is better to buy it at specialized theater stores. True, there it is more expensive, but less likely to cause an allergic reaction. Water-based formulations are preferred over fatty formulations, as they are easier to wash off from the face and instruments. You need to have: colorless powder, pencils, lipstick, powder eyeshadow and blush, face paints of various shades, a basin of water, clean towels (both for wiping brushes and restoring order, and to protect clothes), 1-2 thin brushes, a large brush, a puff, two or three sponges, a tape to remove hair from the forehead, shine, glitter powder, petroleum jelly, cotton wool or cotton buds, napkins, a bar of soap, Dettol, or a similar disinfectant.
Hygiene rules
Some types of makeup and face paints, especially red, contain potent pigments. Before applying them to the face, conduct a local allergic skin test of the child. If redness occurs or itching appears on the skin, stop using the product, rinse thoroughly and lubricate the inflamed area with a soothing cream or lotion, But even if an allergic reaction does not occur, it is good to apply a protective layer of cream under the make-up. Have soapy water with a few drops of Dettola ready to wash your brushes and other makeup. You can soak makeup accessories in a soap solution. When making makeup for several children, be sure to disinfect the instruments, moving from one child to another. If you use grease-based makeup, you will need synthetic sponges that need to be boiled after use.
Makeup
If you are planning something ambitious - say, a characteristic or fairy-tale character - first draw a sketch on a piece of paper. So you make your job easier and reduce the chances of a mistake. It is also helpful to start making up as much as possible from the top of the face. Then you can touch the skin of the child, without fear of smearing already done. Eyebrow shading: if you have enough time, you can make your eyebrows shade before embarking on makeup. This will allow you to expand the field of activity, including in it the area of \u200b\u200bthe eyebrows. You can get a variety of facial expressions, just changing the shape of the eyebrows. Moisten the edge of a bar of soap with water and soap them with eyebrows, leading one hair up and the other down. This changes the line of the eyebrows, the hairs are pressed tightly to the skin. Let them dry for a few seconds. Now apply the makeup base with your finger or sponge to your eyebrows. Apply a layer of pressed powder with a puff, pressing it into a creamy base. Application of the foundation: using a sponge, starting from the center of the forehead, apply the foundation by running the sponge in the transverse direction and downward on both sides of the face and on the chin. Ask the child to look at the ceiling so that the foundation can be applied under the eyes. If the base is uneven, apply a second coat, this time with patting rather than stroking movements, so as not to damage the bottom coat. Eyeshadows: Use a soft brush to apply the powdery shadows of your chosen shade. Ask the child to close his eyes while eyebrows: draw the desired shape with a soft pencil or thin brush. Blush: apply blush on the cheeks with a large fluffy brush or cotton swab. Start near the hairline and move forward, blending blush to the nose. To achieve greater drama, you can use glitter powder, Lipstick: apply lipstick with a cotton swab (use it only once and throw it away) or with a small brush. Contour: if the makeup consists of several colors, apply their contours on the face with a thin brush or a soft pencil. Then the makeup of different colors will not be smeared and take on an untidy look. Spangles: if you want to decorate your face with spangles, a little grease this area with petroleum jelly, and then stick spangles on it according to the scheme you planned. Avoid applying sparkles near the eyes.
Make-up removal
Water-based makeup is easily washed off with mild soap and water. Creams based on creams and oils are washed off using special tools. To remove the sparkles from the face, cut a piece of scotch tape, put on the sparkles. Lightly push and remove. Spangles stick to the tape.
So, briefly again. If you really want to paint faces, here's how to do it.
- Buying brushes 1 thin round brush and 1 middle round brush (the same are used for ordinary painting), As well as sponges or washcloths, and safe paints.
- Make sure you have a flat surface such as a desk or desk. In addition, there are two chairs, one on one for the artist and for the child. A plate or tray for mixing colors, and a bowl or bowl of water to rinse your brushes. Also hold a paper towel or a washcloth to wash excess water or paint conveniently.
- Ask your “victim” what kind of design she wants you to draw. Next, use a sponge in the background and wait until it dries, then finish the outline with a thin brush in black.
- If you are just starting out, you may need more than 5-10 attempts before a successful acceptable result.
- Apply colors slowly, making sure that you do not mix black with other colors.
- Tell your wards not to touch for 5 minutes to let it dry or use a hand fan to dry the paint faster.
- Keep it in the mirror to show this child the result.
- Mixing paint with a little water on a saucer gives a better result, especially with watercolors.
- Look at the video of the work of other make-up artists and make a sketch of a simplified version with a pencil for your version
- Always ask what colors children prefer.
- Before painting your child, always make sure that you can do this quickly and accurately.
- If you are writing for children, then talk to them so they don’t worry.
Warnings
- Use only those colors that are clearly marked for use only on the skin. Acrylic, oil, or nitro paints are not safe to use on the skin.
- Refuse to draw for those children who have open sores or ulcers on their faces.
- Very young children, as a rule, do not like the feeling of paint on their faces, so you can just slap a spot of red paint on their small nose and you have an instant clown.
Things you need
- Face paints
- Brushes
- Sponges (preferably natural sponges)
- Shine
- A lot of clean water
- Towel or Dishcloth
- Mirror
- Paper towels
- Hand fan (to help the paint how to dry quickly)
- Sketches (so the child can choose)
- Hair bands (keep your hair off their faces, if necessary)
Description of examples of face painting

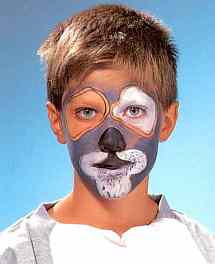
"Dog".
- At the tip of the nose (at the most prominent place) put a point. Draw a horizontal line through this point, starting with the wings of the nose. Paint the nose below the drawn line with a dark color (black or brown).
- Draw straight vertical lines from the eyebrows to the previously drawn horizontal. The wings of the nose are tinted with a darker shade, the resulting strip in the middle of the nose is lighter.
- Draw a line along the cavity above the upper lip. Paint the upper lip with a dark pencil. If the lips are full, first cover with foundation, and only then draw a thin line.
- The area above the upper lip is painted over with white. Draw antennae and dots.
- Around the eye, capturing a small area above the eyebrow and part of the cheek, draw a “spot” and paint it with white (or, conversely, dark) color.
Because theater is not always possible, then you can, for example, do with a simple cosmetic pencil and buy brown and white shadows without sparkles and pearl.
Tip. If you have to make up with simple eyeshadow, first apply a cream or foundation on your face, because the shadows showered.
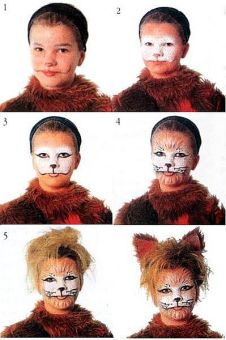
Cat makeup
1. Extinguish eyebrows with soap and flesh-colored foundation. Use a soft make-up pencil to draw the main contours on the face.
2. Apply foundation using a sponge or brush.
3. Using a thin brush, apply liquid black makeup over the base. Apply white paint first. Then orange. Circle your eyes and paint over your nose.
4. Use a thin brush to draw a mustache. Make subtle strokes of black, brown and white paint on the cheeks, forehead and chin. They should depict cat hair. To make-up does not blur on the face, powder it with colorless powder applied to the puff. Sweep away excess powder with a large brush.
5. Tie the top of the hair into a ponytail and fluff the ends of the hair.
6. Spray hair with a tint varnish to match the color of makeup. Attach invisible ears.
Snowflake Image, Zimushki, Snow Queen, Snakes, Stars, etc. can be effectively emphasized with body jewelry. The easiest (but not the cheapest) way is to stick special Swarovski Crystal Tattoos on your face. They are easy to apply, do not rinse with water and hold on the body for up to two weeks. In stores, you can now see a wide range of patterns from rhinestones with a flat bottom, treated with a special adhesive that is sensitive to heat and pressure for easy application to the skin.
Not so elegant, but quite affordable option is to use ordinary sequins (sequins) or independently cut out of wrapping paper<голограмма> circles, triangles, stars. You can glue them on the skin with ordinary honey!
Snegurochka’s face and hands are covered with very light foundation and powder the whole face with white shadows with sparkles. White eyelashes and eyebrows look spectacular. Apply to the eyelashes the usual colorless mascara gel for the eyebrows, and until it has dried, cover the eyelashes with white pearlescent eyeshadow. Select the eyes with a blue eyeliner, and circle the lower eyelid strongly. Use a soft pink lipstick with strong lip gloss. Such a Snow Maiden in your performance will surprise even sophisticated theatergoers.
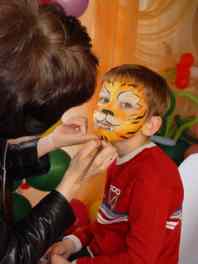
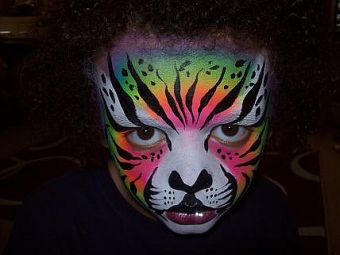
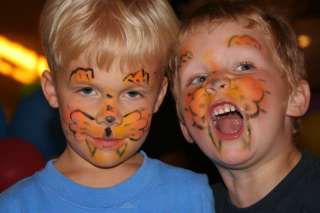
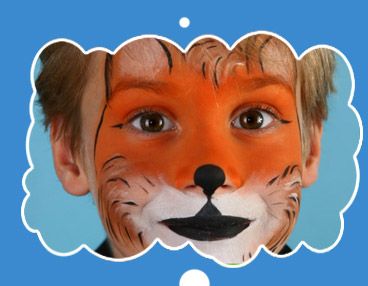
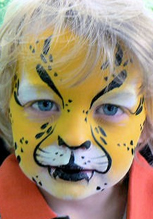
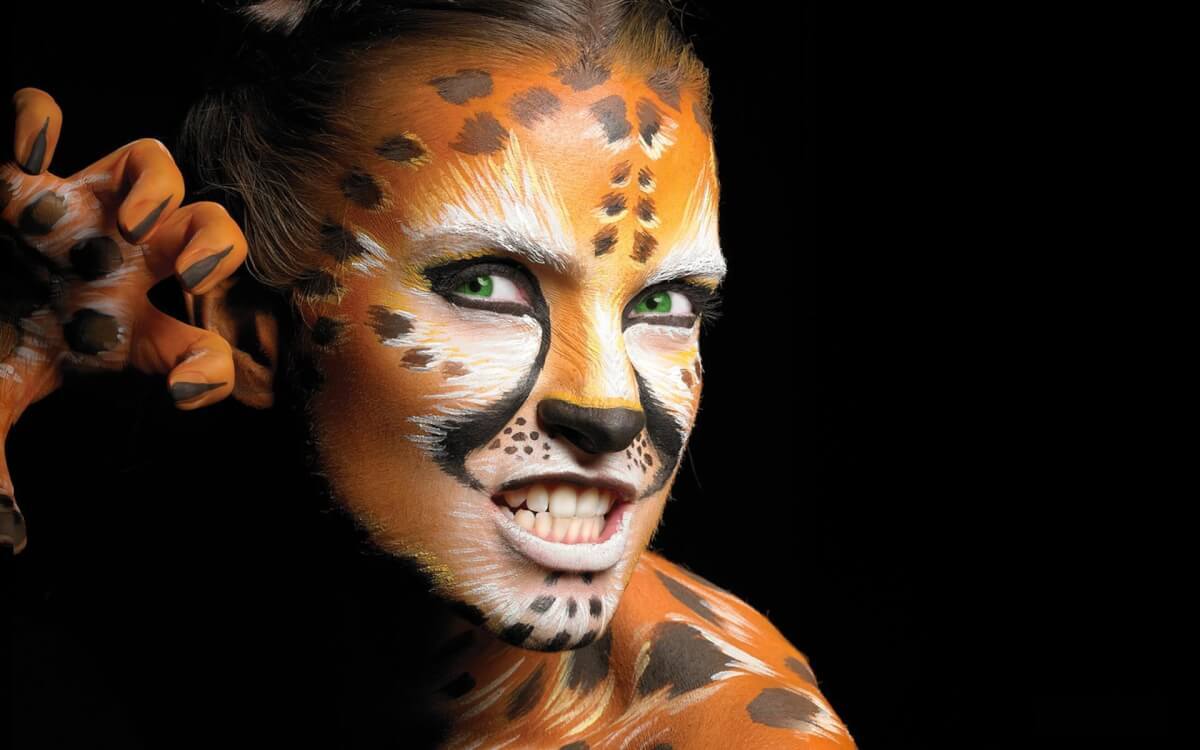
Another example is the application of face painting “ a lion”(Tiger, cat).
![]()
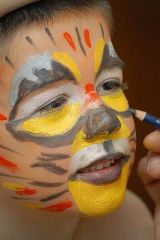
- At the beginning, light white makeup is applied. This is the nose, under the nose-cheeks, the upper eyelids of the eyes, the lower part of the chin and the contour of the face. And this is not only for the tiger. In most cases, in body painting start with light tones.
- The next step - the rest of the face is painted in a red tone. It is better to use a sponge to apply paint on large surfaces. If you have several sponges and brushes, this will facilitate the work, you will not need to constantly wash the brushes and clean the sponge.
- The third and last step is the application of black paint of tiger strips on the cheeks, on the forehead, the tip of the nose, we circle the white cheeks and draw a mustache and points on the cheeks. You can paint your lips black, but it will not be very convenient for the child to eat later at the party. Before applying a layer of paint already on the existing makeup on the face, let the first layer dry slightly so that the paint does not smear.
 |
 |
 |
 |
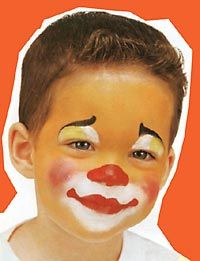
Mask clown
- To emphasize other colors, use a sponge to apply a buffy-yellow base on the face without painting over the eyelids and mouth contours - make these areas white.
- Put pink or red touches on the cheekbones and apply light yellow paint on the eyelids.
- In black, draw strips over the natural line of the eyebrows, repeating the line of the brow arc.
- Paint your nose bright red. In the same red paint, draw a mouth, rounding the corners of the lips in the shape of commas.
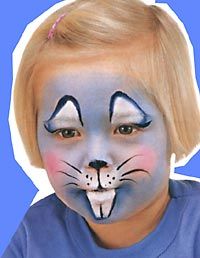
Mask bunny
- Using a makeup sponge, blend the blue makeup over your face, excluding the eyelids, cheekbones, lower part of the nose, and chin.
- Draw a triangle over each eyelid with white, draw two spots under the nose, separated by a thin line, depict an elongated trapezoid on the chin.
- Draw the blue braces over the eyebrows, paint over the tip of the nose, draw a line in the middle of the muzzle and circle the white triangle on the chin so that you get two teeth.
- Finish the portrait by outlining the brush with three antennae on each side.
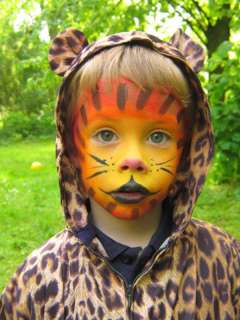
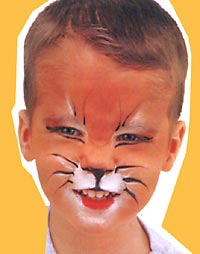
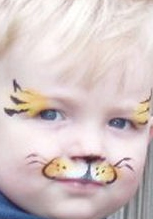
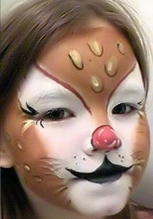
Mask tiger cub
- Apply a beige or light brown tone to your forehead, cheeks, and nose. Brush the white curve in the direction from the inner corner of the eye to the forehead.
- Now color the space under the nose with white, painting the antennae.
- Underline the lower eyelid with black, paint over the tip of the nose and draw a vertical line in the middle of the muzzle.
- Draw a mustache without pressing too hard on the brush to make the line thin and light.
- Finish with black strokes over each eyebrow. Make the mouth red.
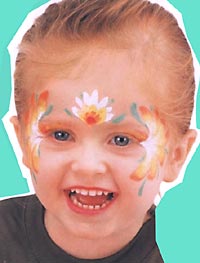
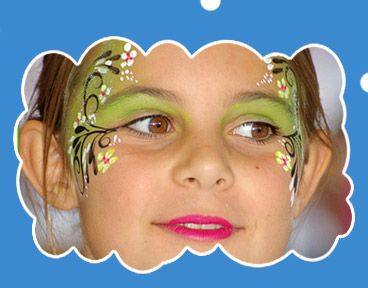
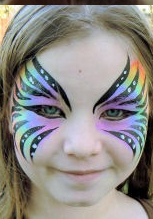
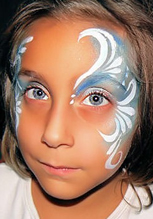
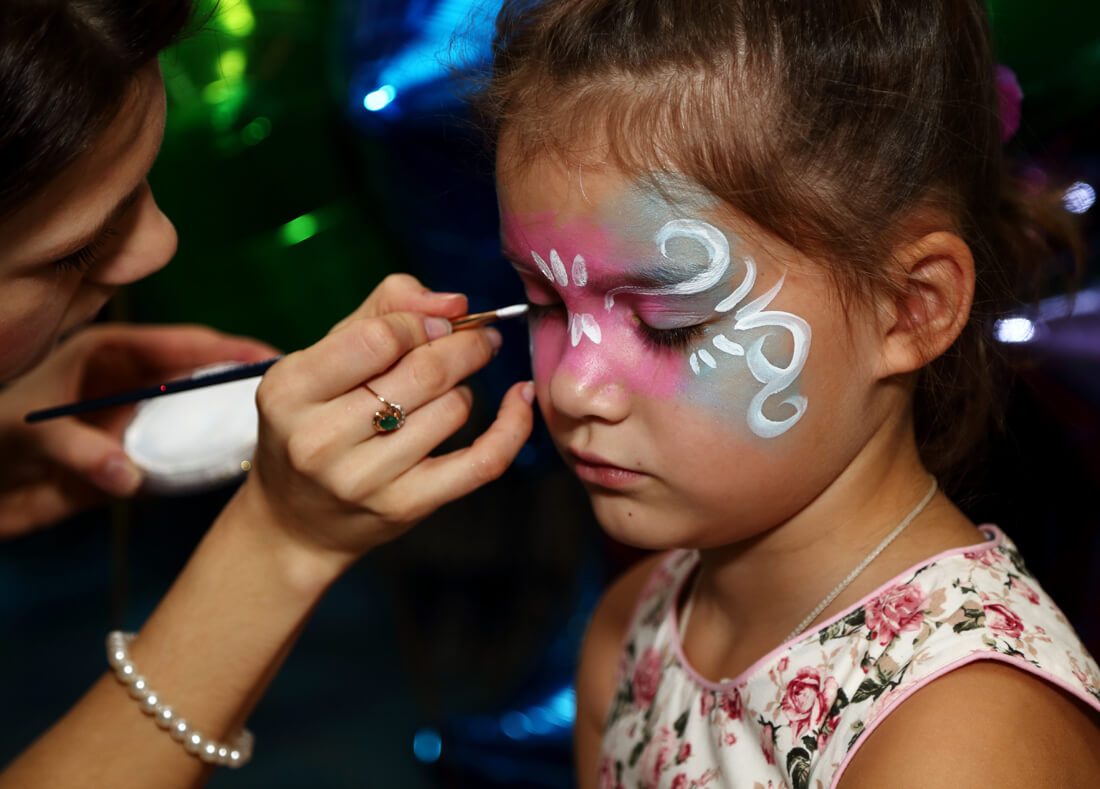
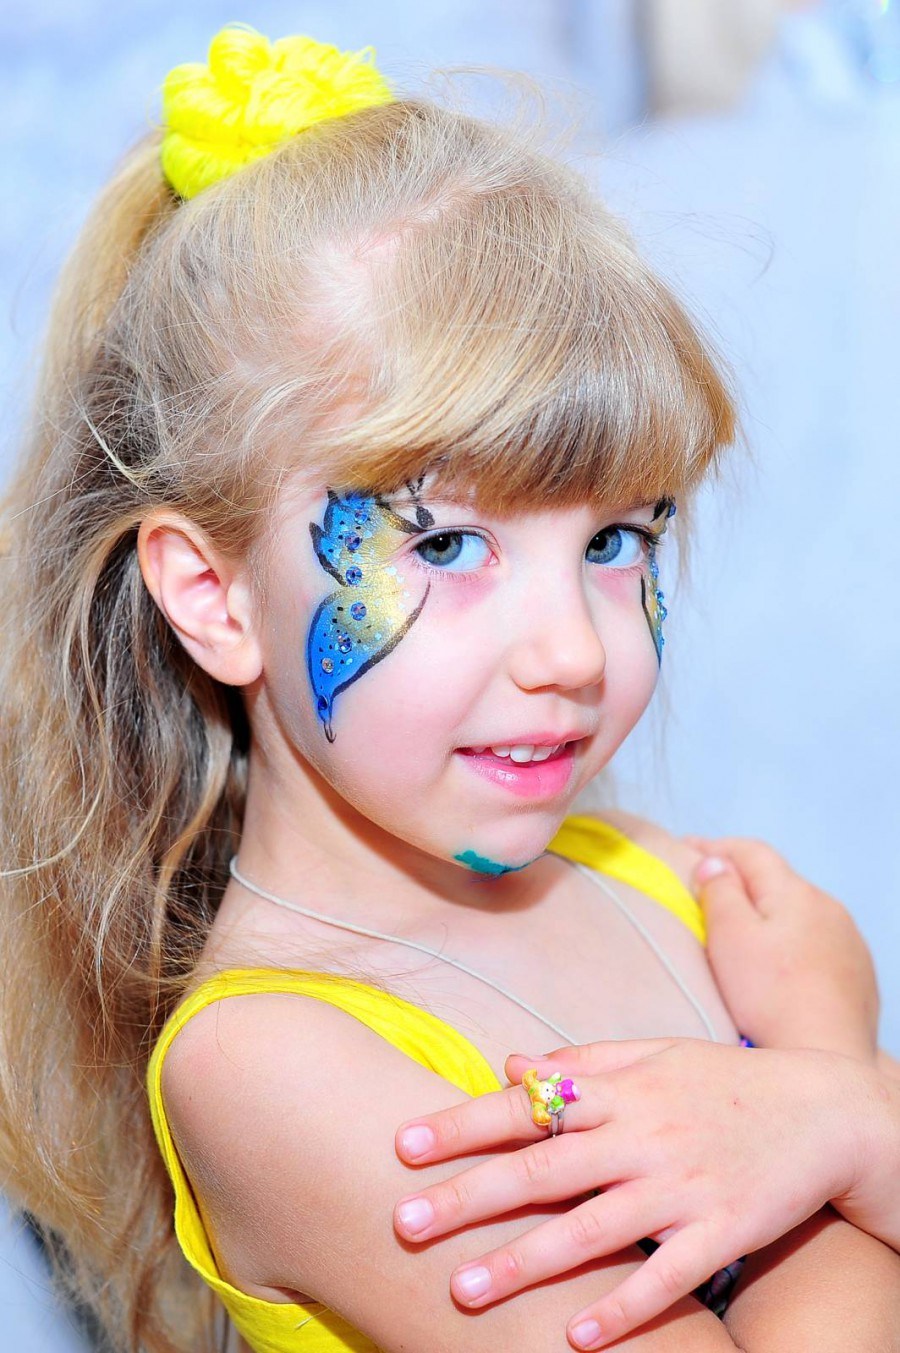
Mask flower
- In the middle of the forehead, draw white petals in the shape of a fan, then paint the middle with yellow. Depict the same thing on your temples. Paint the eyelids orange.
- Continue each white petal with yellow so that the transition of the shades is smooth. Do the same with orange paint.
- In conclusion, add green strokes to each flower. Paint your lips red or pink.
Using a similar makeup technique, you can create and paint any carnival mask. Choose your favorite hero, and try using the makeup to convey the main features of his character.
How to apply baby makeup

If you are suddenly organizing a party with face painting, then you need to follow our tips.
Instruction manual
Step 1: Remove all adult makeup so as not to seduce children. Some children have allergies, so it’s important for adults to understand the potential risk.
Step 2: Choose a hypoallergenic makeup if you can. There are special brands for children. You can also use your own makeup.
Step 3: You must have enough applicators. If you have a party with a lot of children, be sure that each of them wants to use a new applicator.
Step 4: Start with the foundation for makeup. Apply powder on the baby's face to create an oil absorbing layer. Paint your eyelids using neutral tones and covering your entire eyelid. Apply neutral or slightly pale blush to your cheeks. Choose a light-colored lipstick or pale lip gloss.
Step 5: Let the children choose the paint design themselves if you are doing face painting. Start drawing from your nose and head towards your ears. With younger children, avoid areas around the eyes. Make sure that the color and design of the drawing is not too defiant or offensive.
Step 6: Remove makeup and face paint with cold cream or soap for sensitive skin.
Cats, dogs, fairies, ghosts, witches, wizards ... children of all ages love to paint their faces. Here are a few tips to help do this.
- Rate your colors Professional face paint and cosmetics can be very expensive, especially if you are painting a whole group of children's faces. Do not scatter them (paints) where children can freely master them and experience them on their own. Try out different types of paints to see which ones you find best for the job. If you previously apply a layer of ordinary baby cream on the child’s face, then you can try using simple paints. In this case, in a small amount and for a short while, almost any paint is harmless.
- Sponge Does Not Clean If you want to cover a large area of \u200b\u200bthe face or apply the main color, then if you use a sponge to apply paint, not a brush, then this will be a faster way. The presence of different sponges for different colors eliminates the need to wash off the sponge during the painting session (the same applies to brushes).
- Be patient and do everything in thin layers Allow the first color to dry before applying the following paints. If you do not, then they will mix and you will probably need to wipe it and start all over again. In addition, instead of applying one thick layer of paint that can crack, apply a thin layer, let it dry, then apply another.
- Visualize (imagine) a finished face Know that before you intend to paint, first draw up a sequence of your actions. Children are known for their impatience and will not be able to sit still, so you think it over in advance and then do it quickly. Have a basic face design articulated in your mind; You can always add special additions to this as soon as you are done.
- Special effects The paint you use will work as the primary glue. To create bumpy noses or large eyebrows, soak some paint in cotton wool, cover the face with a piece of fabric, and paint. Soaked rice or wheat makes perfect warts; just a coating with a little fabric and paint. For an extra-ghostly effect, apply a light brushing with flour as soon as you have finished painting your face (be sure to force your subject to close its eyes tightly).
- We use ... If you are unsure and not fluent enough in painting, or need time, then why not use a stencil? Stars, hearts, flowers will be the whole stencil on the cheek. Have stencils in several sizes to hand in, accommodate small and large faces.
- Temporary tattoos (tattoos) Even faster than stencils - temporary tattoos. But some people's skin reacts terribly to them, and they require more time to remove. Glitters are well suited for a quick, dramatic effect, but it is added everywhere and it is very difficult to get rid of them! (Also check that glitter is suitable)
- Getting a solution If you have a group of children, then coloring the next one, ask the next children in a line in advance so that they can decide which drawing they would like to have a few minutes before you finish the face that you are currently painting. In this way, they have little time to decide, and you do not lose too much time for painting. You can offer several options for individuals to try to give them the opportunity to limit their choice to one of them. We believe that creating a retrospective of options for children; much easier for them the task of choice. Include simple options, such as hearts or balloons, as many children love them.
- Mirror, The reflection on the wall will show who is the most beautiful of all? Remember to set the mirror so that the child who is the face you just painted can see the result. Also bring a tall stool for the children to sit so; so that you do not have to bend over for a long time - this will save you from back pain.
- Fabric stock You will probably use more shreds of cloth or wipe than you think you need in order to wipe your hands, brushes, etc. Face painting can be dirty, but it's fun! The child wipes the work, quick and easy for "mistakes"; You must also be sure that the paint is safe to use on faces.
- The most popular face paintings for girls are Butterfly, Fairy, Princess, Fantasy, Rabbit, ladybug, Cat, Flowers, Rainbow, Dog (Puppy).
- The most popular face paintings for boys are the Red Spider Web, Pirate, Skull, Tiger, Robot, Bat, Clown, Dog (Puppy), Alien, Native American.
- The most popular Halloween Face Pictures - Vampire, Witch, Devil, Skull, Spider Web, Bat, Cat, Alien, Monster, Clown
And remember, there are 5 basic principles if you want to create stunning face pictures quickly and at ease:
- Have a large collection of options to offer;
- Know exactly what consecutive steps are required for each person, when coloring each option in your collection;
- Use only high-quality paints;
- Use the right tools,
- Know how to mix color mixes and paints.
It’s best to stick with simple face painting options until your skills improve. And of course, use patterns, seals (stamps) and temporary tattoos (tattoos) to speed up the process. Face painting is something that all children enjoy, both boys and girls. Face painting is a fun addition to any camp event.

Let us dwell on some more subtleties of face painting:
- Allergic reactions This must be taken into account, not to mention the fact that you need proper face paints for face painting in order to insure yourself a little from allergic reactions, if any. Measures should be taken if the child has additional sensitive skin or a skin problem such as eczema. If this may be the case, then do not paint their face, but instead dye their hair or make a tattoo on their arm or shoulder. When in doubt, act on the side of caution because your goal is to make the child happy, not hospitalized.
- Eyes and mouth If you are painting over eyes and mouth, you do not want to use any paint that is harmful or poisonous, as children tend to rub their eyes as well as digest paint when they eat. In some cases, it is better to avoid these areas anyway, especially if it seems that the child will be carrying his food most of the time instead of eating it.
- What is the best choice of face colors? The answer is many colors. There are more expensive brands of paints as well as cheaper paints, which are all made specifically for face painting, taking into account the above two problems.
- Colors Black, blue, green, gray, orange, pink, red, white and yellow are the most used colors and are available in shopping centers, warehouses and shops.
- Sparkling paint Available - a wide range of colors, sparkling paint can look fantastic and spectacular.
- Forms Paints can be either a paste or a liquid, and everything is water based to make removal easy on the skin and clothing. It also means that there is no harm in swallowing paints. The more water you add to the paint, the more washable the color will turn out, which can be used in a good effect in hatching and backgrounds. You can get a face by painting with sets diluted on a palette or single bottles or tubes. Take care that when painting the applied paints do not mix in their original containers. Always use a clean brush or brush to paint over a clean palette or face.
- Shine Glitters are a lot of fun if they do not contain aluminum. They should be created specifically for the purpose of painting the face, avoid contact with eyes or exposed skin - first apply gel to the skin to protect it.
Once you have the right face colors then you can free your imagination and create both unique designs and classics, being sure that you can hold any smile of the child. Good luck and success in face painting!
I use makeup - paint children according to the theme - Indians, jungle, pirates ... but actually face painting with a brush is sometimes uncomfortable, but pencils such as wax crayons are super - special for children's parties, so far no one has given them an allergy. it does not spread, there is no need to mess with water, it is easily washed off with water, it is quickly applied, in general - practical and healthy.
 |
 |
 |
 |
Learn to draw face painting
To create a do-it-yourself face painting, we need:
- Special water-based paints, which are of two types - liquid and in the form of compressed dry powder, outwardly similar to ordinary watercolor paints (although you can even use gouache and watercolor on top of a thin layer of baby cream).
- Brushes for drawing - standard brushes made of natural pile for gouache or watercolors of different sizes are suitable: at least two thick brushes with a flat tip and thin pointed brushes for painting small details.
- A set of sponges - special sponges for applying tones to the face.
Stage One: Preparatory
Despite the fact that face painting of well-known brands has undergone special examination and testing, before starting work on a small area of \u200b\u200bthe skin of the model, it is advisable to apply a little paint and conduct a test for sensitivity and allergic reaction. Before applying makeup, remove the hair from the face to open the forehead as much as possible, and sprinkle something that is not a pity to stain, although the paint is easily removed from clothing with warm water.
Stage Two: Tone Overlay
First of all, it is necessary to apply a tone to the face, which should be perfectly even and smooth. Wet the sponge (sponge) in water, wring it out carefully, three times over the paint and apply light tone in a circular motion, distributing it evenly throughout the face. Long straight strokes are best avoided, as they will be too noticeable when dried. Be sure to stain the upper and lower eyelids. We pay special attention to the folds in the corners of the eyes, nose and lips, since it is the relief parts of the face that cause the greatest difficulties for beginners.
Stage Three: Draw Lines and Contours
Now begins the most difficult and crucial part of the work - drawing contours, lines and small details. Holding the brush like a pencil, dip it a little higher than the bristles and draw the paint with circular strokes. The paint should be a creamy consistency, it should not drip and spread. Apply face painting, holding the brush at right angles to the face of the model. To get a point or a thin line, we barely touch the skin with the tip of the bristles. If you need a thick line, apply a brush to the skin and, gently pressing, draw a line.
When the model is not an adult, but a child, it is necessary to work clearly and quickly, since it is rather difficult for small fidgets to sit motionless for a long time. In addition, from touching the brush to the face, children can be tickled or funny, which will immediately affect facial expressions. Experienced aqua-make-up artists are able to work with such a “clientele” and distract children with an easy conversation.
Selection1
- Theatrical makeup (children) Vivienne Kelly
- A. Galvani, V. Pina - "Textbook on make-up art for children"
- Chris Kadron, Caro Childs, Vivienne Kelly "Coloring the face. Theatrical makeup" 1999
- Children's face painting - Animal faces
- Maquillaje Getting Ready for the Holiday Carnivals
- "Maquillajes ninos" (Make-up mask for children) 2007
A selection of 2
- "Grim" D. A. Tolbuzin 1927
- A. Goltsov, V. Derevtsov, M. Faleev "Make-up", 1961
- R. D. Raugul "Makeup", 1935
- Lee Baygan "Techniques of three-dimensional makeup", 1982
- T.M. Shukhmina "Grim", 1956
- GRIMAS "Make-up voor professional en hobby", 1992
- The anthology of the actor. Facial expressions, makeup, movement, speech. 1930
- “Makeup lessons to help folk theaters and amateur art” Moscow 1962
- Lee Beigan "Make-up for theater, cinema and television", 1997
- Syromyatnikova I. "The art of makeup and makeup", 2005
Children are very fond of painting and painting themselves on top of each other. Therefore, for all kinds of children's parties, keep in your home a set with carnival paints. Even if there are no parties in the near future, face painting is a great occasion to cheer yourself up and your loved ones.
If you are new to drawing, it is better to start with abstract and simple drawings: patterns, butterflies, clowns, Indians - always work, but in order to portray a feline or a tiger face you need to first practice. It would be nice at all to start with sketching paper on a sketch, so you will reduce the chance of mistakes, and you won’t have to redraw.
We draw on the face. Tiger (cat)
- At the beginning, light white makeup is applied. This is the nose, under the nose-cheeks, the upper eyelids of the eyes, the lower part of the chin and the contour of the face. And this is not only for the tiger. In most cases, in body painting start with light tones.
- The next step - the rest of the face is painted in a red tone. It is better to use a sponge to apply paint on large surfaces. If you have several sponges and brushes, this will facilitate the work, you will not need to constantly wash the brushes and clean the sponge.
- The third and last step is the application of black paint of tiger strips on the cheeks, on the forehead, the tip of the nose, we circle the white cheeks and draw a mustache and points on the cheeks. You can paint your lips black, but it will not be very convenient for the child to eat later at the party. Before applying a layer of paint already on the existing makeup on the face, let the first layer dry slightly so that the paint does not smear.
 |
 |
 |
 |
 |
 |
 |
 |
 |
Colorful face painting for adults and children will create a festive atmosphere and cheerful mood. With the help of face painting, you can create an image for a children's matinee, photo shoot, flash mob, carnival. Face painting lessons for adults and children will provide an opportunity to learn the basics of art painting on the face and body.
Creative pictures can be depicted on any part of the body (on the face, on the back or on the arm). Face painting for children and parents will fill the holiday with joy and unforgettable emotions.
What is face painting
Face painting on the face and body are applied using the art scheme, which can be found on the Internet or developed independently.
For face painting exclusively harmless dyes made on a water basis and completely fat-free are used.
Thus, face painting for children is safe and can be used on the smallest party participants. The “plus” of this face-art is that it is easily washed off using soap and warm water. In the process of socks, the paint does not get dirty and does not shift to clothing. To start art visage using face painting techniques, you must:
- buy necessary materials for creativity (special paints);
- pick up sponges and brushes, with the help of which make-up will be applied. For face painting, there should be several brushes, which will allow you to perform a variety of patterns;
- it is advisable to take a master class in face painting to study the intricacies of the creative process;
- just before applying the picture to the skin, you need to make a simple sketch on a small area of \u200b\u200bthe body in order to eliminate the risks associated with individual intolerance to paints.
Face art: application technique and ideas
You can thoroughly master this art by registering for special courses in your city. If it is not possible to attend at least a face painting master class, then you should watch video tutorials in which step by step instructions for applying makeup on your face are set out. Such lessons are useful for a person who has a small supply of artistic skills: an understanding will appear of how to make up with simple makeup and simple drawings and complex ornaments.
Face painting for beginners. Work Stages:
- Allergy test: apply paint to a small area of \u200b\u200bthe skin and wait a couple of minutes. If there is no reaction, then continue.
- Drawing tone. Moisten and wring the sponge; rub it on the paint. Spread the tone evenly across your face.
- To draw contours, take thin and thick brushes.
Ideas of drawings have no limits. Such drawings for children are popular and simple in execution: cats, cubs, butterflies, superheroes, floral abstraction. For adult parties, you can portray a pop art style or vampire makeup on your face. Learn video tutorials and come up with your own sketches.