When kids get acquainted with this fun, sooner or later the question will be asked: “Mom! Dad! Grandmother! Grandfather! How to make animals from plasticine. Then the existing experience, fantasy and insane improvisation come into play. Horses and cows are obtained in a variety of shapes and colors, not without the participation of the child.
In this post, we will introduce you to a number of schemes and algorithms that will help you make beautiful plasticine animals with your own hands.
Below we provide pictures of step by step instructions how to make this or that animal from plasticine. Here we did not begin to divide them into domestic and wild, familiar and exotic. There is a whole zoo or reserve, as you like.
Plasticine is beautiful in that it is easily accessible, and does not require any special skills to work. I took it and sculpt, and there are a lot of benefits - a fun and useful pastime, organization of leisure, as well as the development of creative abilities!
Therefore, this post with do-it-yourself diagrams and patterns of plasticine animals will be useful for both young parents and teachers and educators in kindergartens. Afternoon groups, hobby groups and just free time - you can do modeling anytime and anywhere.
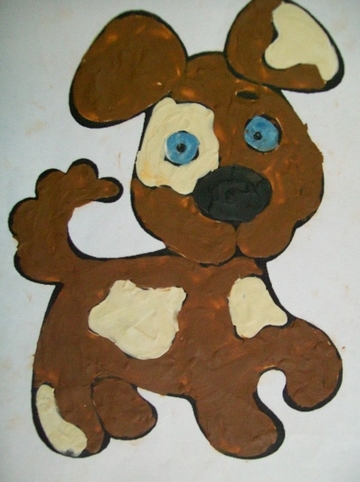
Let's start with one of the closest creatures to man - dogs - our most devoted and faithful friends from the animal world.
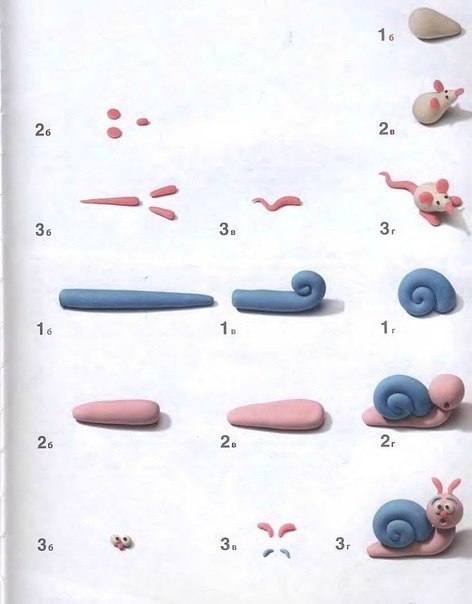
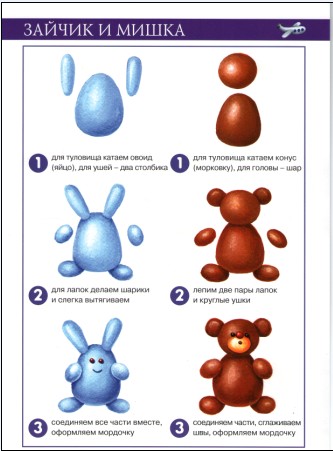
The assembly of animals from plasticine will be incomplete without one of the main characters of many cartoons and most Russian fairy tales - bunnies! Let's figure out how to sculpt it.

In this section you will find more detailed analysis and other variants of similar and other crafts. It is worth making a couple of clicks on the links to our articles, and you will find what you were looking for.

This compilation of instructions and recommendations on how to make plasticine animals uses a similar blank format for all the crafts given. Therefore, you can easily upgrade each and make your own version. Or, using these templates, make other little animals.
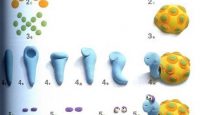
Close to us, but often imperceptible, the most unhurried exhibit is a snail.
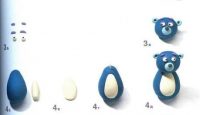
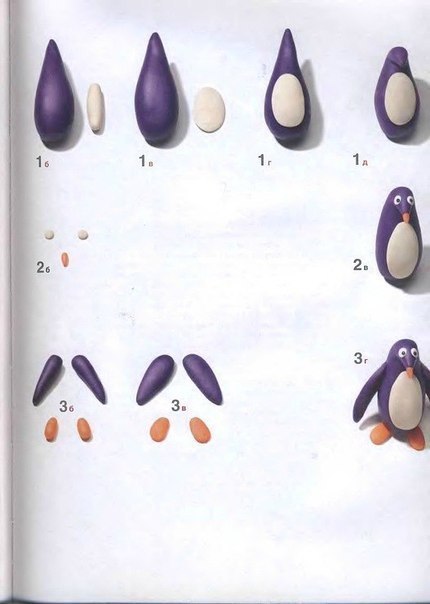
Let's add a little exotic to our zoo. Let's touch on the coldest corners of our planet - we offer you a scheme for sculpting a penguin.
Dear friends, of course, these are not all plasticine animals that are collected on the pages of our portal. A couple of clicks will convince you of this!
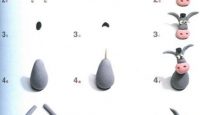
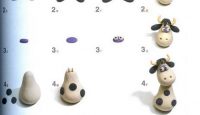
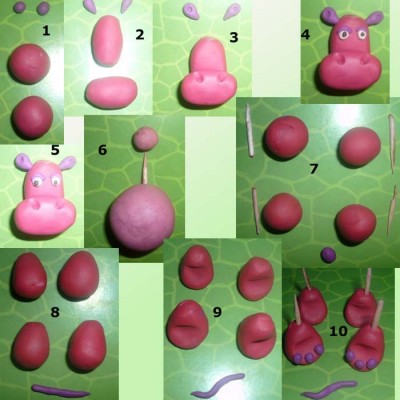
Well, we have a hippo next in line!
We will complete our selection with the tallest representative of the fauna world, a resident of the hottest continent on Earth, the owner of the longest and slender neck - the giraffe.

Sculpting is not only fun, but also a great way to creative development your child. Remember this!
You will be interested:
Due to its properties and a wide color palette, a material such as plasticine allows you to create crafts on various topics. For example, bright, interesting animals and plants can be fashioned from it. In addition, such classes are very useful for children, because in the process of classes, children develop imagination, they become more attentive and accurate.
This article will present master classes with detailed instructions that will help you figure out how to make animals out of plasticine.
Also below, you are offered a selection of videos in which the masters will tell and show which animals and how you can sculpt. In particular, it will be shown how to sculpt such animals and animals: a lion, a turtle, a chicken, a dog and a giraffe.
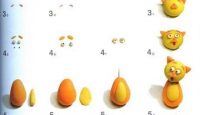
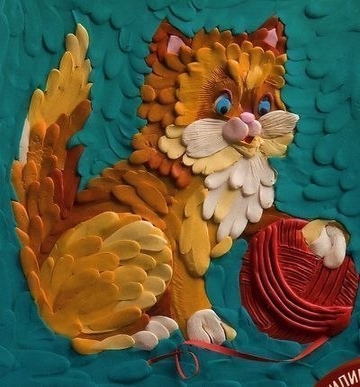
Sculpt a cat (first method)
Of course, the most popular character for modeling among all pets is a cat, so two options for making a cat will be presented below.
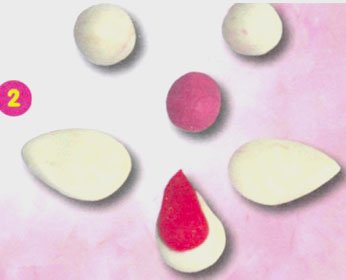
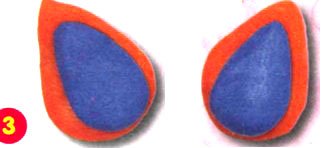
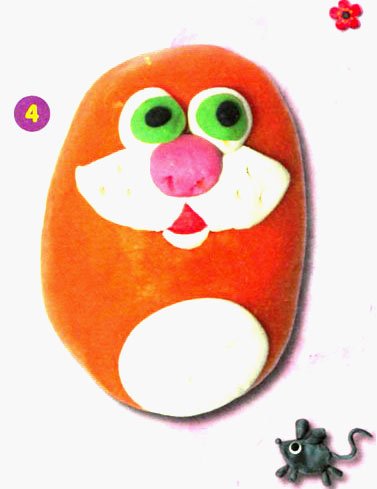
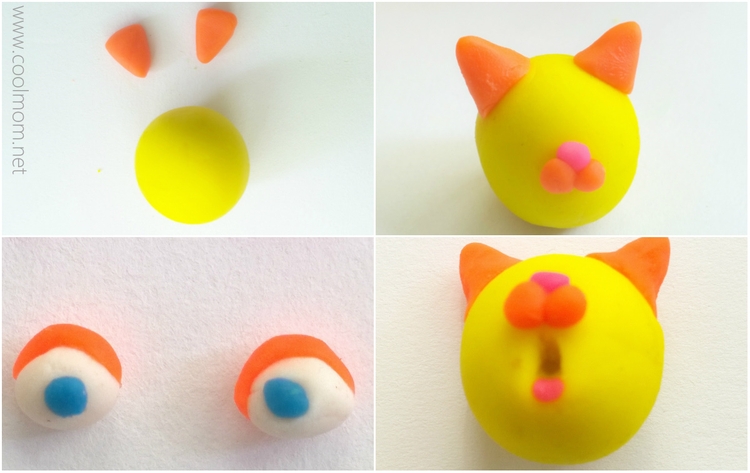
To make a cat, according to the first option, you will need plasticine of orange, white, pink, red and blue flowers. First, from the orange color, you need to fashion a torso in the form of a bar, a sausage for the tail and four parts in the form of a drop for the ears and paws, for the ears you need to make of blue color two teardrop details. Then from plasticine white color you should form two identical balls for the eyes, one ball of pink for the nose, and also from white, you need to make three details in the form of a drop and one drop of red color in order to get a lush mustache and tongue.
After all the details are ready, you can start assembling. First, all the details of the muzzle and belly must be attached to the body, it can be made of white by rolling out a small circle. Then you should attach the paws, ears and tail.
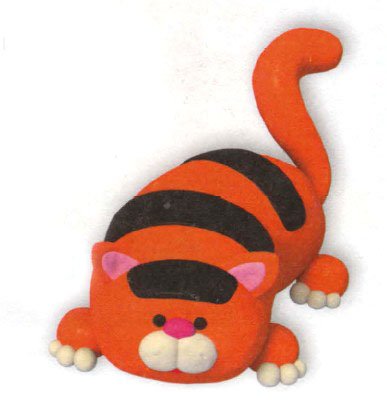
Second way
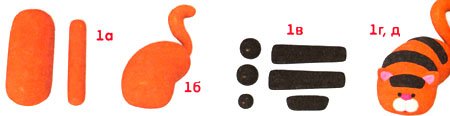
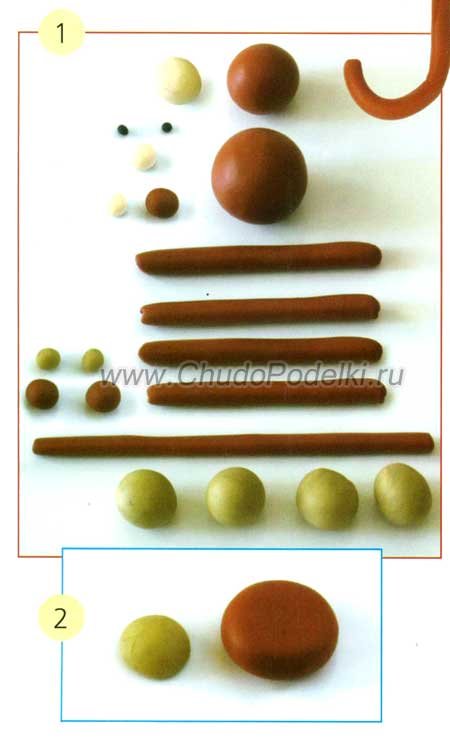
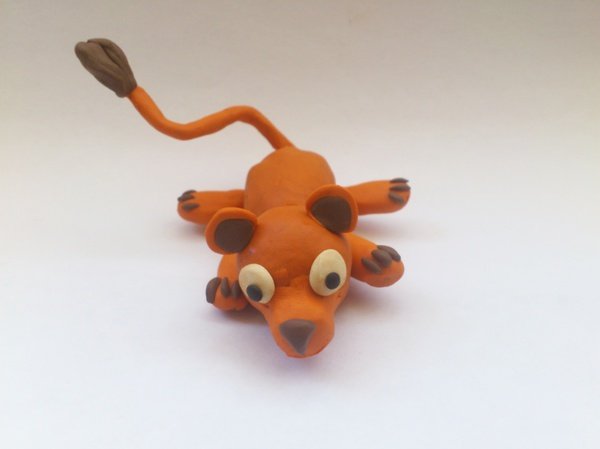
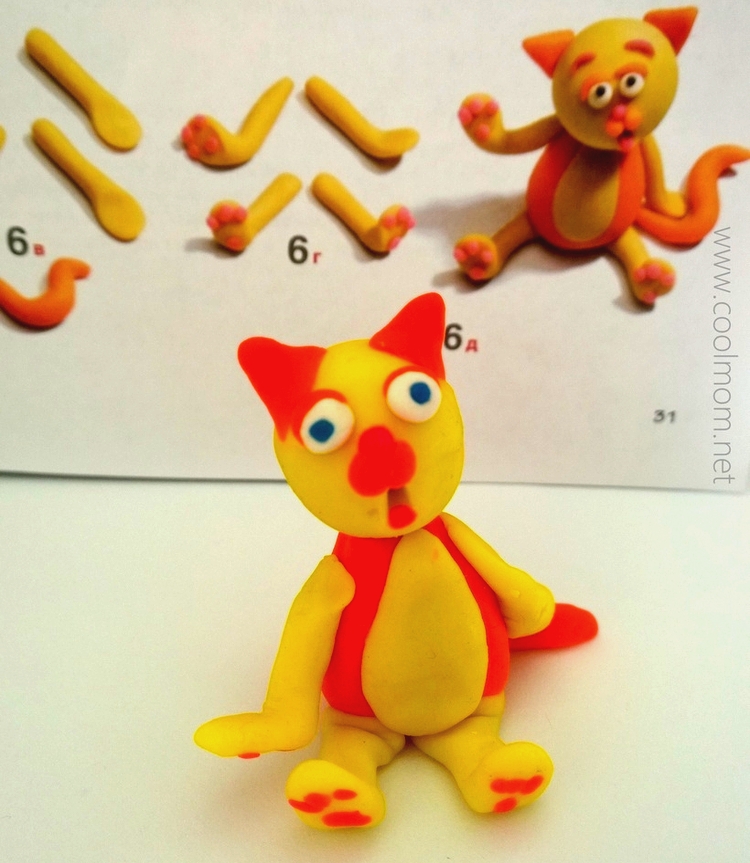
To complete the cat, according to the second option, you will need plasticine of orange, black, red, pink and white flowers. First you need to form two rollers from orange, one is thicker, it needs to be bent a little, the second is thinner - this is the future tail. Three balls must be formed from black plasticine and rolled into strips, then these strips must be attached to the body, and then the cat will turn out to be striped. Next, you should make all the details of the muzzle, and in order to get paws, you need to form four identical orange balls and small white balls to make claws. At the final stage, all the details must be connected, and the cat craft is ready. The stages and results of the work of the two options are shown in the photo.
![]()
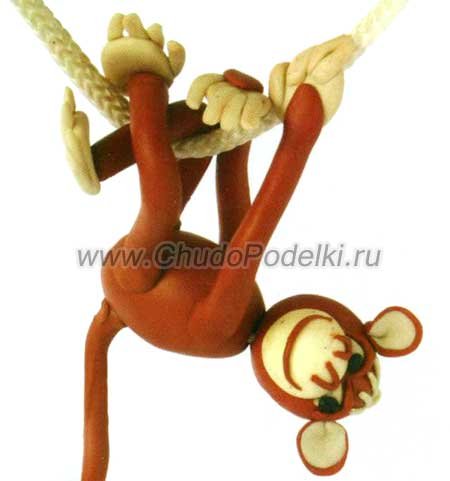
mischievous monkey
From plasticine, a child can fashion animals and animals that he saw at the zoo, for example, a monkey. In order to get a funny monkey, you will need brown, beige, white and black plasticine. First of all, it is necessary to fashion the constituent parts, namely: two balls Brown color different sizes, one for the body, the other for the head, also one small ball of beige and white colors and two tiny balls to make eyes. And also brown rollers for the tail and paws, in addition, beige and brown balls for the ears, palms and feet. Below will be shown a diagram that illustrates step by step how to connect all the parts.

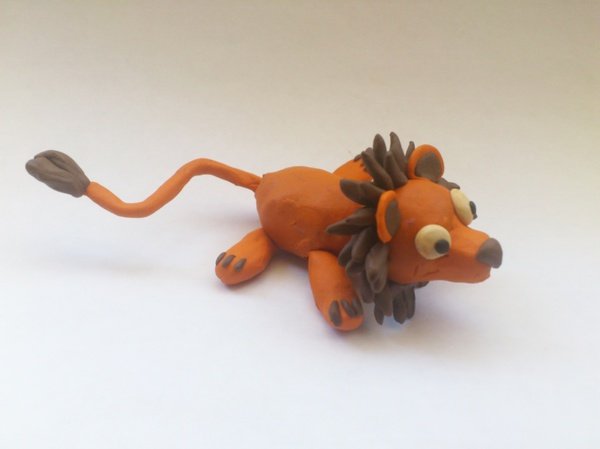
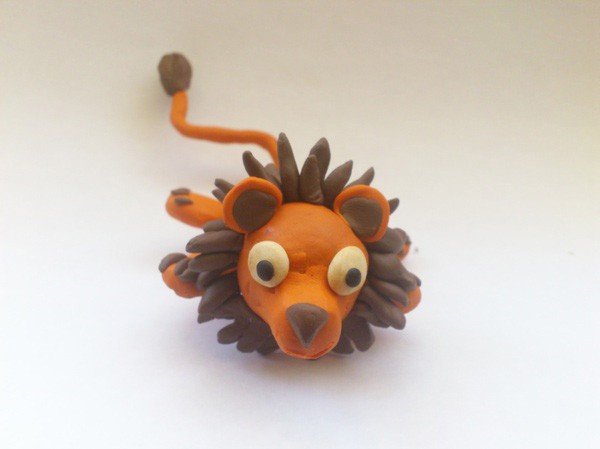
The lion is the king of all animals
For those who sculpt and collect plasticine figurines animals, a master class dedicated to the technique of sculpting a lion will not be superfluous. To work, you will need plasticine of orange, brown, white and black colors. From the orange color, the torso and head should be formed. Then, on the front of the head, you need to attach the nose and eyes. Also from orange and brown circles it is necessary to form ears and attach paws with claws. In order to make a tail, you can use a wire and wrap plasticine around it, and then attach a brown brush. And, of course, we must not forget to make a mane from brown plasticine.
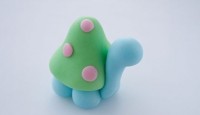
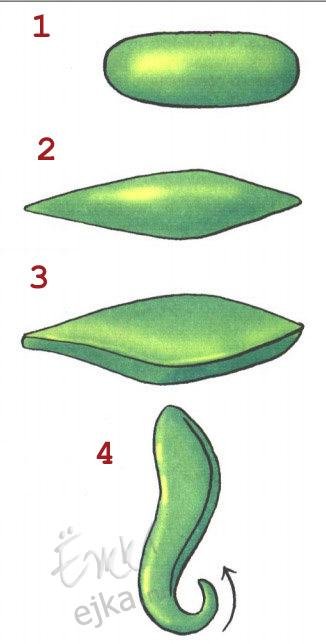
Sea Horse
You can also sculpt marine life from plasticine, for example, seahorse. To work, you need green plasticine and a little blue and red. First, a sausage should be formed from green, then flattened and bent in the form of a spiral. Then, from a piece of green, you need to make a blank for the head. The fin can be made from a piece of blue. Then you need to attach the head, fin to the body, and use a pencil to make a pattern. Next, you need to attach eyes made of red plasticine - and the craft is ready.
Plasticine modeling is an incredibly fun and interesting activity for children. Kids like to sculpt everything that surrounds them: houses, flowers, their favorite toys ... However, most of all they like to sculpt animals. Why?
In the process of a long study of the behavior and psychological characteristics of children under 4 years old, it was revealed that children of this age identify themselves not with people, but with animals. Therefore, in the process of drawing or creating a domestic or forest animal with the help of plasticine, the child expresses his own essence.
Plasticine modeling of animals with a child
Work with plasticine in each educational institution is not in vain - this material is necessary for kids not only for fun, but also for the development of fine motor skills, for the manifestation of the creative abilities of children.
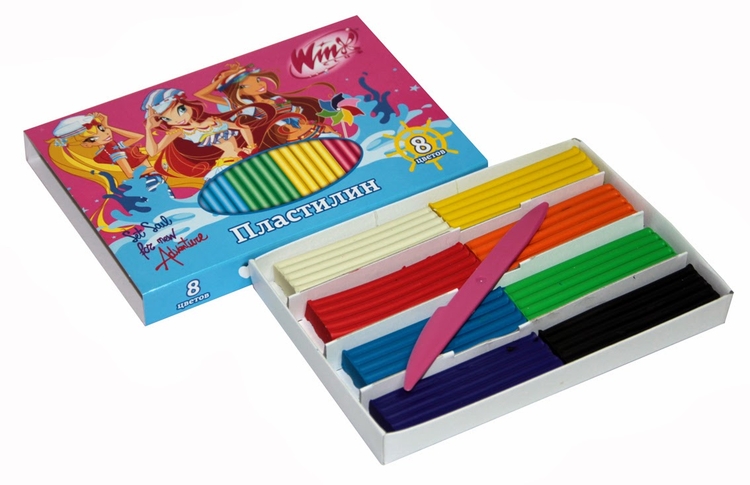
Today, on the shelves of stores you can buy beautiful, soft, bright plasticine, in the form of dough, paste, balls. With such material, it becomes possible to make fairy-tale characters, favorite cartoon characters, etc.

By the age of three, the child is already completely ready for creativity using plasticine. On the part of an adult, it is enough just to suggest to the children what to blind, and also, if necessary, show how to do it. At the age of 3, a child not only can engage in lesson creativity, but must also do it, this is his inner necessity. Being engaged in modeling, he unconsciously develops memory, perseverance, concentration, etc.
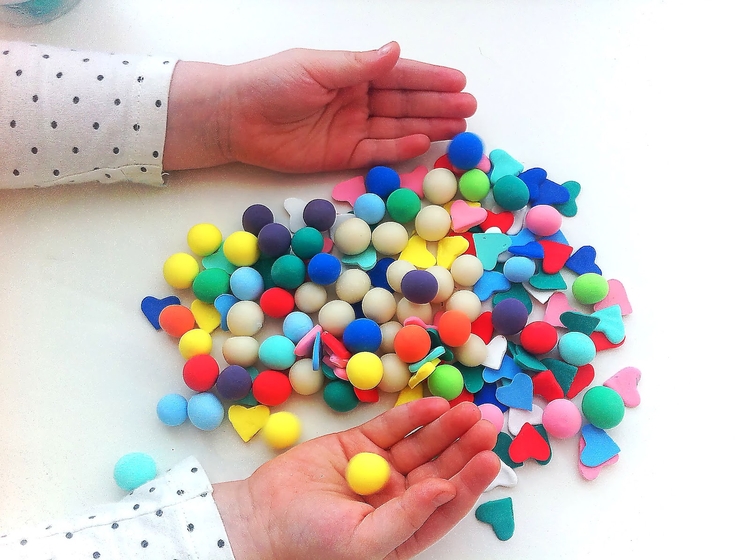
In modern kindergartens in recent times gained quite a lot of popularity plasticineography.

What is needed for this? Sheer trifles - just plasticine, a piece of cardboard and a plastic board and a little imagination! Having all this, the child can start creating his own picture from plasticine.
You can sculpt animals or the world around the child in another way - for example, using applications. Amazing animals are also obtained using ball plasticine, which provides many additional opportunities for the little creator. For example, with the help of ball plasticine, you can stick around an ordinary jar or glass, and then we will get a beautiful pencil box.
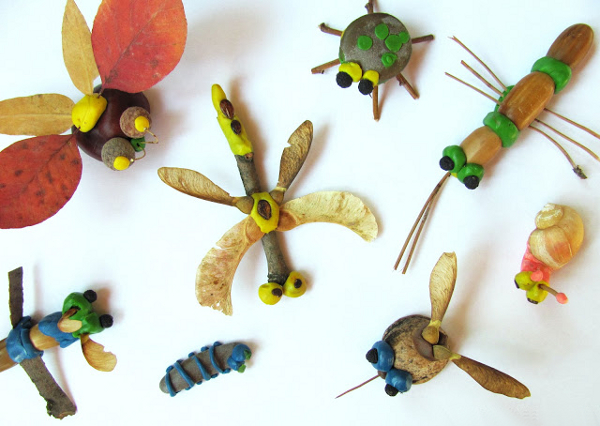
It is much more convenient to sculpt animals from plasticine if you use different Additional materials. Autumn offers us a lot of options for crafts, when you can easily find acorns, beautiful bright autumn leaves, twigs, etc. on the street.
Plasticine modeling: getting started
In order to help a child learn how to sculpt animals correctly, it is necessary to teach him how to work with the material correctly.
You need to work on a special board made of plastic. It will not allow you to stain the surface of the table or furniture. Often in a kit for young children, additional molds of various animal figures or geometric shapes which will allow to acquaint the child with the material and its possibilities. However, this is only suitable for the first lessons with plasticine, and not for an experienced baby.
kdcnov.ru
It is extremely important to teach the child the basics of working with plasticine - how to knead the material, how to roll it, the main figures that you can sculpt yourself (for example, a ball, sausage, bagel, etc.). As soon as you see that the child has learned to sculpt the most basic shapes, proceed to more complex designs. The main thing here is to work, work and work again. The more practice, the faster the child will develop their creative abilities and show them to others.
If the child does not yet have enough strength in his hands to knead the material, help him with this - knead the plasticine until it becomes soft and plastic enough. It will be much easier for a child to work with such a correctly prepared and warmed up plasticine in his hands. And at the end of the work, be sure to wash the child’s hands thoroughly, make sure that there is no dirt left under the nails.
Modeling animals from plasticine: a master class on making a horse
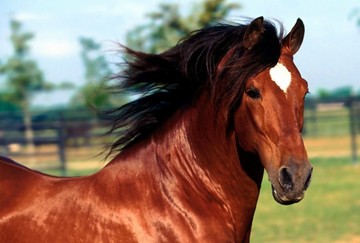
There are different variations of sculpting a horse (depending on the age of the child), but even a baby will be able to blind the simplest horse preschool age. You can invite your child to mold a horse from their favorite cartoon, a beautiful thoroughbred horse or a fabulous unicorn or pegasus.
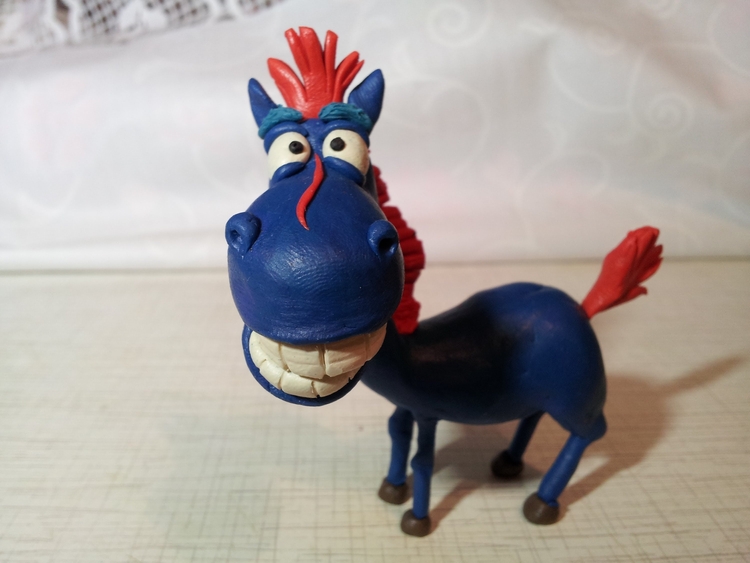
Choose 2 main colors for sculpting the horse, prepare 2 small objects that will act as eyes, and 4 matches or wooden toothpicks.
First of all, we roll sausages from plasticine. To the bottom, each sausage should expand a little - this is how we create the future legs of our horse. To make the legs as firmly fixed on the body as possible, insert a toothpick into each leg.
The next step is sculpting the horse's body. To do this, we sculpt a thick short sausage, bend one of its edges up a little and narrow it a little - this will be the neck of the future horse. You can also insert a toothpick into it to then fix your head on it.
You can blind the head by making a small oval blank, at the end it needs to be slightly narrowed. With the thick end of the head, we attach it to the neck, sticking it on a toothpick or just sticking it to the body. In the same way we connect the legs to the body of the horse.
It's time to make 2 more small balls from plasticine, and then flatten them - these will be horse nostrils. Let's make 2 more small balls and get the horse's eyes, into which you will need to insert 2 small objects (beads, buttons, etc.).
To mold horse ears, you need to invite the child to make 2 balls, and then make droplets from the balls - slightly stretch the ball from one end. Another two flattened balls make excellent hooves.
It remains quite a bit - roll out a piece of plasticine into a tape and attach the mane in place, and also make the tail in exactly the same way as the mane.
Modeling animals from plasticine: a master class on making a cat
You can also blind a cat in several ways. Here is the easiest way.
For this modeling method, you will need to use a special knife for cutting clay, clay itself and a few wooden toothpicks. This method is perfect for sculpting the little ones.
Take a piece of plasticine and divide it into 3 even parts with a knife. From one part it is necessary to roll a ball - this will be the body. From the second piece we separate a small piece, from which we will continue to make a tail, and from the bulk of the second piece we sculpt a head. We divide the third part of the plasticine into 6 equal parts and roll balls out of them.
From 4 small balls we roll the flagella - these will be paws, we divide the fifth ball into 2 parts and sculpt 2 ears, we also divide the sixth into 2 identical pieces (for the cheeks) and separate a very small piece (for the nose).
It remains the case for small things - to connect all the parts with the head. Ear balls can be shaped like a circle or triangular with a little flattening. We insert a toothpick into the head, on which the entire body of the cat will be attached.
In the same way (with the help of toothpicks) we attach flagella-legs to the body. You can additionally mold a small red flagellum from red plasticine, which will become a cat's tongue.
Any animal is molded from the most basic figures that just need to be correctly assembled - balls, flagella, ribbons, sausages.
Help the child to show his imagination and just be there - this will be quite enough for him to be able to sculpt animals or people from plasticine, the phenomena and things around him in life.
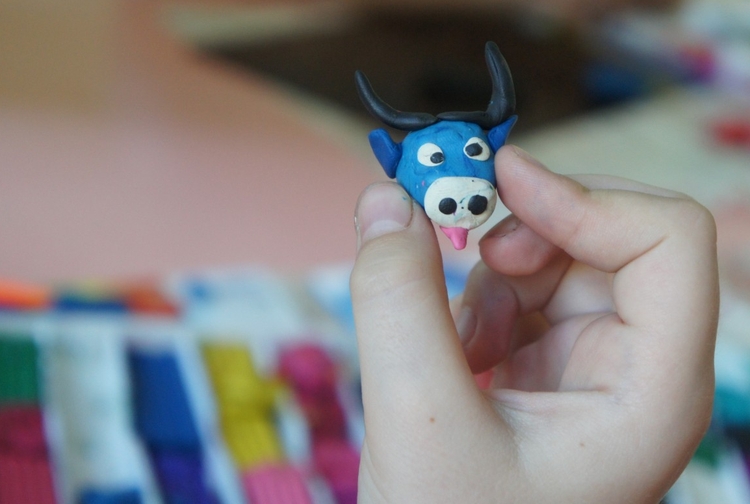
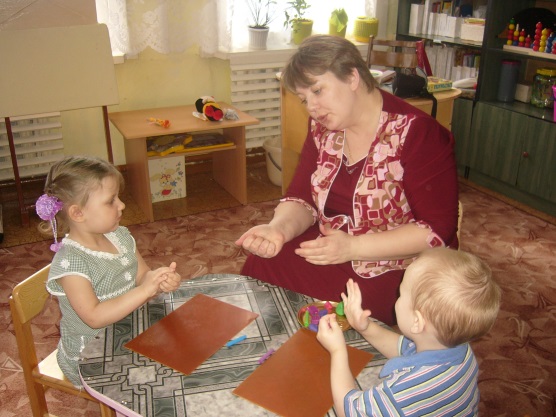
Good day to all, dear readers and friends of my blog! Tatyana Sukhikh is with you, as always, with a new topic for conversation, namely: modeling animals from plasticine with preschool children. Finally, holidays, classes do not need to be held, you can just let the kids do whatever they want. My pupils are very fond of playing with plasticine, so we always find time, for example, in rainy weather, for this useful developmental work.
In fact, even though it's a vacation, we continue to train the fingers, the speech of the kids, teach them new ways of drawing, sculpting, but without an outline, as they say, for our own pleasure. Just along the way, we show what and how can be made from familiar materials.
I can’t stop reading, my life is incomplete without books, so I don’t stop self-education even on vacation. In search of novelties of the artistic word, as well as professional literature, I, as usual, visited my favorite online stores: "UchMag" and «OZON.RU».
AT "UchMage" you will find many types of materials for modeling and tools. There is colorful plasticine, bright - “pull out the eye” is called, but there are classic colors, calm. I think you can alternate, using either bright or calm colors. You will also pick up special dough for modeling, kits for creating pictures from plasticine and much more.

«OZON.RU» pleases not only sets for creativity, but also with special literature - a whole series from a famous author Roni Orena dedicated to the art of sculpting various animal figurines from plasticine. Books will help parents teach their child different methods of working with plastic mass and creating specific characters.
In addition, this store recommends a similar literature of domestic authors who also devoted their books to modeling. Educators will definitely find my findings useful, for example, for compiling a summary of classes.
And I liked the fluorescent plasticine. Imagine a child blinding something, and it will glow at night! Cool...
Why is it so nice to crush plasticine in your hands?
It was not in vain that I devoted a large article to plasticine crafts, because this activity is one of the most useful for the development of a child. We are all already literate and know how important it is to train fine motor skills. In addition, by kneading the plastic mass, children develop imagination, logical thinking, and memory.
After all, it is not just necessary to crush plasticine, but to form a product on a given topic.
The kid, moving towards the goal - to fashion a figure, develops patience, perseverance, perseverance;
When he decides which color to choose and how to combine different pieces and colors, he develops abstract thinking, artistic taste, creativity;
Rolling up a ball or sausage, children develop coordination of movement, self-regulation;
Sculpting from clay or other materials is extremely useful for the nervous system; it is not for nothing that this activity is one of the elements of psychotherapy. It is especially useful to sculpt for children with an excited nervous system, they will calm down, they will sleep better;
This kind of art can also be used to rid the baby of fears: let the child blind his fear and then crush the figure or remake it into something positive;
At home, modeling will help you and your baby grow spiritually together, strengthen emotional contact;
In general, by creating own works from plasticine, the child independently builds a kind of bridge between the fantasy world and reality. He feels significant by creating.
Secrets of the old…
Of course we are in kindergarten we approach teaching children how to sculpt seriously, even scientifically, one might say. We have a lesson outline, which is based on guidelines Ministry of Education. There is a teaching methodology that we follow in our daily activities during the school year. True, I already have old books, but very useful.

And during the holidays we sculpt what and how we want, consolidating the acquired skills. It is clear that most of the manuals that we use in our work are a little behind reality.
What I mean? For example, in the classroom we sculpt standard figurines on the theme of animals: bunnies, chanterelles, cubs, etc. But modern children are much more interested in making Smesharik, Sean the Sheep, Sponge Bob. In the summer we try to teach the guys to make their favorite characters.
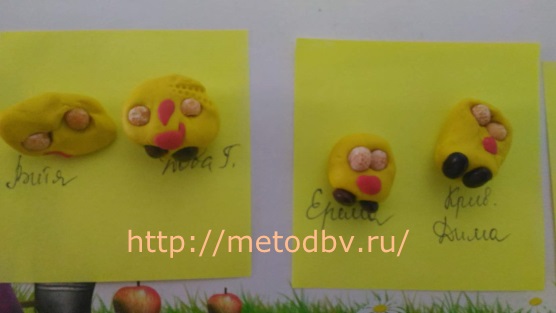
I myself can mold, in principle, anyone, but it is much easier when I have a modeling scheme at hand. You can print color pictures from the Internet with step-by-step instructions and give them to the children so that they can figure it out themselves, developing logical and spatial thinking. Look, I found some samples.
Parents often ask me what is the best thing to do: give the kid the freedom of creativity, they say, let him sculpt or draw as he wants, or specially teach different techniques and techniques, showing samples.
I’ll answer with a question: have your children ever gone crazy because they can’t do well?
From a lack of skills in working with different materials the result is that the child does not know how to mold, for example, a cube or roll a perfect ball. And then he no longer wants to continue working.
You should definitely take the time to show how to make the basic elements for the figurines.
There are three options: to make a figure from individual elements, to draw parts from a single piece of plasticine, or a combined method.
For children over 3 years old, you can make a whole presentation on the topic: how to sculpt from plasticine. For example, show a modeling lesson of your favorite cartoon character.
And for kids, just give plasticine and learn together to roll, pinch, cut, flatten, knead, connect parts, press objects into plasticine, etc.
The kid must master all the techniques of modeling. And then he himself, having decided to make a character, will also develop tactics: the head is round, which means that you need to roll the plasticine on a plank or between the palms. The body is a sausage, which means we stretch and roll the workpiece ...
There are secrets of making animals, for example, that will help you learn how to make beautiful figurines.
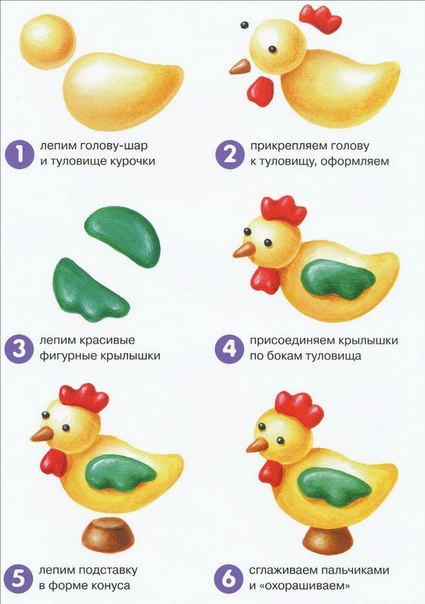
So, it is important to learn how to sculpt all parts of the body. It is always better to start with making balls. We take a piece of plasticine of a suitable color and divide it into parts: the largest for the body, then the head, then 4 paws. We roll the balls from all the pieces. Then we roll out a sausage for the body from a large ball.
Let the head remain round, then just add the necessary details to it. We have paws in the form of sausages, which we flatten at the end. You can sit the animal on its hind legs or put it on all 4 limbs. Let the child himself suggest what details need to be added to get a specific animal.
Be sure to learn how to use a stack, sticks to concretize details and create texture. The "wool" of a lion from hot countries will turn out more realistic if you walk along it with the sharp end of a toothpick.
![]()
The average group in kindergarten can already deftly make whole compositions from plasticine with small details and knows how to use modeling tools. So, if you are raising a child at home, take into account the requirements for the knowledge and skills of children at a certain age.
And you don’t have to graduate from pedagogical universities to learn how to draw up the correct outline of a modeling lesson - just use the manuals I have selected from "UchMaga" or «OZON.RU». It shows exactly how to make specific figures. Moreover, the material is selected taking into account the hobbies of modern children. There are samples of sculpting many of the characters from cartoons beloved by the children.
Do not think that modeling is pampering, a game, entertainment. This is a colossal work of the child on his own development. Help him, tell him, guide him!
Oh, how much I wrote, it's time and honor to know, so as not to bore you with my teachings. Do not remain indifferent, share your thoughts about what you have read.
It is not yet forbidden to subscribe to updates and share links on social networks.
Sincerely, Tatyana Sukhikh
See you soon!