When working with children, the psychologist often uses the means of visual activity: paints, gouache, plasticine. Creating images, children involuntarily share those problems that are not yet conscious and captured in their fantasies in the form of symbols. A child psychologist suggests that kids draw or create the characters in films, works, or their own fantasies that they like best. Often in the box is not enough green or brown plasticine, from which the character is created, and sometimes there are no shades at all that the preschooler would like to portray. Therefore, a specialist should know how to obtain brown color or orange, mixing the colors available.
An example from the practice of a psychologist
In the process psychological work with a closed girl of 7 years old it became known that she had been asking her parents for six months to buy her a monkey as a pet. Mom’s persuasion and dad’s explanation that the brother was allergic to all kinds of animals did not help. The girl was offended and closed even more. In the lesson, the psychologist asked the girl to tell: what kind of monkey would she like? Big or small? Boy or girl? What will she do with the monkey at home? The girl decided to mold a plasticine monkey. The psychologist helped her by kneading plasticine and making the body or legs of the animal according to the recommendations of the baby. By the middle of class brown plasticine ended, and the work was unfinished. Together they came to a decision on how to make brown from the remaining bars of plasticine, and mixed red plasticine with a little black. In the process of sculpting, they talked a lot about different monkeys, about their lifestyle. It was clear that the shy and modest girl envied the monkeys - so free to express themselves, so active in movements and as flexible as gymnasts.
In the next lesson, parents complained that the girl was unusually capricious at home when she needed to go to bed, was offended by her relatives, and behaved aggressively if something was not pleasant. Together with parents, it was suggested that, dreaming of a monkey, but not having it, the daughter began to represent herself as a monkey, showing all the qualities that were listed in the last lesson. Together with a psychologist, she decided to continue modeling, but now there is a monkey on a tree eating bananas, jumping from branch to branch. The conversation was now focused on how to raise this monkey, who does not obey and does what she likes. In order not to be distracted from the topic of psychological work, I had to mix clay for making wood, since again a lot of brown material was required. By trial and error, not knowing how to get a brown color, we tried to mix red and green plasticine in equal proportions. Very quickly they got a big lump of brown color from which they could make a tree, and even a little more remained. Together, they praised the monkey for eating such wholesome and nutritious food (bananas and other exotic fruits) that it not only jumps on trees, but also listens to its hostess, and it can show its flexibility and activity in a sports school.
Gradually, the girl learned to control her “internal monkey”, the image of which was sculpted and raised together, she became more active at home and more successful in gymnastics. In one of the subsequent classes, the need again appeared to sculpt a monkey, and here the psychologist was confused: there was no more red, green, or black plasticine, and the girl showed an impatience and quite acutely to sculpt a whole family of monkeys. Thinking how to get brown, we decided to mix orange and gray. The result was not as dark as we would like, but, adding a little blue, as a result, they still dazzled a whole family of brown monkeys. This time, the girl solved family problems by discussing the behavior of monkey parents and monkey children. The psychologist helped her to find the right approaches to communicate with her brother, father and mother without losing activity, without closing herself and not hiding in her room.
The psychologist does not set the task to teach the child does not teach how to get the brown color of the paint when displaying large drawings or with a lack of colors. The main thing is to work with images that can be very attractive to the child and with the help of which he could solve his pressing problems. But still, this knowledge is involuntarily laid in children, and they, in addition to psychological work on themselves, gain additional knowledge on how to get a brown color or how to cut a snowflake, how to rain in a glass jar or how to lay down Knowledge is repeated at home or in kindergarten are shown to friends, which additionally gives confidence to any child.
What you need to know in the first place to sculpt from plasticine?
Where to start?
We believe that the very first plasticine modeling lesson should begin with a study of color mixing. So, we take plasticine and sheets of cardboard. Let's start learning to mix colors and make “marble” from 2 and 3 colors of plasticine. You need to know and be able to create any work from plasticine.
Plasticine Modeling Tutorials: Mixing Colors
Color mixing
———————————————————————-
Mixing colors is a very interesting and fascinating topic. Experiment, mix and see what happens.
So what happens if you mix the colors: red and yellow, yellow and blue, blue and red?
If you really want to learn how to sculpt from plasticine, then do not just read this article, but do it.
In the first case, it will be orange, in the second - green, in the third - purple. Check it out in practice.
And what will happen if you mix all three colors?
Most often you get dirt, but you can add a little more yellow or red, and you get a brown color.
So combine the three colors very carefully.
Mix the colors in small pieces until smooth, if you want a beautiful, even color.
When two colors are mixed, a new pure color is obtained, but what happens if two colors are mixed, such as red and green or blue and orange or yellow and purple.
At first glance, these mixes have only two colors, in fact, three colors are mixed, since the green color consists of yellow and blue, plus red or blue plus yellow and red, it is orange, or yellow plus red and blue, it is purple. Remember this and try not to mix them.
How to make the color brighter
"Marble" of 2 colors
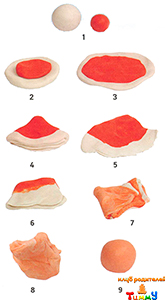
To do this, mix white plasticine in colored plasticine.
The more white plasticine, the brighter the color.
You can mix with white all colors, and black too.
Try to mix all the colors with white plasticine, do not be afraid, all the colors obtained will be used in the future.
How to make color darker
Everything is clear and understandable.
Just mix any color with black, which should be less than another color, such as red.
Marble of 2 colors
Of course, you won’t make marble, but you can mix clay in such a way that it reminds a piece of marble with its divorces. Marble is made of two, three or more colors.
Start simple.
Take two pieces of plasticine, for example blue and white, it is desirable that the pieces be larger, since then this plasticine will be needed in the "Festive table" section.
So, take two pieces, roll from one and the other sausages.
Slip both sausages in length and twist. Twist one side clockwise and the other counterclockwise. Do this not abruptly, slowly, from the middle to the ends.
You should get a roller as shown.
Roll this roller a little along the board to make it longer.
Now fold in half and again roll on the board.
Do the same a few times.
The main thing is not to wrinkle plasticine so that the stains turn out beautiful. Roll into a ball. Now you can sculpt.
3-color marble
Marble stains can be made more complex if you take three colors that are close in tone. Mix must be similar to mixing two colors.
Roll out three sausages, connect them together along the entire length and twist.
Then roll across the board and fold in half. This must be done several times - and a piece of "marble" in your hands.
Pink + White + Purple;
pink + blue + red;
yellow + green + blue;
yellow + red + brown;
blue + white + purple.
For children, such a creative process gives a lot of pleasure.
But I’ll tell you one secret. For adults, it is no less exciting.
And if you sculpt together with a child, then you will enjoy both communication and the creative process.
Our first, not at all great lesson, came to an end.
Ahead is a new lesson: "We draw with plasticine." How to choose colors that are close in tone. The following articles will help you with this.
When sculpting from plasticine often have to mix different colors. In order not to be mistaken with the choice of color, you must first try to mix small pieces. Usually this is enough, but the child is often interested in the question: "What color is obtained if mixed ...?"
To satisfy children's curiosity, we will create a color table. To do this, you need paper in a cage, a ruler, a simple pencil, plasticine and a file.
How many flowers to take for an experiment depends on the age of the child. For a 4 year old baby, 4-5 colors are enough (red, yellow, blue, green, white). The older the child, the more colors you can use. The complexity of the work is completely independent of the number of colors, but the time it takes is dependent on their number. For preschoolers, it is better to exclude black from the experiment.
1. On paper in a cage, draw a grid with cells 3 * 3 cells. The number of rows and columns should be 1 greater than the number of selected colors.
2. In the cells in the upper row we stick pieces of plasticine in the order of the spectrum from warm to cold tones. If white and black are used in the work, then it is better to place them at the edges of the table.
3. The left column can be trusted to fulfill the child. Colors should follow in the same order from top to bottom.


4. To fill the following cells, we take pieces of plasticine of those colors that are located in the upper cell and in the left column, mix them well and place them in the corresponding cell.
5. Please note that when mixing any color with black in a 1: 1 ratio, black tones are again obtained. Exactly with the professional joke of the artists: “The artist is not afraid of either a black cat or a black stripe in life. He knows that there is no black color, there are very dark shades. ” For this reason, for kids under 7 years old, it is better not to take this color. The child is very quickly tired of getting the same gloomy result. For a child older than 7 years, this, on the contrary, will be a valuable observation.

6. You can cut small pieces of plasticine of the same size and invite the child to choose the right colors for each cell. If this task turned out to be difficult, then simply fold the pieces in pairs and arrange them into cells. The child will only have to mix them and observe the result.

7. Having reached the end of the table, it is worth paying the attention of the child to the fact that on the diagonal the same colors are obtained as they were. For many children, this is not an obvious fact.

8. An adult understands that in the lower left corner the colors will be mirrored to those available. However, the baby will almost certainly want to check it out. If such a question arose, do not be too lazy to finish the entire table or check at least two or three colors.
Making such a cheat sheet takes a lot of time. Therefore, it is better to do it in good company. If you have 3-4 helpers, you can assign each of them to mix the colors of plasticine in one line. In this case, it is better to make a complete table. If you do it together, then you can turn on a cartoon in parallel, for example, “Fixies. Plasticine".
The finished table must be removed to a file. It will come in handy more than once in the following plasticine crafts.
Drop by and download free pc software from our movie portal or download the dle template on the best portal
The benefits of sculpting have already been written in one of the articles of our club of parents (""), and in this article we want to talk about small secrets and nuances of the sculpting process, as well as give another palette for mixing colors to get a piece of the desired color.
Secrets and nuances of modeling from plasticine
- If you take a soft and warm piece of plasticine, then working with it is very convenient than with a cold one. However, cold keeps its shape very well. If you want to keep as a souvenir the figure that your child made, or you need to take it to the kindergarten / school in the morning, feel free to put it in the refrigerator, and preferably directly in the freezer. In the morning you will get almost a stone figure. It can be easily attributed to where it should be.
- Before you start sculpting, hold a piece in your hands for a while. So it heats up and becomes much softer, i.e. sculpting from it will be much easier.
- If you need to attach any thin part to the main figure, and it is already ready - do not rush to do it right away. Let her lie down on clean paper for just a few minutes. It cools down, becomes much harder and you don’t have to get upset because it crumpled while you fastened it in the right place.
- During sculpting, it is important to remember that plasticine very quickly and very easily stains objects. But he himself gets dirty no worse. Dust particles, villi, small pieces, etc. stick incredibly quickly to it. For this reason, sculpting directly on the table is not recommended (you don’t want to buy a new table or change the table top), but also tablecloths, napkins, etc. also not suitable for this. From them, your piece is very quickly covered with small fibers and other particles. It is best to use a smooth plank made of plastic or a thick sheet of pure white paper for sculpting.
- In addition to collecting garbage, it sticks very well to your hands. If you have just blinded some figure or piece from, for example, a black piece, but do not immediately take on the modeling of light color. Otherwise, it will almost immediately get a black tint. After working with any color, wash your hands and tools well and wipe them thoroughly.
- From the hands he launders badly enough. Even warm water and soap to eliminate all traces is not enough. After washing your hands and tools, it is important to wipe them well to remove all traces of water. If you take plasticine with wet hands, then he and all the crafts made of it will get wet, stop sticking to each other, and the whole figure will simply disintegrate.
So, these are all the main nuances of modeling. Now you can move on to the secrets and rules of mixing colors. On the one hand, the palette of purchased plasticine may seem sufficient. On the other hand, it is very limited. Of course, no one forbids sculpting a bright blue horse (let it be magical, fabulous) or a pinkish elephant, but quite often the color / shade that is not in the box is needed. Getting it is quite simple. It is only necessary to mix the colors correctly and the palette of mixing rules is given below.
But how to mix plasticine?
The technology is very simple and easy.
A little secret of mixing plasticine: marble effect
![]() If the mixing process is not brought to the very end, then you can get a very nice marble effect, and of any color, because it will depend on the plasticine that you mix. From the resulting color you can create a truly fabulous, unusual horse, bird, etc., as well as a bright, colorful flower.
If the mixing process is not brought to the very end, then you can get a very nice marble effect, and of any color, because it will depend on the plasticine that you mix. From the resulting color you can create a truly fabulous, unusual horse, bird, etc., as well as a bright, colorful flower.