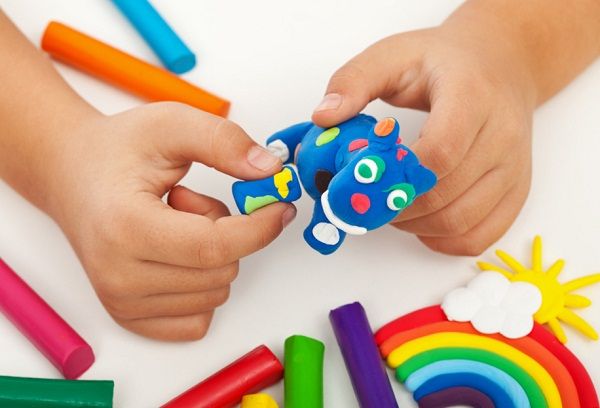
The age of 2-3 years is optimal for including modeling in the child’s leisure. Of course, such a complex figures as a frog or a lamb from plasticine for a small creator will not be available soon, but the meaning of the process is not so much in creating masterpieces as in stimulating the development of the baby.
Today, many thematic classes have been developed for young children, but, according to experts, it is modeling that gives the maximum possible stimulus for the development of the mental abilities of a small person. It affects all the senses, but at the same time looks more like entertainment than occupation, especially if everything is organized correctly.
The benefits of clay modeling for young children
If from an early age to engage in various developmental things with children, one may be surprised at how much talent is hidden in them and how quickly they absorb everything. In this sense, modeling is considered one of the most useful and correct directions for a number of reasons:
- Physical labor. In the process of creating plasticine products, not only the fingers actively work in the baby (and this stimulates certain brain centers), but also the hands. During manipulations with plasticine, small joints are developed, tens of muscles are strengthened.
Tip: To get the maximum effect from the direction, you need to work out activities for children in advance, and not just give them a piece of plasticine or dough. At the age of 2-3 years, the baby still needs not so much in the company of parents, but in their help. Modeling will not give the expected result if the child constantly uses the same techniques, images and materials.
- The development of imagination and creative thinking. If you give your child a vague task (for example, to make a bird), he will not do without connecting imagination, which is what you need to strive for. Some are trying to build a cock from plasticine, which “gives out” a red spot on the head, while others try to blind a swallow with a forked tail. Parents only need to guide the baby, pointing out details that he might not have noticed.
- Developing the right perception. When we, adults, sculpt something of their dough or plasticine, we automatically take into account the proportions of the details of the craft. In children, this skill develops gradually, by visual assessment and comparison with the original. At the same time, you don’t even need to pay the baby’s attention that the snowman’s head turned out to be more than the foundation, he himself will understand everything after a while. Practice shows that with children in whose leisure modeling is present, it is not necessary to additionally engage in developmental games aimed at understanding the size of objects and the ratio of their parts.
- Stimulating logic. Unbeknownst to themselves, children begin to understand that plasticine will stick better if it is kneaded well. Dough products need to be created faster until the composition is dry. When mixing two different colors, the third color is obtained.
- Speech training. Modeling relaxes, facilitates communication. In order to form a figure correctly, the child will be forced to ask questions, which will contribute to the development of the skill of formulating thoughts.
- Development of practical thinking, attention. Thanks to the inclusion of a wide variety of methods of influencing plasticine, even at the age of 2 years, a child will begin to understand what will happen to a thing if it is squeezed, stretched, thrown, hit, connected to another object. A constant focus on a small goal will allow you to work out perseverance and patience.
- Memory development. If for children from time to time to arrange master classes, just showing what you can do with pieces of plasticine or dough, he will gradually remember the actions seen and after some time he will try to do everything himself, without any help.
Despite the fact that some mothers try to instill in their babies a love of modeling as early as a year, experts recommend waiting until exactly two years. This is the best time to start practicing fine motor skills at such an intense level, and even at an earlier age the baby will not yet adequately perceive advice and instructions.
Choosing the best materials and tools for conducting classes
Today, in addition to traditional plasticine, a variety of materials have become available to children:
- Children's plasticine. This is a pleasant smelling, incredibly soft and plastic, hypoallergenic raw material. It doesn’t stain clothes so much, it is washed off hands without any problems, modeling is not difficult even for a very small peanut.
- Special blends. Their difference from plasticine is only in the fact that the finished figures, after spending some time in the air, freeze and turn into completed sculptures. They can be used already from 2-3 years, but only on condition that the baby is already familiar with the basics of the direction and works for a specific purpose, and not just wrinkles the material.
- Clay. Usually it is used by children already at a conscious age, but sometimes it can be offered to a little man as a variety.
If we sculpt with children, then any material can be used. In the case when children just need to take something and they will not be under strict control for some time, it is better to give them the opportunity to create crafts from the test. The easiest way to prepare the product is as follows: for 2 parts of flour, take 1 part of fine salt and water, mix well. Of course, there will be no benefit from getting such a test into the baby's body, but it will not bring much harm. To paint the composition take food colors. If you are sure that the child will not eat it, you can use a few drops of watercolor or gouache.

In addition to the basic composition, you need to take care of the availability of auxiliary items. It can be shovels, molds, spatulas, colorful paper and other items. The kid should constantly work with different textures, and not with one familiar plasticine, in order to learn to understand the differences between them and not lose interest in the direction.
Basic rules for organizing modeling lessons at such an early age
If modeling is not only a way to occupy a baby for a while, but also pursues pedagogical goals, then when organizing classes, the following points should be considered:
- The duration of one approach at the initial stage should be no more than 1-3 minutes. When the baby is already accustomed to the game and begins to show interest in it, the duration can be increased to 10 minutes. For children aged 2-3 years, this is the best time, you should not try to captivate with the child’s activities, his attention will already be too distracted.
- The kid should work. Even if we sculpt together with children, mother can only help at the request of her child. In this case, it is better not to do something instead of the child, but to explain how he needs to act in order to get the desired result.
- It is advisable to do it every day, repeating the same manipulations until they are fixed in the memory of the baby.
- At the age of 2-3 years, several methods should be fixed in children aimed at processing plastic materials, and understand the difference between them. This can be kneading with fingers of small pieces, palm - large. Nipping off the right amount of material from a large piece or adjusting the size of the element. Flattening parts in order to give them a more flat shape, leveling the surface. Rolling items in sausages.

The simplest work patterns available for young children
It’s unlikely that even the most brilliant baby will be able to create something grandiose from the first attempt, and you don’t need to strive for it, because the baby needs to grow somewhere. In order to stimulate the interest of children 2-3 years old in modeling and at the same time ensure their development, we begin with a simple and move to the original. First we sculpt together with the baby, then we encourage him to independent actions.
- Bagels and pretzels. For both products, first roll a thin sausage. To make a bagel, just connect the ends of the sausage, to get a pretzel, you need to cross the ends. Modeling of such products should be carried out every time at the beginning of the lesson. She will help to hone acquired skills and prepare for new achievements.
- Candy.It will consist of three parts - an oblong sausage (candy itself) and two balls at its ends (wrapper).
- Pie or dumpling. First, children need to be taught to roll a bun. Then we flatten it, getting an even flat circle. Fold it in half and pinch the edges. If desired, you can put a “stuffing” inside.
- Lemons or eggs on a plate. Modeling a plate involves rolling the kolobok and flattening it. After that from the test or white plasticine we roll small oblong balls (eggs), yellow spheres (lemons) or something else that the child himself can offer.
- Apples First, we roll up a red, yellow or pink bun, flatten it at the poles, and in the upper part we also make a small depression. From green raw materials we twist a very small sausage, which we flatten, getting a “leaf”. We place it in the recess of the "apple".
Practice shows that when working with children you don’t even have to figure out what else to blind, children are happy to suggest new product options.
Plasticine drawing to enhance intelligence
To sculpt not tired, you can come up with other options for the use of plastic materials in the leisure of children. A real delight in kids is drawing with plasticine. The consistency of the test and the features of clay in this case will not work, and profile mixtures can be tried. The principle of operation is very simple. You need to take a piece of thick paper and carefully draw a large object (a house, a flower, a ladybug) on \u200b\u200bit with a pencil.
After this, the work of the children begins. The kid should paint the picture with plasticine. It can be rolled out in a thick layer directly on paper or spread very thinly. At the initial stage, you can’t do without mom’s help, the child may have difficulty with color selection.
By the same principle, children 3-4 years old can draw on their own, coming up with their own images. Here the main thing is not to interfere and do not forget to highly evaluate the result, even if it is not entirely clear what is shown in the resulting figure. Encouraging a child to new achievements, you can help him reveal his talents in early childhood. Even if in the future an architect, sculptor or artist does not grow out of him, the knowledge gained will certainly prompt the development of other skills.
HOW TO LOSE AFTER BIRTH?
The most beloved and long-awaited child was born, and with it the EXTRA WEIGHT. But caring for a child leaves no time for themselves or for gyms. And most diets can have dangerous consequences for both mom and baby.
But I want to put on my favorite dress, high-heeled shoes again and look perfect, as before ... There is a way out - the stories of mothers about how easy it is to lose 20+ KILO!
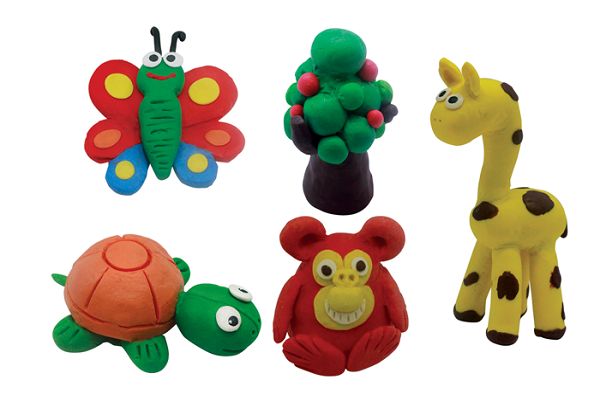
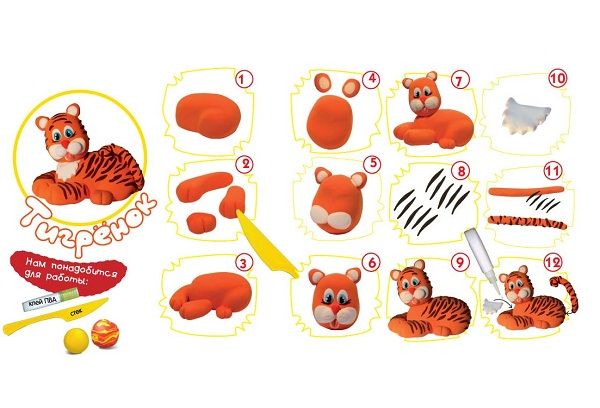
Plasticine is ideal for developing children's creativity. It helps to improve the motor skills of fingers and hands, makes the child’s imagination brighter, balances the psyche and teaches perseverance and patience. Ideas for sculpting will never end. It can be animals, crafts and food for dolls, paintings from plasticine, flowers and much more.
ladybug
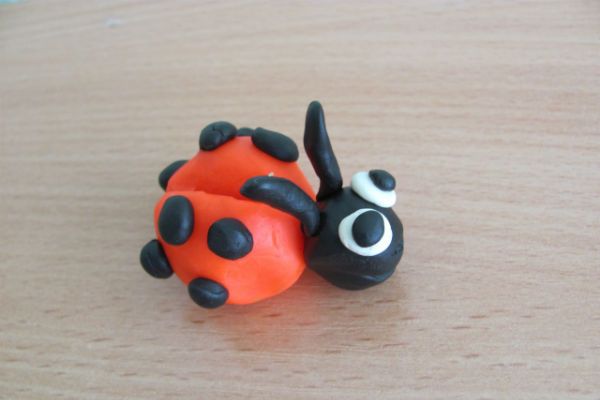
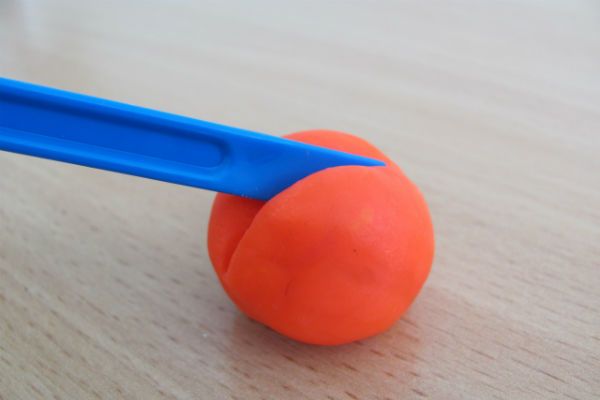
Mash the plasticine and roll the ball.

Make a cut in it.
Attach 4 black dots to the wings on each side.

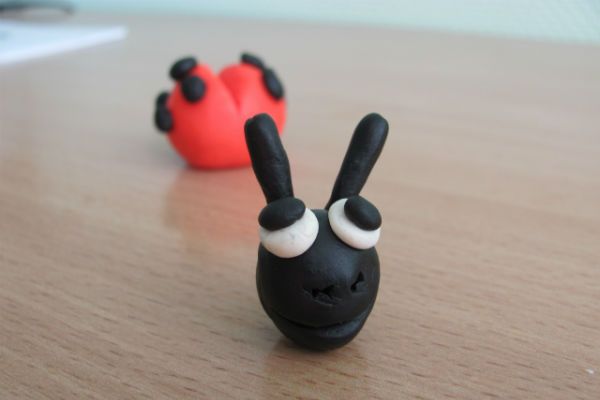
For the head, roll a ball from black plasticine, two balls from white for the eyes and two small ones from black for the pupils. Collect everything and make a cut of the nose and mouth. Twist the antennae. Attach your head to your torso.
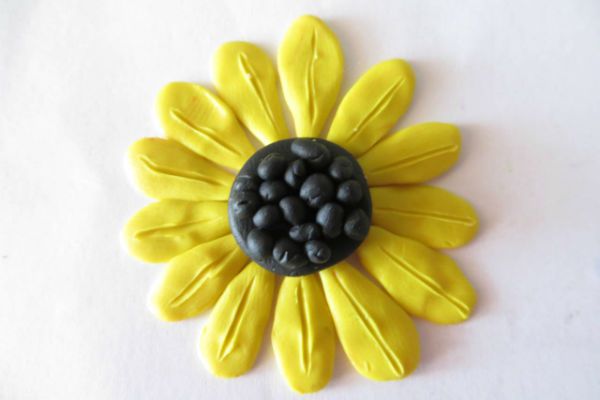
Sunflower
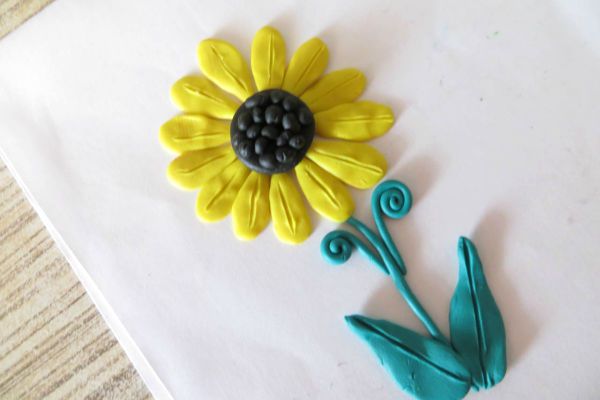
Make the core of a flat mug and lots of black balls.

Roll 13 yellow balls, form petals. Start laying them out one opposite one and make slots with toothpicks.
Twist the ropes from the green plasticine and lay out the stems. After, form two leaves like petals.
Fish in the aquarium

Wipe the inside of the jar with any degreasing agent, you can use alcohol.
Form the body of the fish and make a groove with a wooden orange stick.

Attach the fish to the same side. inside cans. Roll the rope from green plasticine. Flatten them on the surface of the jar next to the fish, making algae. The jar can be filled with room temperature water.
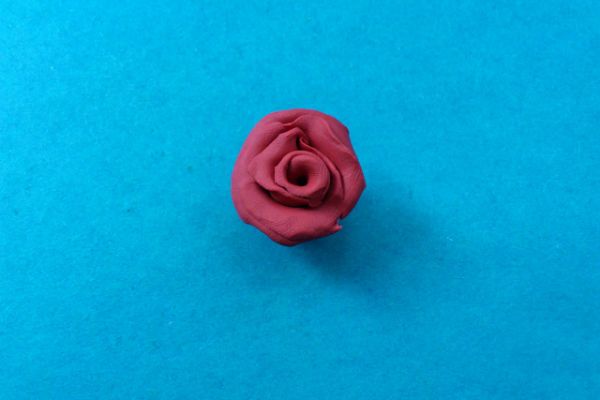
Volumetric roses

For each rose, roll plasticine into a tape 15 centimeters long. Start twisting.

The edges of the resulting spirals need to be straightened a little, forming petals.

Make green sepals on the bottom of the finished roses.
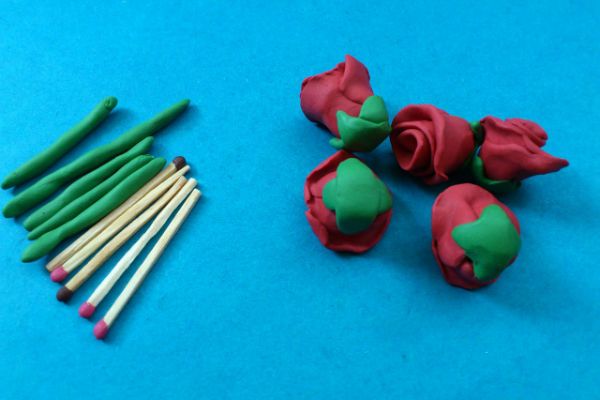
On the surface of matches, wrap green plasticine, plant flowers on these stems.

Push the brown plasticine into the small cover, insert the match-stems there, form the green leaves and add them to the stems.
the little Mermaid

Roll an oval of flesh-colored plasticine. It will be a face. With a wand, shape the nose, designate the eyes, mouth, eyebrows.
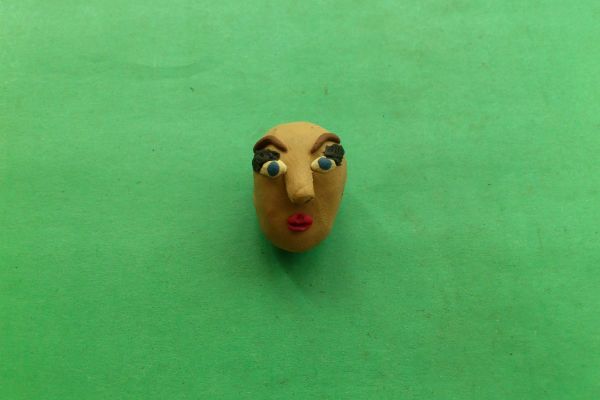
From a plasticine chosen for hair, roll a lot of ropes. Stick around their head, cut the ends evenly.

On a match, stick a silhouette from the same plasticine as the head. Make two balls for the bust. Leave the match head uncovered, set your head on it.

Make the skirt of the same color as the bust.

Make hands, shape your fingers with a wand. Make corrugations on top of the bust and skirt. Imitate scales on a skirt, blind a flat fin and also add corrugations on it.

Add a head and the mermaid is ready.
Smeshariki

Roll an even ball, make two small white balls, flatten them for the base of the eyes, stick two black pancakes on top of the white, and then stick two smaller, but white ones again.
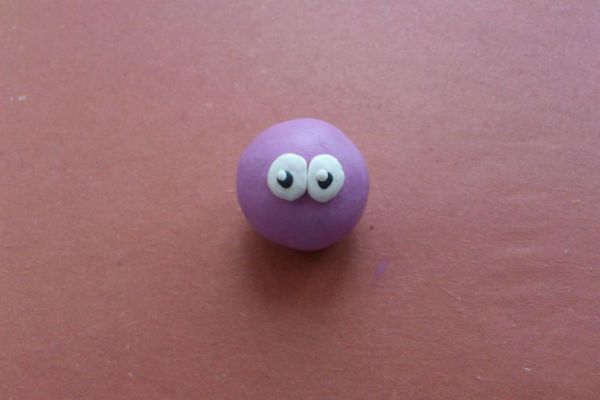
Make a small nose triangle and eyebrow stripes. With a plasticine knife, cut the line of the mouth.
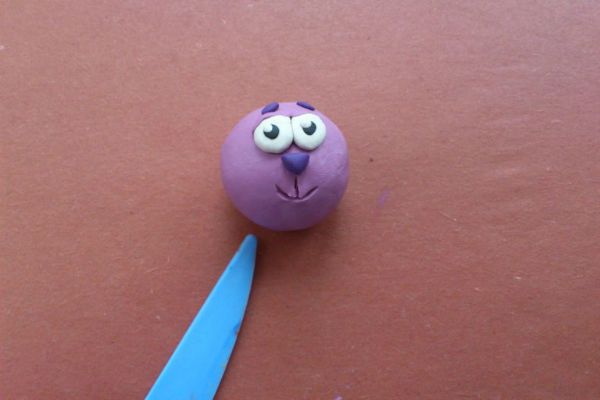
Using the cap from the felt-tip pen, make the body circles characteristic of Barash, which will imitate the wool.

Blind the horns. Use the same color for hooves. Sharpen them with a knife, cutting off the edges.

Bed

This bed is suitable for small dolls.
As the base of the bed, so that it keeps its shape, thick cardboard is used, and for the legs of the match.
Roll up the same size legs, stick matches in them, make balls on top for decoration.

Partitions between the legs also make of cardboard, keeping them oval on top. Cling to the blanks with plasticine.

Cut a rectangle for the base of the bed. Insert it into the legs, directly under the bottom of the partitions.
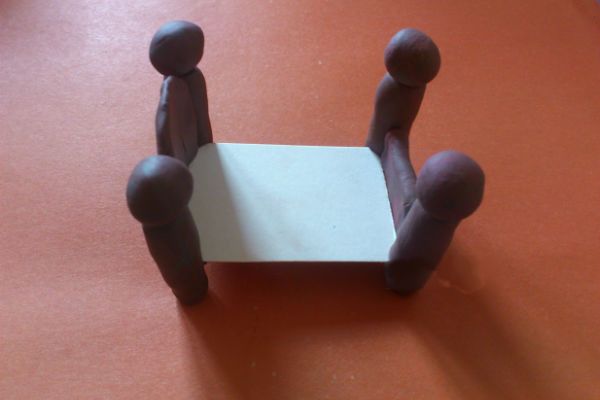
Make pancake out of yellow plasticine, roll it out, make cuts like on a blanket. Cover them with a bed and lay a cushioned pillow on top.

Almost all parents are interested in having their child receive a comprehensive education, therefore they teach the child to music, books and, of course, to creativity. In many forums, one of the most popular questions is “What should a 2 year old child do? Of course, there are a lot of tips, but modeling from plasticine, salt dough or polymer clay.
What is good modeling for 2 years old children? Let us dwell on the main advantages:
What gives a child a clay modeling?
- modeling exercises actively develop coordination of movement and fine motor skills of the fingers
- with the help of a molding, the baby’s fingertips, which contain the nerve endings associated with the development of the baby’s speech, are kneaded and massage.
- during sculpting, imagination, imagination, creativity develop, which will be useful to the baby in various types of his activities.
- modeling forms character - develops perseverance, endurance, observation and ability to concentrate.
A child engaged in modeling from plasticine, shows logical thinking, becomes attentive, accurate and feels like a real magician, turning ordinary multi-colored soft pieces into original products.
Psychologists recommend using modeling lessons to stabilize the nervous system, so that the baby's excitement, contradiction and irritability recede into the background, and a complete harmony of feelings and thoughts comes. It is also important in the modeling that the kid gets acquainted with the color scheme, forms an idea of \u200b\u200bthe variety of geometric shapes, shapes.
How to work with plasticine?
To work with plasticine, you will need the main material - plasticine in different colors, a molding board, plastic or wooden modeling tools, and you can also use additional materials to decorate your made figures: beads, acorns, chestnuts, rhinestones, etc.
Which clay for children 2 years old is better to use during modeling?
- soft plasticine imported, which has a salty taste, so the kids do not eat it
- homemade plasticine made from flour, salt, water and food coloring
- sculpting mass is a plasticine substitute, absolutely safe for the peanut, even if he tastes it. The advantage of this mass is that it is much softer than clay, and also smells of various berries or fruits. There is a drawback: it is too expensive, dries quickly and crumbles
- plasticine of domestic production in its composition has an average density and is suitable for those who are limited in finances. Such plasticine has advantages over foreign clay in that the created products harden like clay and hold their shape for several months and even years if they are not exposed to direct sunlight or if a heat source is not affected. Soft plasticine quickly loses shape under the influence of its own mass. The disadvantage of domestic plasticine: it needs to be kneaded before sculpting the figures, as well as parents to be careful that the little one does not take it in their mouth!
What colors should plasticine be for children 2 years old?
Specialists recommend giving preference to natural colors: red, green, yellow, blue, brown and black. During sculpting, you can mix colors, then the products will be in several shades with soft transitions.
So, the process of sculpting, begin with the familiar peanut with plasticine:
- give your child a piece of plasticine and give him the opportunity to mash him in pens
- show the baby how to pluck small pieces from the larger.
- teach your child to sculpt simple objects that are found in our daily lives. It can be a ball, bullseye, sausage, tortilla, drop, etc.
I will dwell a little on the correct manufacture of simple elements:
To make a ball or ball, you need to pinch off a small piece of plasticine and roll it in circular motions between two palms or between your palm and a modeling board, forming a spherical shape.
A bit simple to do if you have already rolled up the ball (ball). Just pull one end out of it, giving the ball a droplet shape.
To make cube it is enough to compress the plasticine ball from all sides, evenly pressing it to a flat surface. Align the edges with a flat modeling stick so that all sides are proportional.
If you want to form sausage, then take a piece of plasticine and roll it between the palms with reciprocating movements. If you need to make a strip, then put the sausage on the modeling board and press it with your finger over its entire surface, making it flat. A cake can be made from a ball by pressing it with a palm or finger on a modeling board.
From a droplet you can make a quadrangular pyramid by squeezing it evenly on four sides using the cube formation method.
We sculpt figures and compositions from plasticine:
The next step may be to extrude various figures from plasticine. To do this, in addition to plasticine, you will need: a special rolling pin or an ordinary rolling pin for dough, a board for plasticine and a set of shapes or figures. Take a piece of plasticine and roll it with a rolling pin until an even layer is formed. Usually, if the child is two years old, then this is done by the mother, and when the baby is older, it will easily cope with the task. Show the child how to squeeze out figures of various shapes from the bed. If you do not have special forms, then instead of them you can use lids from under the jars, pasochki for playing with sand, as well as forms for cookies.
You can also show the peanut how to cut plasticine with a plastic knife into rectangles, squares, triangles, etc. if you cut the sausage, you get rings.
Worked out, and now you can play ...
When the baby has learned to sculpt the simplest figures, you can play in their comparison. To do this, ask him to make a small sausage and a large one so that he can feed two toy dogs for fun: one small and the other large. Then you can ask the child to roll three balls of different sizes, and then blind them together to make a snowman. If the baby does not know: how to make one ball smaller than the other, then tell us that you need to pinch off the unnecessary amount of plasticine and then the ball will become smaller.
The next step in teaching a two-year-old child how to sculpt is to teach him how to make simple compositions.
From a flattened ball - you get cookies; from several flattened balls, stacked one on top of the other - we get a cake; from the same flagella, interconnected, like links - a beautiful chain will come out; and if the flagellum is twisted in a spiral and flattened, you get a rose bud.
Plasticine is often used in the manufacture of crafts. It can be all kinds of animal figures, cars, dolls. But sooner or later, the fantasy ends, and the question arises, what else can be molded from plasticine? If various children are already tired, then try to create a picture for him, or you can even come up with a whole plasticine story.
What is good modeling for a child?So, modeling exercises contribute to the development, and accordingly the speech of the baby. DIY paintings made of plasticine contribute to the formation of a child’s own artistic taste, which will be useful to children in the future, especially those who are interested in painting.
Where to begin?As you know, to make something out of clay, you need ideas. Therefore, this kind of creativity should begin with an idea. Only after you and your child decide what you want to do, you can begin to select the necessary materials.
Typically, modeling does not require a large number of tools and devices. To do this, just some plaque, a glass of water, a plastic knife, and, of course, can not do without plasticine. By choosing the latter, you must approach with all responsibility.
How to make a picture of plasticine on glass yourself?First you need to prepare the tools. To make a picture of plasticine on glass, you will need the following tools:
- wax-based plasticine;
- small glass (10x10 cm);
- thick cardboard;
- frame for future painting;
- a container of water (a small plate will be enough).
If you are modeling for the first time, it is better not to use complex, with a large number of elements, plots. You can start, for example, with flowers.
For their manufacture will need a large number of knives. At the same time, they should all be plastic, because plasticine strongly adheres to metal, and instead of sculpting a picture, you will be engaged in unsticking it from metal knives.
Before each contact of hands with plasticine, it is best to moisten them in water. Then, having dried with a paper towel, they begin to smooth the plasticine. If children work with glass, it will not be superfluous to paste over its edges with masking tape, and it is best to use organic glass for such creativity.
The selected plot, a picture with flowers, gently pinned under the glass and fixed with tape. Then, softened plasticine is necessary to color, knead in the hand until it becomes plastic. After that, they begin to fill in monochrome sections of the picture. At the same time, they begin with the largest parts: petals, pestle, stalk, etc. It's okay if the child goes a little beyond the boundaries of the contour. All errors are easily fixed by cutting the stack with an unnecessary piece of plasticine.
The background is usually filled with plasticine, the color of which is contrasting, with respect to the main elements of the picture. 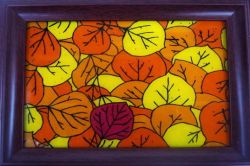 Also, instead of the background, you can use a piece of colored paper that is glued to the back side glass.
Thus, element by element is glued to the glass, smoothing them carefully so that the picture will please its creator for a long time. Also, to extend the life of such a picture, you can cover it with transparent nail polish.
Thus, having decided that you want to mold children from plasticine, you can begin to implement the idea for modeling. In the manufacturing process, try to make the child sculpt as much as possible independently, and you only prompt him and correct his mistakes a little.
A popular activity for the development of a child’s motor skills, abstract thinking, artistic taste.
What to sculpt?
In principle, you can sculpt from everything that sticks. Plasticine, modeling masses, modeling dough - all this is sold in stores. But try to ensure that the purchased product meets the conditions:
- the mass should not dry too quickly (the industrial "dough for modeling" sometimes quickly becomes unsuitable);
- there should not be a sharp tasteless or strongly aromatic smell;
- pieces of mass stick well to each other, but not to hands;
- don't get dirty.
Plasticine
Plasticine is the most common modeling material.
Most likely, you will not be able to immediately buy plasticine that meets all the requirements. Personally, we approached the soft plasticine “Kroha” produced by the chemical plant “Luch”. there is good plasticine wax based.
Modeling dough
You can buy it, but you can do it yourself (very quick and easy).
Recipe for salt dough for modeling:
- 2 cups of flour;
- 1 cup of fine salt;
- 1 glass of water;
- 2 tbsp vegetable oil;
- food colors optional.
Some recipes include the addition of 2-3 tbsp. tablespoons of lemon juice. The finished dough can be divided into parts and add different food colors to them, knead.
The dough is very pleasant, soft. It can retain its properties for up to a month if stored in a bag (or in a hermetically sealed jar) in the refrigerator. But usually, nevertheless, after the game you have to throw it away because of the large number of “foreign” particles that appear in it, or as a result of coloring :)
The finished version that we tested is Color Puppy modeling dough. In the declared ingredients, he also has only water, salt, flour, food colors. The kit included molds, a roll for rolling, a “syringe” for extrusion, and dies. The dough sticks in the set are small, but many colors.
Popular Play Doh
Play Doh (in Russian it reads “play-do”) is a popular brand for sculpting. Contains wheat gluten, water, salt. Enough for several sessions of the game. Then gradually the mass dries up, begins to crumble.
Play Doh is an entire industry. The manufacturer produces not only the mass itself, but also many "accessories" and tools for playing with it.
For example, a 2.5-year-old child likes a turtle-shaped press. The upper block is movable, you can twist it around the axis - and when pressed, "sausages" with a cross section of different shapes will be obtained. Then they can be used to continue the game. For example, flat "pasta" in our place as a road, which then drive button cars.
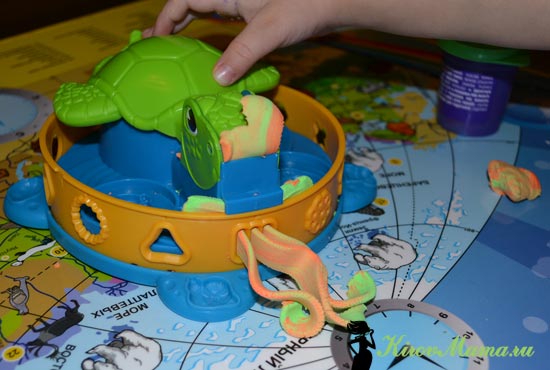

Play Doh is the same consumable as dough. Therefore, if you like it, and if you come across a sale (for example, sometimes it happens in the Children's World), you can immediately buy several packages.
Other options
Ball clay.
Ball mass for sculpting is positioned by manufacturers as follows: "light, airy, interesting in texture and does not stick to hands, hair, clothes and work surface at all." Well, of course, there is some truth here. But our purchased mass (they took the middle price category) didn’t really like me. The figures in the attached instructions were beautiful, but in reality the mass did not hold its shape well. Separate balls stuck to the palms (the daughter spread her fingers, she did not like it, asked to be removed).
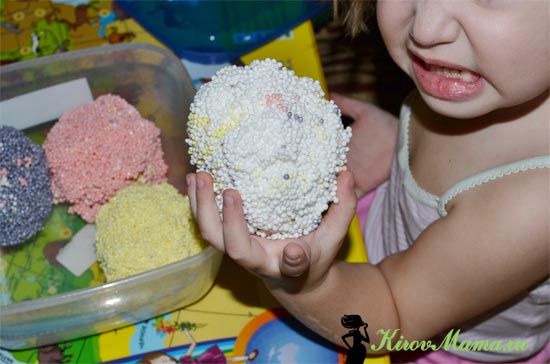
You can make volume applications from ball plasticine (lay it right on the table). True, sticky marks remained on the table after class.

Another (so far the last of the found) minus is that the colors are confused, after the game they cannot be completely separated from each other.
Addition: I want to write a few words about the modeling of ball clay after some time. My daughter grew up (almost a year has passed since the publication of the article, she’s about 4) and she does not disdain this mass. From time to time, she recalls, asks to get something, takes pleasure in something (cakes, “cookies”, some of her monsters with strange funny names: Aikidon, Gilikimen and so on, where only she takes these names similar to the names of the Scandinavian gods ?). The mass has not yet lost its sticky properties. But the colors are completely and irrevocably mixed.
Kinetic sand.
From kinetic sand, you can sculpt simple shapes - balls, ellipsoids, cubes. You can combine them with molds, build locks. This, of course, is not exactly modeling in its pure form, but it is an interesting texture, sensory diversity.

Modeling with a small child
If the child goes to a day nursery, then modeling classes take place there. Usually in the locker room, groups post a magazine with a description of the activities. You can see what the kids are doing (to have an idea and develop the acquired skills).
The easiest lessons - the first steps in modeling
First you need to get acquainted with the material, get used to it, "feel". Make a cake. Let the child poke a finger on the surface. You can use this surface for application (crush peas). This lesson is generally suitable for children from 1.5 years.

We divide into parts. You roll a sausage, the child tears off even pieces from it. This exercise can be expanded: use the resulting pieces for application. For example, draw a tree - let the baby stick apples (or leaves) on it.
We roll sausage and balls. This exercise is already for kids. For the first time, show your child how to roll a sausage on a work board / surface. When it turns out, let him try to roll between his hands. Same thing with balls. First, roll the palm in circular motions on the table, then between the hands.
Fingers. After we learned how to roll sausages, we make fist. We pinch the edges of the sausage together.
The simplest exercises when working with dough / soft mass:
- spanking;
- pinches;
- pressure (you can "flatten" the balls).
And a few more tips.
Combine materials and textures. Also a well-known example. You make a hedgehog out of plasticine, and the child inserts him with toothpicks.
Use as part of a game or developmental activity. Connect your imagination and think about where else you can use clay or mass / dough.
I will give an example. We studied birds, on a walk listened to their singing, looked for nests in the trees. At home, after sleeping, they did sculpting ... also a nest! I blinded the base, and my daughter decorated it with counting sticks, and then I planted figures of birds inside.

Do not be lazy and do not be afraid of cleaning! I always give this advice, it is relevant for any occupations with a crumb. Let you have to work with a spatula yourself, scraping plasticine from the table, but do not stop the child when he, enthusiastic, expands the surface for the game.
additional literature
1. With all my heart I want to recommend a book Natalia Kostikova “Creativity with kids. Drawing, modeling, games with children under 3 years old (in the Labyrinth, on Ozone). I didn’t have such a book, by the time of its publication my daughter had already grown. But I’ve been reading Natalya’s blog for a long time (it’s very beautiful, it’s not only about the development of children, but generally about creativity and needlework). We have kids of the weather, so it’s interesting to follow the development and work of her son. It happened more than once that the day after the publication on her blog of a post describing an activity, I suggested that Dasha do the same. The book is a whole encyclopedia, in it there are more than 70 detailed workshops and ideas that you can translate into lessons with your baby. Yes, I know that now everything can be found on the Internet (I do just that). But with the Internet it often happens like this: there are a lot of bookmarks in the browser, and when you need it, nothing is ready for the lesson, not selected, etc. type requests in Yandex. In my opinion, it is much easier to organize periodic classes with a book.
The book is also a great option for a present for busy mothers.

2. The modeling book, which I am delighted with and which helps to diversify our activities with plasticine, Secrets of Plasticine by Roni Oren (You can buy a book in Ozone, in the Labyrinth). This is still basically a manual for me, but my daughter, at 3 years old, shows great interest in this book, considers, tries to sculpt something. Most importantly, she sees the potential of plasticine as a material for creativity.
The book has many detailed instructions and entire scenes, molded from plasticine.

This book is just "Secrets of plasticine." And there are also “Secrets of plasticine. Dinosaurs "," Secrets of plasticine. New Year"And, like, some other thematic books.
3. You can also see a little book E. A. Yanushko “Modeling with young children”. The Mosaic-Synthesis Publishing House, in that form, was no longer reprinted. I took it to a regular children's library. In a book aimed at kindergarten teachers, the activities of children with dough, plasticine are laid out on shelves: from the simplest to the more complex. Here is an example of a book spread, as you can see, everything is sooo detailed (click to view full size):

This brochure has now been republished by Vlados. It is revised, supplemented (the volume increased by about 2.5 times, new illustrations, color inserts were added). So if you are a teacher, then the book of Elena Yanushko “Modeling with young children. 1-3 years. A toolkit for teachers of preschool institutions and parents "(buy in the Labyrinth, buy on Ozone) can be very useful for you.
There you will find everything from acquaintance with the material (pressing, pinching, smearing, rolling sausages / balls, etc.).