Children love to sculpt from plasticine something with which they can later play, inventing various plots and stories. Very often, kids ask their parents to help them make a human craft from plasticine, which at first glance may seem like a very complicated and time-consuming process. We offer you a simple master class on sculpting a person from plasticine, thanks to which even a child preschool age will be able to cope with this task.
How to make a man out of plasticine in 7 minutes?
A simple way to make a man out of plasticine will not take you more than 7 minutes and, in addition, a 4-5 year old child can make such a plasticine hero himself. All you need is colorful plasticine, a knife and toothpicks.
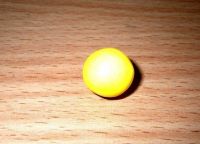
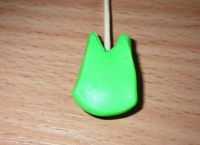
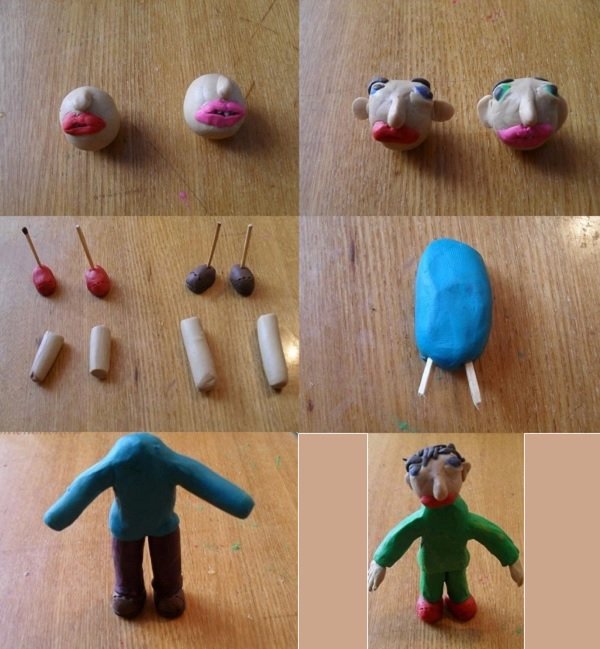
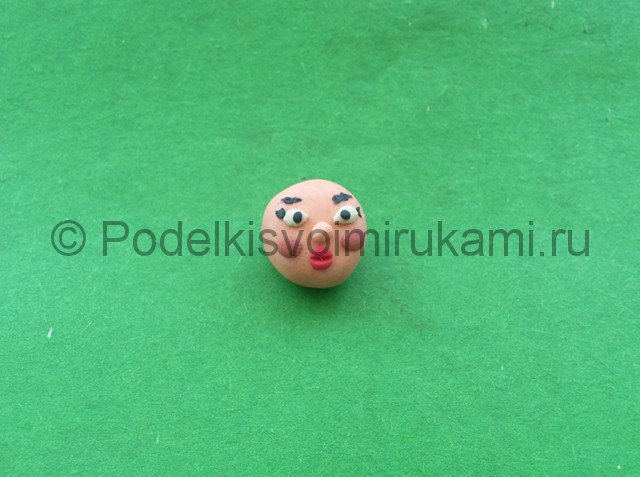
- We begin to sculpt a man from plasticine from the head. Let's take yellow plasticine, roll it out into an oval and make recesses for the eyes and mouth.
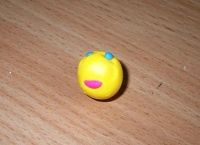
- We sculpt the face: roll out small blue balls for the eyes and a small pink sausage for the lips. We insert the eyes and mouth into the special recesses and apply a little pressure.
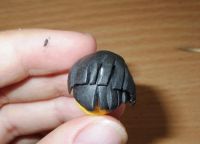
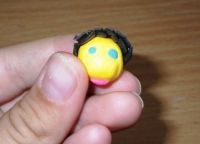
- We sculpt the hair: we roll the ball, then press it with our palm, making it flattened. Using a knife, we cut small strips - hairs and apply our hairstyle to the head.
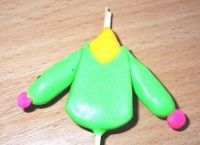
- We sculpt the torso: cut out a collar from a rectangular piece of plasticine with a knife and attach a sausage made of complexion-colored plasticine to it - this will be the neck of the man. Then we roll two sausage arms, insert toothpicks into them and attach them to the body. We also insert a toothpick into the neck and attach the head to the body. Thus, our little man’s head and arms will be movable.
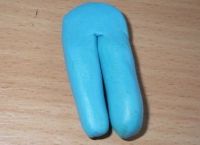
- We sculpt the legs: cut a rectangular piece of plasticine in the middle, but not all the way. We roll out two ovals – shoes – from dark-colored plasticine and connect all the parts using toothpicks.
 |
 |
 |
 |
 |
 |
 |
 |
 |
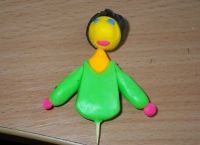
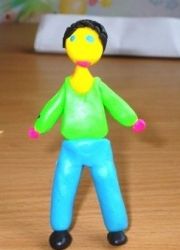
The plasticine man is ready!
How to make a real man from plasticine?
Older children, of course, want everything to look much more natural, so for them we have the idea of sculpting a person with natural facial features. For this we will need sculptural and colored plasticine, a bowl of hot water, a knife and toothpicks. In the absence of sculptural plasticine, to obtain flesh-colored plasticine, you can mix ordinary plasticine in the following proportions: white - 6 parts, red - 2 parts, yellow - 1 part.
 What kind of heroes can be molded from plasticine?
Remember: how long have you held plasticine in your hands? So long ago that you can’t even remember? And now your own children are asking you to help them make a man out of plasticine? We give you a great chance to please your children, have a great time with them, and at the same time remember how to sculpt funny figures!
Preparation of materials
To make a plasticine figurine of a person you will need:
- A box of plasticine in several colors, including white;
- Matches or toothpicks (you can also use wire - then it will be easier to give the little man any pose);
- Stacks;
- Backing made of oilcloth or thin plastic.
Modeling and step-by-step assembly of the figure
Plasticine, in addition to being easy to process, is also good because its different colors can be mixed in the same way as paints. To get a flesh color, take a piece of white plasticine, pinch off a little orange or light brown, heat the plasticine in your palms and thoroughly knead and rub it until it is a uniform color. In the same way, you can make other shades that are not in the set.
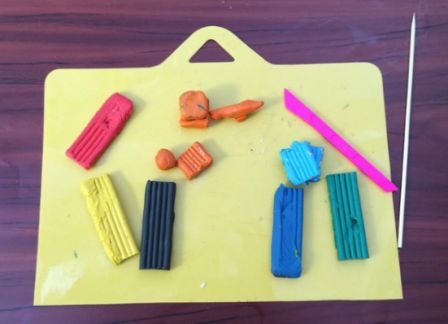
- We choose which colors we will use in our work. By mixing we get the missing ones.
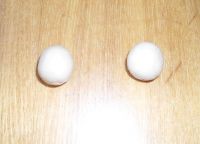
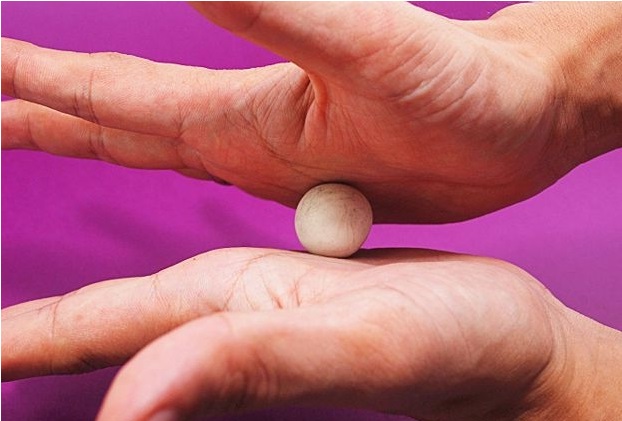
- Using a stack - a plastic knife - we separate pieces of the required size from the plasticine bars and roll them into balls: one large and two small flesh-colored balls. This will be the head and hands.
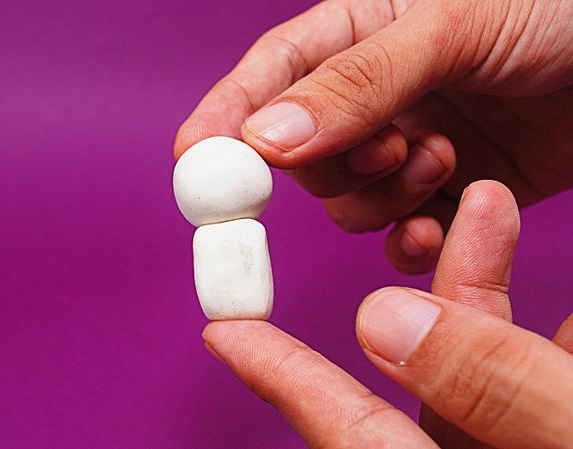
- From a block of any other color you choose, in which you want to “dress” your little man, we make a blank for the body: we roll a ball slightly larger than the head, slightly flatten it on the sides, giving it a slightly elongated shape.
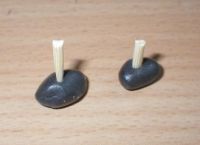
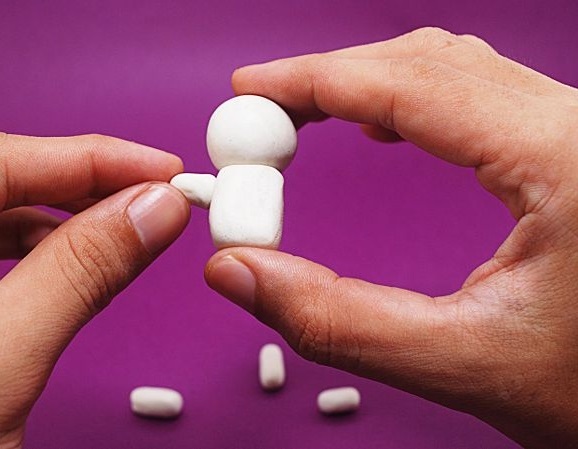
- To make hands from plasticine of the same color as the body, roll two small balls and roll each into a “sausage” shape. We sculpt the blanks for the legs in the same way as the arms, only of a different color and larger: we take more plasticine and make thicker “sausages”. If we want our little man to be able to stand in a standing position, we place toothpicks inside his legs as a frame. For the shoes we sculpt two small dark balls, slightly larger than those we prepared for the hands.
- Using a stack, we make a slit on the man’s face: this will be the mouth. You can insert teeth from tiny white balls into it - but this is only if you want to create a very filigree work. Along the slot we will stick two thin pink stripes - lips. We attach the nose a little higher - it can be sculpted in the form of a small ball or droplet, or you can not sculpt it at all if it doesn’t work out. For the eyes, take very small white balls and flatten them into flat cakes; We stick tiny black pupils on top. For hair, you can mold a lot of thin flagella, or you can simply apply a thin layer of plasticine of the desired color to your head and make a stack of notches or draw stripes with it, imitating strands.
- For the hands, attach balls - hands - to the prepared “sausages” and flatten them slightly. We make notches with a stack - fingers and trim them. For the legs, in the same way, we attach shoes to the prepared “sausages” - dark balls, which we first give a slightly oval shape.
- We form the body of a man, stick two halves of a toothpick from below, onto which we attach the “sausage” legs. Carefully apply the places where the parts are attached to each other for strength. Where it is difficult to reach with your fingers, we use a thin stack. But the arms can be attached to the figure’s shoulders without using a frame - there won’t be much load on them.
- We also carefully attach the head to half a toothpick, and cover the neck with the stack.
- You can refine small details: fashion buttons, a belt or jewelry, and carefully place them on the figure.
- We give the finished little man the desired pose and strengthen him on a stand made from a large ball flattened into a cake. You can make several people and make up funny scene with them.
Video
To learn about ways to sculpt human figures from plasticine of varying complexity, watch the following videos. After all, even professional artists use plasticine at various stages of work, and amazing works come out of their hands!
Let's see how to mold a person from plasticine, especially since you found the time for this and prepared colored plasticine, matches or toothpicks (to hold the parts of the body together). Who he will be - decide for yourself, just maintain the proportions of the torso, arms and legs, otherwise you will end up with an alien, and not an earthly man!

As usual, we tried to select two simple instructions: in pictures and in video. We hope you make a wonderful plasticine man.
1. Video instructions.
So let's get started. To get started, take a look at the video below. In this instruction you will need wire in addition to plasticine of various colors. We need wire to make a “skeleton” for our plasticine man. Then this skeleton is “covered” with plasticine, which is given shapes:
Have you looked? Then we can move on to a simpler diagram in pictures.
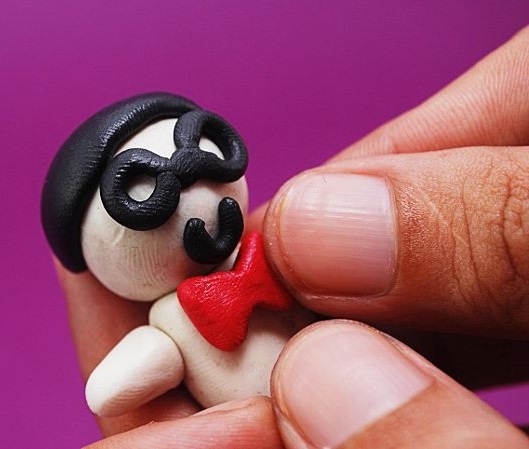
2. Scheme in pictures of how to quickly make a man out of plasticine Here the little man will turn out to be creative, just like in an advertisement.
So, we will need plasticine of several colors.
Step one: roll a ball of white plasticine, this will be the head of our little man.
Step two: make a rectangle out of plasticine of the same color.

Step three: connect the body to the torso.
Step four: attach the arms and legs
And the last step: we need to make a hat, eyes, mouth and, if desired, a bow. The eyes can be made from two plasticine bagels, or from two small black plasticine cakes, onto which white balls are stuck. Mouth - simply form a letter C and secure below the eyes as shown in the picture. The final touch is the butterfly. Although you can wear a tie
 Plasticine for children's creative activities and fantasies is the most ideal and suitable material. It is obedient and flexible, made from real, natural materials that are beneficial for the skin (clay, fats, etc.). And what joy such creativity brings to children - one block can be repeatedly transformed into various characters or objects - you just have to decide who it should be today!
This article will present master classes on how to mold a person from plasticine in stages (step-by-step photographs and a selection of training videos are attached). In particular, it will be discussed how you can sculpt a figurine of a girl; it will also be explained how you can make figures of some of the most famous and beloved movie and comic book characters by children - Spiderman and Ironman.
Educational videos
This article will offer a selection of videos that will demonstrate the processes of sculpting the head, face and body of a person. It will also be shown how to sculpt characters from famous films.
Let's sculpt a girl
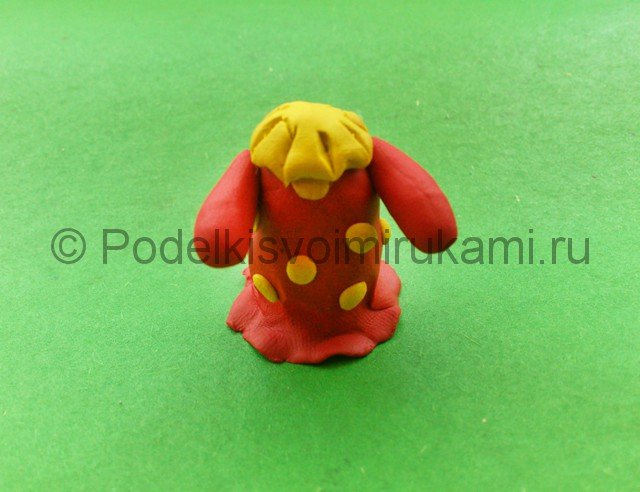
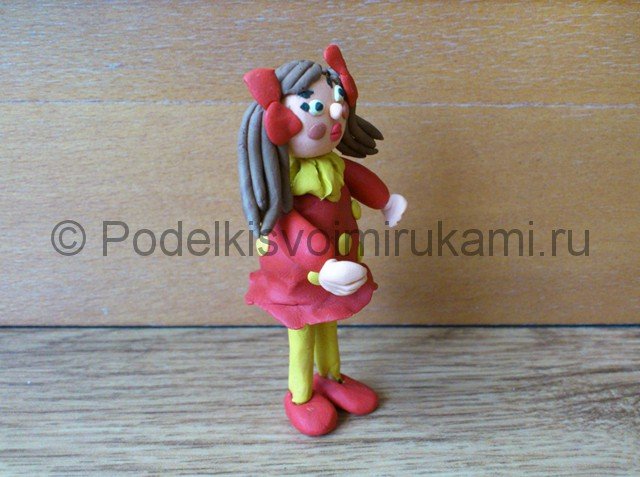
The first master class will be devoted to the process of sculpting a girl figurine. In order to mold a girl from plasticine, you will need plasticine of several colors, namely: red, pink, yellow, beige, white, brown and matches.
You need to start the modeling process by modeling a dress; to do this, you need to form a cone-shaped part from a piece of red plasticine, then stretch the plasticine in a circle so that you get a skirt. Then, using a different color, you can apply a pattern to the skirt, for example, you can make a polka dot skirt using yellow plasticine. Next, you should make a cake from the yellow color, then you need to make cuts on it and attach it to the top of the cone-shaped part. Then you need to make sleeves from red and attach them to the dress.
In order to make a head, you need to form a ball from beige plasticine, then you need to attach eyebrows, eyes, nose, lips and cheeks to the front part. To make hair, all you need is brown form thin sausages, collect several sausages to form tails, and attach them to the head. You can also make hairpins from red. After this, the two resulting parts must be connected using a match. Next, you need to stick two matches with yellow plasticine, make shoes, attach the parts to the main parts, and the craft can be considered ready.

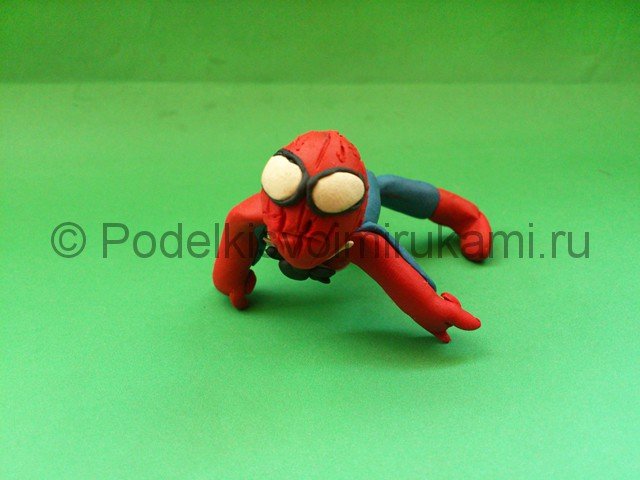
Spiderman
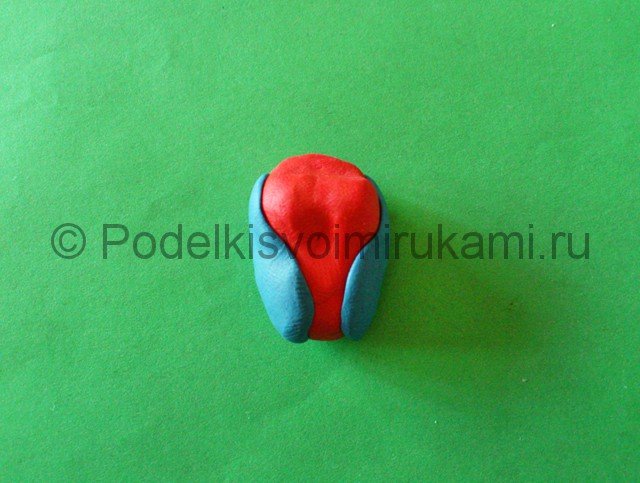
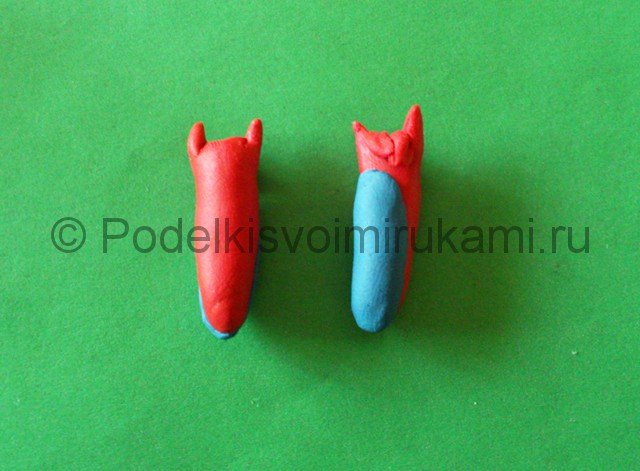
The second master class will describe the process of sculpting Spider-Man. To work you will need red, blue, black and white flowers. The red color should make the hero's head in the shape of an oval; two large eyes made of white plasticine with a black edging should be attached to it. In order to make a torso, you must first sculpt a torso with muscles from red plasticine, then attach thin layers made of blue. In order to make hands, you need to form two red tubes and add blue inserts to them, and to make legs you also need to connect pieces of red and blue plasticine. The resulting arms, legs and head can be attached to the body using matches. You can also attach a web of black plasticine to the back.

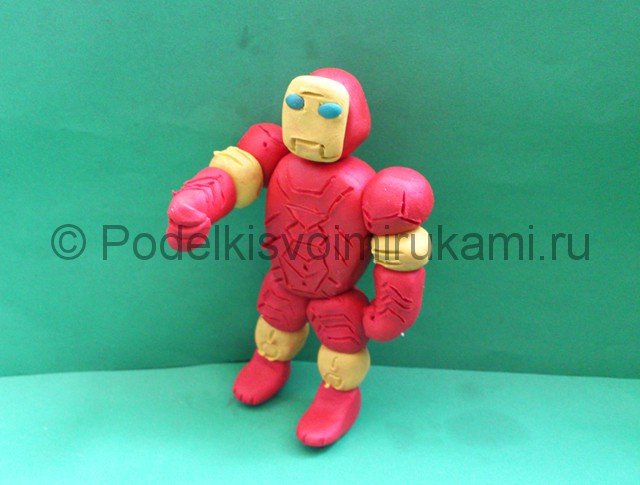
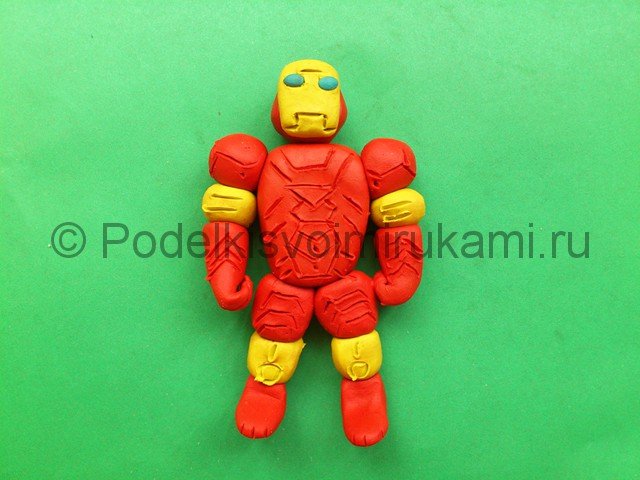
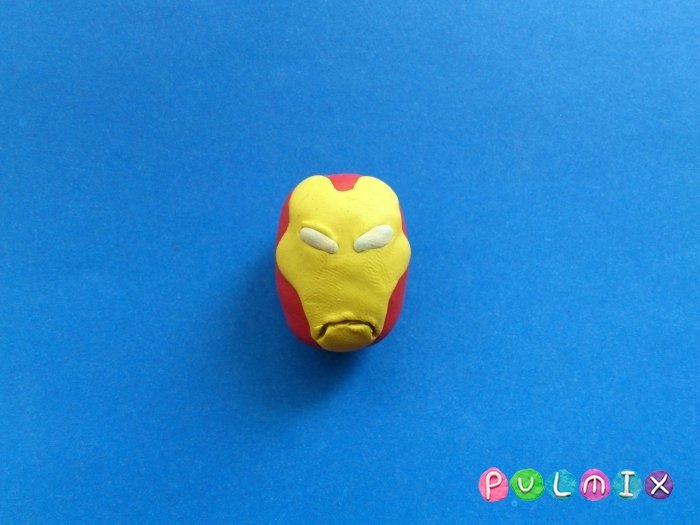
Iron Man Tony Stark
The third master class will tell you how to make an iron man figurine. To work you will need red and yellow plasticine. First, a diamond-shaped head with slightly rounded corners should be formed from red. On top you need to attach a square made of yellow plasticine. The body should be made from a piece of red color, clearly marking the shoulder line. Arms and legs can be made using yellow and red balls, alternating them. Using a spatula, cuts must be made on all components. At the final stage, all the parts should be connected, and the toy is ready.
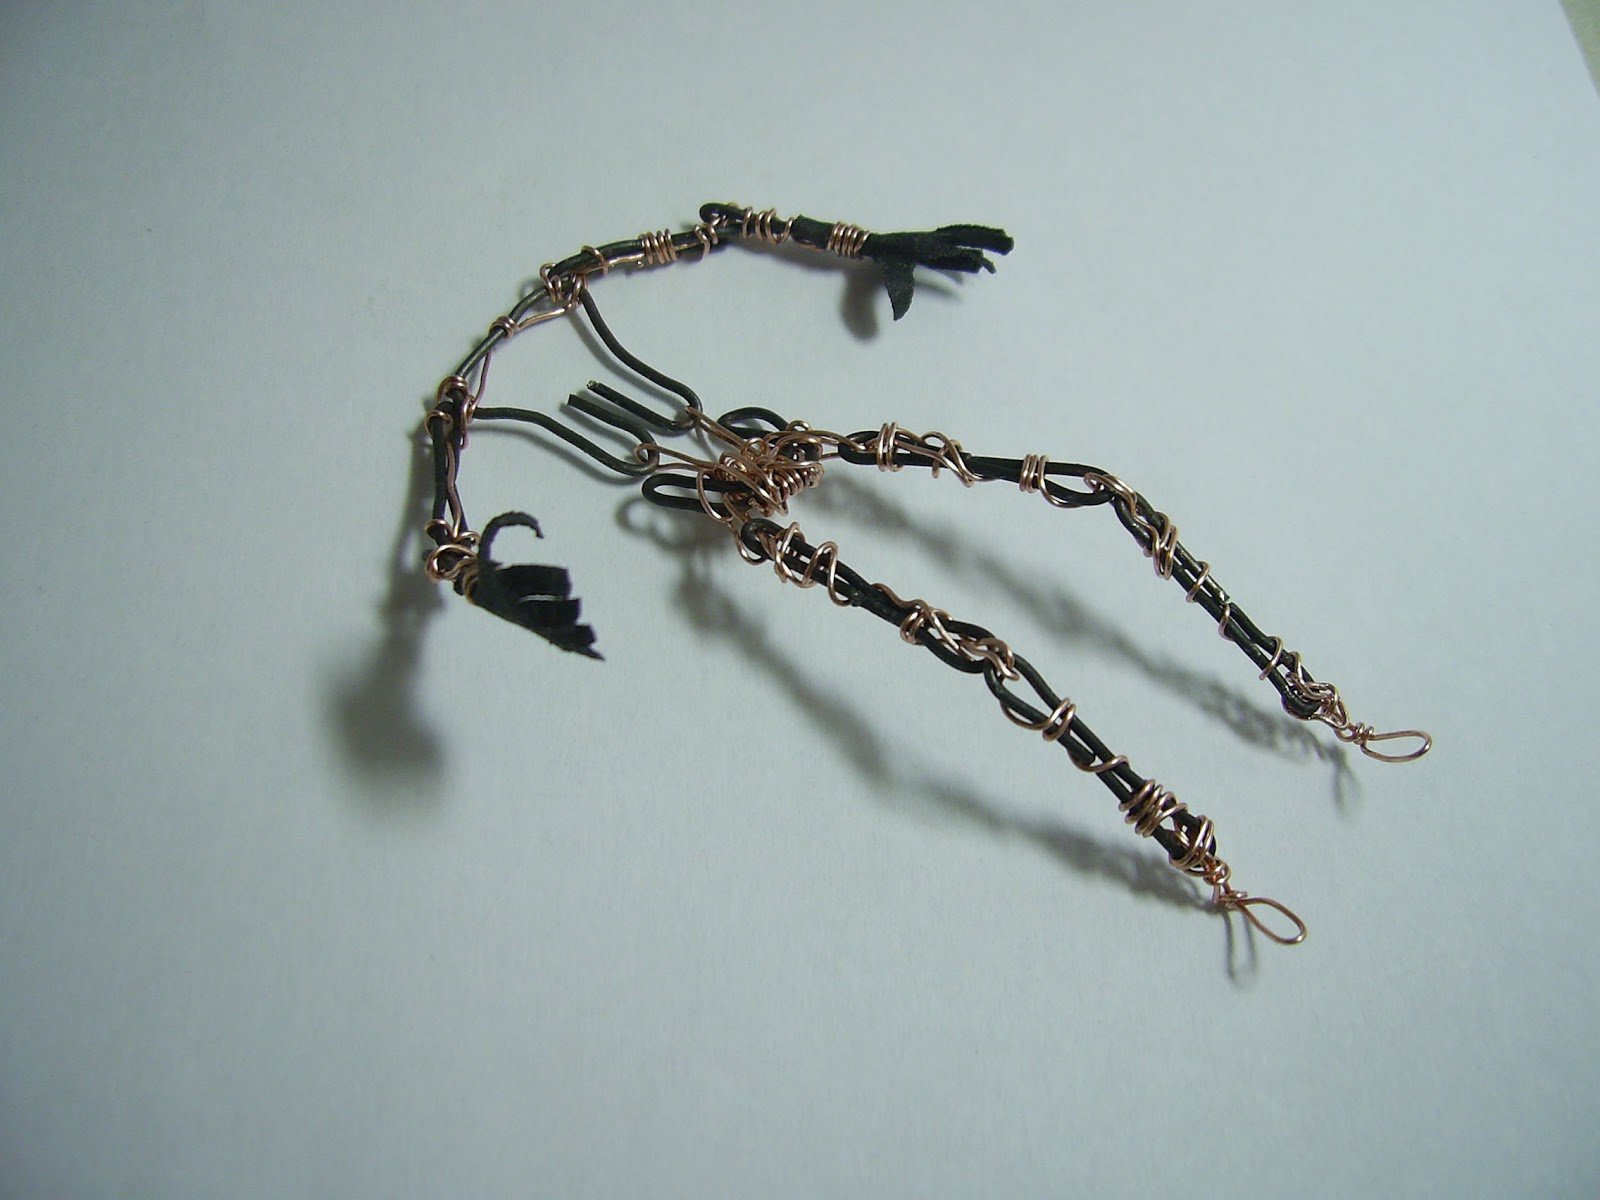
Human figurine on a wire frame
A human figurine can also be made using plasticine and wire. In this case, the process of creating a human figurine consists of two stages: at the first stage, a frame skeleton is formed from wire, and at the second stage, the skeleton is pasted over with plasticine. The stages of work are shown in the photo.
Many children love to sculpt from plasticine, especially their favorite characters from fairy tales and cartoons, whose figures they can later play with. Most often these are all sorts of little animals and people. We will show you how to mold a person from plasticine step by step in our article with detailed instructions.
Many parents have at least once asked the question - how to mold a person from plasticine, how to explain this to a child step by step and as clearly as possible? At first glance, a rather complex task turns out to be simple in practice. The main thing is maintaining proportions and knowing the basic anatomy of the human body. In any case, they will help you detailed instructions with photo.
Workplace of a small sculptor
- First of all, you need to prepare a place for modeling. Place oilcloth on the table where classes will be held. The surface must be sufficiently illuminated. Put your child on an apron or clothes that you don’t mind getting dirty.
- Prepare all required materials and tools. First of all, it is plasticine.
- For the youngest creators, modeling dough or soft plasticine is ideal. It is very pliable, it is easy to make koloboks, sausages and simple children's crafts from it.
- Ball plasticine, consisting of small foam balls, is useful for those who do not want to get their hands dirty.
- Medium-hard plasticine is used for older children. When heated, it becomes softer, but as soon as it cools, it hardens again. This material also holds its shape well, so more complex figures can be made from it.
- And finally sculpture plasticine, which is intended for wireframe modeling.
From the tools you will need a plastic knife - a glass, toothpicks and a bowl of water.
We sculpt a simple man together with the baby
Modeling individual parts can be somewhat difficult for young children. It will be much easier to roll the plasticine into a block and then “pull” a figure out of it. If this is your child’s first modeling experience, first show him how simple shapes like balls and sausages are sculpted. After a little training, you can begin more complex tasks.
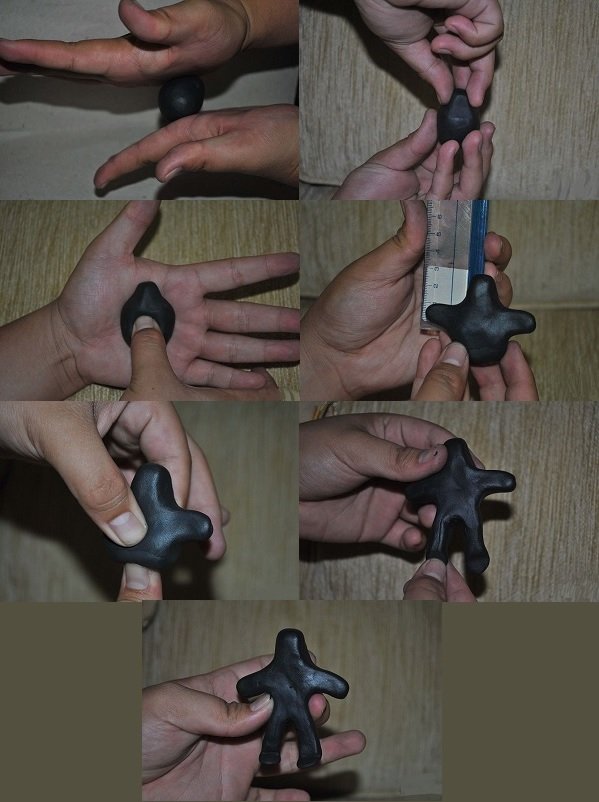
So let's begin. Take a block of plasticine and knead it well. Give it the shape of a cylinder.
Press the top of the block with your fingers to form a head.
Squeeze the cylinder slightly in the middle and extend the man's arms on both sides of the body. Divide the lower part in two with a longitudinal cut to create legs, and round the edges.
You can leave the finished craft as is, or add details, such as hairstyle and clothes, turning the figurine into a girl or boy.
It’s interesting to sculpt simple people, but even more interesting to sculpt famous superheroes!
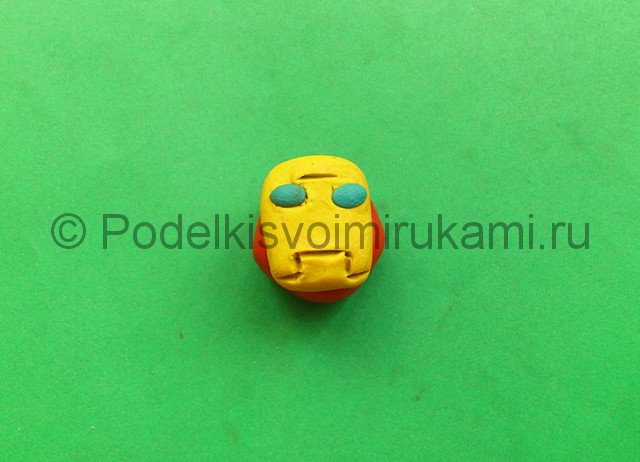
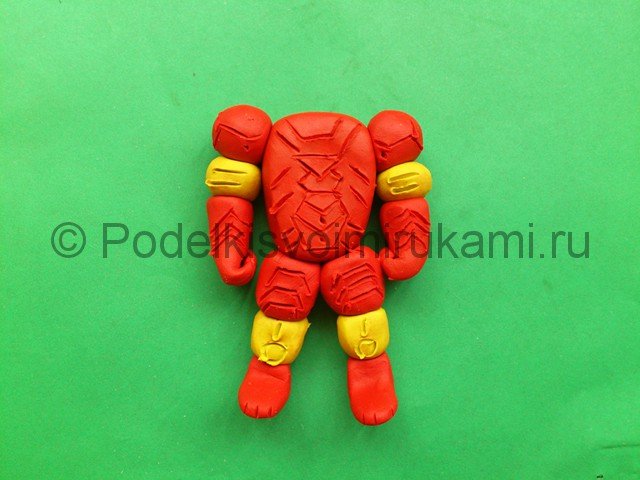
Making an iron man from plasticine
You will need one block of yellow and two red plasticine. Other similar shades, such as orange, will also work.
Make a red oval, and then glue an oblong yellow cake to it, having previously cut out something like a diamond-shaped mask from it. Use the stack to cut slits for the eyes and mouth. In place of the eyes, stick a couple of elongated pieces of white plasticine to give a glowing effect.
Squeeze out round elements of the mechanism on the sides of the head.
Let's start sculpting the upper body. Take some more red plasticine and make a part in the form of a trapezoid. Draw diamond-shaped stripes on it, and place a white LED in the middle. Cut a rectangular notch at the bottom.
Attach red balls to the sides - shoulders. Extend them with yellow details in the form of cubes, draw stripes on them. Make the forearms and hands in the same way and attach them in place. For greater strength, you can connect the parts by placing them on pieces of toothpicks and wire.
Continue the armor by adding a belt area to the torso. Combining red and yellow colors, blind the hero’s legs. Assemble all the parts together and place the craft in the refrigerator to harden. After this, the Iron Man figurine can be played with.

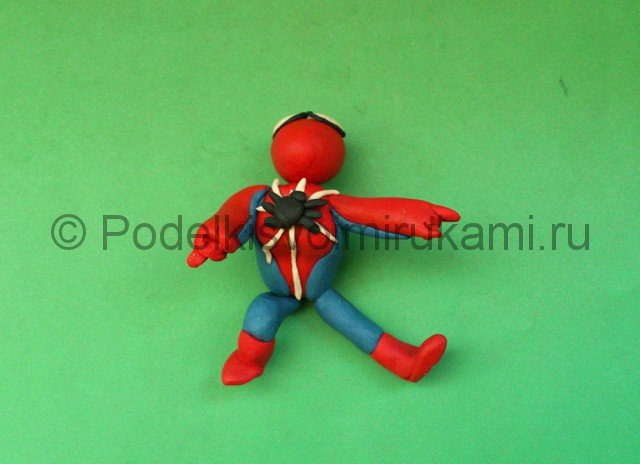
Making a plasticine Spider-Man
Prepare plasticine in four colors - red, blue, white and black.
As usual, let's start with the head. Roll a small red ball and stretch it out, making an oval head. Using the flat side of a knife, squeeze out two holes under the eyes.
- Blind large white eyes, without pupils, in a black frame, and attach them to the head.
- The head is almost ready, let's move on to the body. Make a neck and body from a piece the size of a matchbox. Press the plasticine at one end, highlighting the belt, and at the other, stretch the neck. Attach two blue flat pieces to the sides, symmetrical to each other.
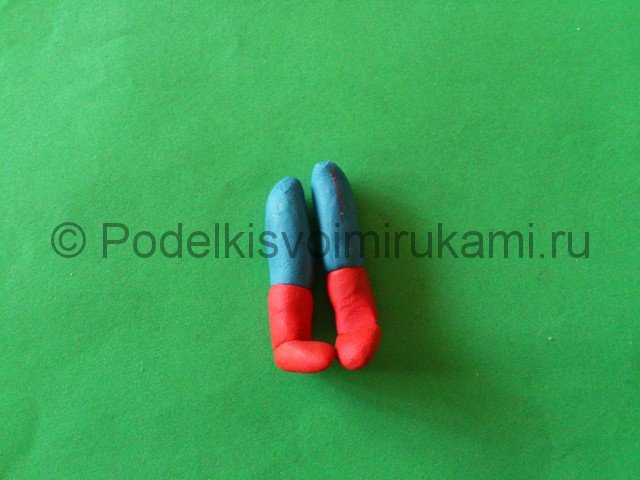
- To sculpt the hips, bend the plasticine sausage in two without closing the parts. Give the part relief by pressing and rubbing the material. Highlight the knees with small tubercles and attach high red boots.
- Make your arms slightly bent by combining the red and blue parts of the superhero costume.
- Assemble the entire Spider-Man by attaching the head, body, legs and arms together.
- All that remains is to apply the design of the web to the suit. Draw it with a stack, first hooking a little black plasticine onto the tip of the tool. Add dye as you use it up.

Pay a little attention to the attached video lessons on the topic of sculpting human figures from plasticine.
Video