Preface
The goals, basic principles and basic procedure for carrying out work on interstate standardization are established by GOST 1.0-92 “Interstate standardization system. Basic provisions" and GOST 1.2-97 "Interstate standardization system. Interstate standards, rules and recommendations for interstate standardization. Procedure for development, adoption, application, updating and cancellation"
Standard information
1. PREPARED by the All-Russian Institute of Scientific and Technical Information of the Russian Academy of Sciences and the Moscow State University of Printing Arts
2. INTRODUCED by the Federal Agency for Technical Regulation and Metrology
3. ADOPTED by the Interstate Council for Standardization, Metrology and Certification (Minutes No. 33 of June 6, 2008)
|
Short name of the country |
Code of the country |
Abbreviated name of the national authority |
|
Azerbaijan |
Azstandard |
|
|
Armenia |
Armstandard |
|
|
Belarus |
State Standard of the Republic of Belarus |
|
|
Kazakhstan |
Gosstandart of the Republic of Kazakhstan |
|
|
Kyrgyzstan |
Kyrgyzstandard |
|
|
Moldova |
Moldova-Standard |
|
|
Russian Federation |
Federal Agency for Technical Regulation and Metrology |
|
|
Tajikistan |
Tajikstandard |
|
|
Turkmenistan |
Main State Service "Turkmenstandartlary" |
|
|
Uzbekistan |
Uzstandard |
|
|
Ukraine |
Gospotrebstandart of Ukraine |
4. This standard has been developed taking into account the main regulatory provisions of the international standard ISO 5776:1983 “Printing technology. Proofreading signs for text "(ISO 5776:1983 "Graphic technology - Symbols for text correction")
5. By Order of the Federal Agency for Technical Regulation and Metrology dated August 25, 2008 No. 184-st, the interstate standard GOST 7.62-2008 was put into effect as the national standard of the Russian Federation on January 1, 2009.
Information on the entry into force (termination) of this standard is published in the “National Standards” index.
Information about changes to this standard is published in the “National Standards” index, and the text of the changes is published in information signs “National Standards”. In case of revision or cancellation of this standard, the relevant information will be published in the information index “National Standards”
GOST 7.62-2008
INTERSTATE STANDARD
Date of introduction- 2009-01-01
1 area of use
This standard applies to proof marks for marking publishing (author's) text and graphic originals and for correcting proof and proof prints (hereinafter referred to as marks) of all types, establishes requirements for their style and purpose, regardless of their nature (manuscript, proof print, etc.). d.).
2. Normative references
This standard uses references to the following interstate standards:
4. General provisions
4.1. The signs established by this standard are used for marking publishing (copyright) text and graphic originals of all types, made in accordance with GOST 7.89, as well as for reading proofs during publishing preparation.
4.2. The proofreading work is carried out by the proofreader, the author (author's proofreading), the literary editor (editorial proofreading), and the art editor, who together with the artist checks the quality of reproduction of the iso-originals on test prints and gives instructions to eliminate the shortcomings of the reproduction, and also controls typesetting and layout.
The technical editor eliminates deviations from the markup of the original, from the technical rules of typesetting and layout: checks whether the proofreading of the author, editor and art editor does not cause re-layout and other violations.
4.3. The proofreader is obliged to bring the typing text into conformity with the original text, correct spelling and punctuation errors made during reading, proofreading and typing; eliminate violations of technical rules of typesetting and layout.
4.4. Basic conditions for effective proofreading:
The most important conclusions, definitions, arguments for the work;
Surnames, initials, titles, dates, numbers, names, quotes, particles essential for the accuracy of the publication; repeatable elements that, without comparison with each other, can differ to the point of opposites; cross-references, the inaccuracy of which changes the meaning;
Lines typed in capital font;
Words with a combination of letters in which a small mistake can grossly distort the meaning;
3) when reconciling, first check the lines in which corrections were made (line-by-line reconciliation), and only then read the texts completely for additional semantic control;
4) review proofreading corrections from the point of view of the proofreader, since during proofreading letters and punctuation marks are often missed, letters are not clearly written in, etc.
5. Rules for the use of proof marks
5.1. General rules
5.1.1. On a separate sheet accompanying both text originals and proofreads, it is necessary to provide a breakdown of the color (pencil or pen) with which the performers (author, literary editor, proofreader, art editor) made markings or corrections.
5.1.2. Marks indicated by different colors must be identical throughout the original.
5.1.3. When using correction marks, the following rules must be observed:
1) place correction marks for single-column typeset in small and medium formats on the right margin, and when typing in large formats or in multi-column typeset - in the nearest field;
2) the flags of the correction marks should be directed towards the field on which the mark is placed;
3) if possible, place proof marks on the margin against “your” line;
4) repeating the same correction marks to correct different errors on one print is allowed if the interval between corrections is only 8 - 10 lines;
5) when several identical corrections are made in several lines of the imprint, the same sign is placed in the text, it is repeated once on the margin indicating (in an oval) the number of corrections: 5 times, 7 times, etc.;
6) when making several corrections in one line, observe the following order of placement of correction marks on the field;
7) cross out the text with a proof mark so that it can be read;
8) text insertions of more than one line (up to three lines) must be typed on a computer;
9) insertions of more than three typeset lines should not be printed, but should be attached to the original page, where with a red pen, circle the missing text and write in the margin: “omission”, and on the proof copy in the place of the omission, the insertion mark should be placed in the margin and next to it “in an oval” write the word “pass”;
10) reins (lines connecting a proof mark in the text with the same mark on the field) should be used only for multi-column typesetting;
11) errors need to be corrected only with dark paste, a different color for everyone who works with the text; The typesetter does not take pencil corrections into account; Circle all written instructions in the margins with a pen to avoid accidentally entering them into the text when typing.
5.2. Rules for the use of signs for marking and correcting text originals and proofprints
5.2.1. Various types of text (including font and other types of highlighting) are marked with a pen with a dark ink color.
It is not allowed to make corrections in pencil, except for questions to the author, literary, artistic and technical editors. Such requests are removed or outlined with a pen before being submitted to the typesetter for editing.
5.2.2. On the first page of the original text, the signs used for text highlighting of the font are explained in writing.
5.2.3. Each page of proofs of all types must be signed by the proofreader.
5.2.4. Different corrections on the same line should be indicated by different symbols and repeated in the margins in the same sequence.
5.3. Rules for the use of marks for correcting proofs (illustrations)
5.3.1. When making proofs of illustrations, it is necessary to leave a margin of 3 cm wide.
5.3.2. Signs are placed under the image if they apply to the entire image. When correcting individual areas of the image, these areas are surrounded by a frame (circle), the sign is placed on the field and connected to the frame (circle) with a line.
5.3.3. Marks are affixed with a black pencil (pen or felt-tip pen) on color and multicolor prints of illustrations, and on prints of black paint - red.
5.3.4. Printing process control scales should be placed on all test prints of multicolor illustrations.
5.4. Rules for the use of signs for marking and correcting publishing layouts
5.4.1. Publishing layouts are divided into layouts for covers (bindings, dust jackets, titles), layouts for layout and layouts for editing. Marks for marking layouts are applied with a simple pencil when indicating the size of the fields before (after) trimming.
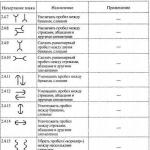
5.4.2. When making multi-color layouts, the paint color is indicated in accordance with the table and circled with an oval of the corresponding color. When the numbermore than five paints, it is allowed to indicate the paint color in abbreviated words and outline it with an oval in accordance with the table.
Example
5.4.3. Publishing layouts with corrections made must be signed by the editor, head of the art department, art and (or) technical editor. A larger number of signatures, for example a proofreader, is allowed if there are illustrations in the text.
6. Classification of signs
Correction marks for marking and correction are divided as follows:
1) to change letters, words (replacement, deletion, insertion), characters;
2) to rearrange the elements of a set;
3) changes in spaces;
4) to highlight paragraphs, red lines, font selections and changes;
5) to clarify the spelling of letters of various alphabets;
6) to correct technical defects of the set;
7) to correct layouts and test prints (illustrations).
7. Drawing and assignment of proof marks
The design and purpose of the signs must correspond to those indicated in the table.
Surely everyone has heard about the scrupulous and responsible work of a proofreader. Let's take a closer look at the subject of his activity and get acquainted with the specific language of proofreading.
What is proofreading
Proofreading is a mandatory stage that any text must go through before publishing it in books, periodicals, websites and blogs. The specialist is obliged to eliminate all shortcomings of the text: typos, etc. If the text is handwritten, then it becomes much more complicated: he needs to check the manuscript, then the typed text, and then the typed text just before the book is published. During this work, proofreading marks are used, which we will talk about later.
How does proofreading work?
Mostly the printed version of the text is corrected, although many have a review mode for the electronic version.
The proofreader's corrections themselves must be clear and legible - use a bright colored pen that contrasts with the color of the main text. The recording made should attract attention, not be too small and be clear to the ruling text. This is one of the reasons why standard proofreading marks are used.
How many edits does the text need?
In order for the output text to be perfect, it must be passed through four types of editing:
- proofreading - carefully reading the text, the proofreader corrects its technical shortcomings and errors (at this moment proofreading signs are applied);
- reconciliation - checking the corrections made by a specialist: line-by-line reading and so-called end-to-end reading;
- proofreading - performed by two editorial staff: one reads the original aloud, and the other, listening, reads the corrected text and reports key discrepancies with the original;
- summary - final check of all edits. This is usually done in a printing house, where the correct placement of printed strips, sheets, templates, etc. is checked along the way.
What is a correction mark?
First of all, it is necessary to clarify that the widespread and universally used phrase “correction mark” is not entirely correct. GOST 7.62-2008, which contains standards for the representation of these symbols, calls such designations proofreading (used for proofreading, not for proofreading).
One way or another, proofreading (proofreading) signs are standard conventional images of actions that subsequently need to be taken by the specialist editing the text. Standard proofreading symbols are needed so that there are no misunderstandings when reading the proofreader’s comments, so that the proofreader perceives the icon in the same sense that the proofreader intended it to mean.
Types of text proofreading marks
Correction marks (inserting a comma, aligning an image, inserting an indent, etc.) are strictly divided into separate categories:
- Changing, inserting, deleting characters, individual letters and lines:
- replacing an erroneous character;
- error in writing capital or ;
- confusion with dash and hyphen;
- replacing a large number of characters with one or more others;
- editing a large amount of text;
- choosing a different type of ruler: thin, bold, bold;
- insertion of a forgotten single character;
- inserting a large amount of missing letters, lines:
- deleting an unnecessary character or line;
- combined signs of change and elimination of erroneous or extra letters and words.
The table below clearly illustrates the correction signs.
2. Permutation symbols:
- changing the places of adjacent symbols or entire words or sentences;
- a sign for arranging words in a different order (the ordinal numbers above them determine this order);
- rearranging several words into another sentence;
- moving the element to the drawn border;
- moving up/down the “runaway” word from the line.
3. Changing the space:
- increasing the space between a set of characters;
- reducing the space between words;
- removing the space character.

- set the indentation in the settings or correct it to the specified parameters;
- remove the "red" line;
- merge paragraphs;
- change the font style to italic;
- make a discharge (type a word with spaces and inside);
- change style to italic;
- change font name, point (size);
- replace the discharge with the usual spelling.

5. Correction signs and standards for replacing letters of one alphabet with symbols of another:
- write down the transcription of the Greek alphabet symbol;
- clarify the transcription of the Gothic symbol;
- replace with a Latin letter;
- replace with a handwritten Latin or Cyrillic character.

Signs of elements, layouts, typing errors
6. Signs for correcting the position of elements in the text:
- indication of the proper placement of diagrams, photos, drawings, tables in the text;
- shifting an element to the right or left to the drawn limits;
- lower/raise stitching;
- rearrange the text and inserted element higher by a specified number of lines or move it to the previous page;
- Move the selected text or element down the specified number of lines or to the next page.

7. Symbols for editing technical shortcomings of the typed test:
- turn the symbol upside down;
- remove a wide space (corridor) that is repeated vertically in several lines;
- align text edges;
- correction of curvature of terms, "jumping" letters;
- removing double spaces;
- strengthen/weaken the pressure;
- remove elements that make the attack incorrect;
- undoing your own correction;
- move the word correctly.

8. Correction of page layout, printed illustration:
- size of pictures before and after cropping (mm);
- paint color icons of basic tones according to the first letter of its name ("h" - black, "p" - purple (red), "z" - yellow, etc.);
- additional paint - abbreviated name ("viol." - purple);
- decrease/increase contrast;
- tone alignment;
- removing blurred edges or contours of an image;
- deleting an image or its details;
- flip the picture by a specified degree value;
- mirroring illustrations;
- change the image completely;
- improve image quality in shadows/lights/midtones.

These are the main proofreading marks and the standards for their design.
Basic rules for the use of signs
When correcting text using the mentioned symbols according to GOST, the following is required:
- Place correction marks on the right margin of the sheet.
- Draw a sign opposite the line to be corrected.
- Identical characters should not be repeated more often than every 8-10 lines.
- If there are several corrections, the characters are placed on both fields depending on which edge of the text the object being corrected is closer to.
- must remain readable.
- The flags at the correction site should point in the direction where the icon is placed.
- If a proofreader inserts text longer than a line for correction, then it must be printed.
- Lines connecting the correction to the mark on the field can only be used in text typed in several columns.
- Only corrections made with a pen are valid; proofreading cannot be done with a pencil.
These are the basic elements of proofreading any text. Of course, at first glance, the GOST requirements seem excessive, but this is a necessary measure to facilitate mutual understanding between the proofreader and the proofreader.
This article is about proofreading signs. To be precise, the signs should be called proofreading, but 95% of users search on the Internet for these icons under the name proofreader and only 5% - proofreader, hence the title of the article. But for general purposes, the correct name for these icons is GOST 7.62-90 proofing marks.
When to proofread?
Regardless of what you are doing - publishing a book, printing a brochure, publishing a newspaper or magazine - the first proofreading must be done before transferring the material to layout. If the materials are handwritten or printed, but on paper, then, first of all, convert the materials into electronic form in any text format. You will learn how to type text “correctly” in the article Typing Rules. After the editor’s work (if such is expected) and after all copyright edits have been made, this material is transferred to the proofreader for the first proofreading. Our agency, as a rule, coordinates with the author all the corrections made by the proofreader and after that the materials are transferred to the layout.
Why are proofreading marks needed if all changes are made by a proofreader in the electronic version? The fact is that there is one more proofreading - editing the layout material and its editing is done from a sheet (printout of the layout material). We recommend doing this after the author has approved the layout and before transferring the material to the printing house.
How many proofs should there be?
At least two, the first before transferring the material to layout and the second before transfer to the printing house. A greater amount of proofreading may be needed when the author makes changes to a large part of the text during the layout process, which is highly undesirable - so try to change the text before layout. The tasks of the first proofreading are to correct all spelling errors, the tasks of the second proofreading are to identify missed errors and correct technical layout errors (a separate article that we recommend that everyone read).
Why are correction marks needed?
First of all, if the proofreader uses generally accepted characters, then the layout designer will not have any additional questions and the work of making corrections will be accelerated. But very often situations arise when generally accepted proofreading signs are missing or can be interpreted ambiguously; in this case, we recommend deviating from the rules and entering all explanations in the margins in as much detail as possible. You should always remember that proofreading is done primarily to correct errors, and not to create new “puzzles.”
How to proofread?
The most important thing is that all corrections made by the corrector are clearly visible and legible.
If you are editing black text, always use a red pen - the brightest and most noticeable. If you use a pencil or dark pen, choose something thin and bright. Regardless of what proofreading mark you put, it is recommended to put a tick in the boxes opposite the corrections made (I’ll say right away, this is against the rules), this greatly simplifies the process of making changes to the electronic version and will reduce the likelihood of missing corrections.
Don't be shallow. If the task arises of placing a new text or the correctional transposition signs begin to intersect and only confuse - cross out this text, put a number in a circle and in the margins or on a separate piece of paper under this number write the required text.
Corrective letter replacement marks
Probably the most common and frequent type of editing. The sign must cross out the incorrect character, then the sign is duplicated in the margins with the required letter. If there are several replacements in one line, then different signs are used. To avoid confusion, many signs were invented, but they are all of the same type.

The main difference is that the sign crosses out a completely incorrect word or line. The most common mistake is when the proofreader begins to make small mistakes in the margins when correcting a large piece of text. Place the sign in the largest field and write the edit there, and it’s better to move the arrow from the sign of the crossed out text to the sign with the edit - it may not be correct, but it’s definitely clear.

It seems to me that everything is clear with this sign.

All marks are shaped like a checkmark, a distinctive feature of the insertion mark. The sign is placed in the space where the insert needs to be placed. Errors - do not forget to include punctuation marks in the boxes.

Since this sign is very similar to the replacement sign, you need to clearly draw a wave that distinguishes the removal signs.

The permutation can be: letters, words or lines. In case of rearrangement in a word, we recommend duplicating the sign in the margin and writing the correct word next to it.

Used if there are many permutations or words are not in a row.

Correction marks for working with spaces

A common type of edit. Be sure to duplicate it in the margins in the form of a sign or in the form of attention checks - this sign of proofreading is the easiest to miss.
And the most important sign of proofreading is the sign of canceling the edit.

The most important sign because it causes the most confusion.

These marks indicate the alignment of text on the page.

The characters show the location of the letter relative to the typing baseline. If there are two checkmarks, the symbol is raised even higher.
Correction mark "paragraph"

The sign is placed in a space where there should be a paragraph, or it combines the text being typed into a selection.
That's all the main signs.
There are also signs that determine the style (bold, italic, capitals, spaced, etc.), but we do not specifically list them. In such cases, we recommend making a note in the margins in the form of words; if the edit occurs frequently, then draw a sign on the first page and assign it the type of edit so that the person making the edit knows what this sign means.
Correction marks
- a system of symbols that serve to indicate the location and nature of errors in the text and are used when editing proofreading/
From 1977 to the present day, graphic styles of proof marks have been enshrined in GOST 16347-70. It includes 48 signs of different meanings, not counting their variations, which are combined into 6 groups. GOST also distinguishes between signs that are repeated and those that are not repeated on the field.
Most correction marks are placed not only directly at the point of correction, but are also placed in the margins next to the line in which the error was made, thus warning about the need to make corrections.
To ensure that the proofreader’s corrections are clear to other participants in the printing process, a system of proofreading marks is used.
The rules of application determine: the color of the ink, the place and order of the sign, the repetition of identical signs, and certain special cases of use. In printing, the quality of the finished product, the circulation of which can be 100,000 or 1,000,000 copies, depends on the accuracy of the use of proof marks. Losses from poor-quality proofreading are easy to estimate, but it is much more difficult to eliminate them.
1. Signs of substitution, deletion and insertion.
2. Signs of permutation of printed characters

3. Space change characters

4. Paragraph indentation marks, red line

Proofreading is carried out using special marks in accordance with GOST 7.62-2008 “Proofreading marks for marking originals and correcting proof proofs”. The standard includes general provisions, rules for the use of proof marks, their classification, design and purpose. GOST provides examples of the use of correction marks.
In accordance with GOST, when applying correction marks, it is necessary to observe the following rules:
- place proof marks in a single-column typesetting of small and medium formats in the right margin, and in larger formats - in the nearest field;
- The flags of the proofing marks should be directed towards the field where the sign is placed;
- If possible, place proof marks on the margin opposite “your” line;
- repeating the same correction marks to correct various types of errors on one print is allowed if the interval between corrections is only 8-10 lines;
- when making several identical corrections in several lines of the print, the same sign is placed in the text, it is repeated once on the margin indicating (in an oval) the number of corrections: 5 times, 7 times, etc.;
- for several corrections in one line, follow the sequence of placement of correction marks on the field;
- cross out the text with a proof mark so that it can be read;
- text insertions of more than one line (up to three lines) must be typed on the computer;
- inserts of more than three typesetting lines should not be printed, but should be enclosed on the original page, where with a red pen, circle the missing text and write in the margin: “blank”, and on the proof copy in the place of the gap, put the insertion mark on the margin and write the word next to it (in an oval) "pass";
- “reins” should only be used for multi-column typing;
- correct errors only with dark paste, a different color for everyone who works with the text. The layout designer does not take pencil corrections into account. Circle all written instructions in the margins with a pen to avoid accidental inclusion in the text when typing.
GOST clauses 5.2-5.4 clarify some rules for the use of proof marks for text originals, illustrations and publishing layouts, respectively.
According to GOST, signs are divided into the following groups:
- to change letters, words (replacement, deletion, insertion) characters;
- rearrangement of elements of a set;
- changes to spaces;
- highlighting a paragraph, a red line, font selections and changing these selections;
- clarification of the spelling of letters of various alphabets;
- correction of technical defects of the set;
- corrections of layouts and proofs (illustrations).
Paragraph 7 of GOST contains a table that presents the sign, describes its purpose, provides notes and examples of its use when editing text.
GOST 7.62-2008 is commented on in almost all educational and reference publications on proofreading and editing. An example of an illustrative commentary from the publication of A. E. Milchin.